File recovery and correction. Media files in Windows. How to recover damaged Windows files
If you have had to restore many files, chances are one or more of them did not open as a result. Some files are always recovered incomplete or appear damaged. Moreover, no matter how good tool for recovery you used. In order to be able to view, edit, or otherwise use these files, you will need to patch them.
Difference between file recovery and file correction
The procedures for returning deleted files and fixing damaged files are often called one word - recovery. However, the operations of recovering deleted data and repairing damaged data are completely different, use different methods and require the use of different tools. Let's talk in more detail about their differences.
File recovery
So, “recovering” missing files. Modern recovery tools help you get back deleted files from formatted, redistributed or inaccessible hard drives, damaged cards memory or unreadable USB flash drives. In other words, you can “recover” all available data.
To recover files, you will need specialized tools such as RS File Recovery (to undo file deletion) or RS Partition Recovery (to recover files stored on formatted storage media, repartitioned hard drives, or damaged partitions). Moreover, these tools will recover any files from the damaged disk or partition that have not yet been recovered.
A number of specialized tools will help you cope with the recovery of certain types of files, such as photos (RS Photo Recovery), office documents(RS Office Recovery). There are also highly specialized tools that allow you to recover only Excel tables (RS Excel Recovery) or text documents(RS Word Recovery) .

Why is it sometimes worth choosing a specialized one? software for data recovery, not a universal tool? There are two reasons: price and convenience. The cost of a quality, specialized tool is often lower than the cost of all-in-one solutions. At the same time, a cheaper tool often uses the same operating algorithms as the most expensive ones, limiting the user only to the ability to recover certain types of files. In addition, specialized recovery tools often offer bonuses not available in general universal programs. For example, RS Office Recovery implements an automated pre-recovery file integrity check to ensure that only healthy, complete, undamaged documents and tables appear in the final list of recovered files. This ensures that any file recovered from RS Office Recovery can be immediately opened in Microsoft Office or OpenOffice and use as usual.
Limitations for file recovery
File recovery tools also have their limitations. If you're recovering small, recently deleted, non-fragmented files, you may never need file repair or fix tools. Because restoring such files is usually not a problem.
If, however, you have to deal with formatted partitions, a damaged file system, re-partitioned hard drive, there is a high probability that some files will be restored completely, while others will be damaged and unsuitable for further use.
Why are some files unavailable for recovery? Maybe it's the quality of the recovery tool? Unfortunately, in difficult situations the data recovery process has its limitations, which even the most modern instrument recovery. Just one example. If you are restoring a formatted HDD, you are dealing with empty disk, which has a clean (empty) file system. This means that there are no entries on it that would point to the files that were on this disk before formatting. Therefore, a data recovery tool (such as RS Partition Recovery) will be forced to use a specialized Content-Aware analysis algorithm to find these files. The algorithm helps read the entire contents of the disk, looking for files of known types, trying to determine their characteristic signatures.
This algorithm works great when restoring small files and adjacent blocks of data. However, a number of files stored on disks are usually fragmented. When recovering fragmented files, a data recovery tool must either use information from the file system to find all parts (fragments) of the file, or recover only the initial fragment. As a result, you may end up with corrupted, incomplete files. And in such cases, you cannot do without a file correction tool.
Correction (repair) of files
Now you know what it takes to successfully recover files, and you understand why you may end up with a number of unusable files even after a generally successful recovery attempt. As for repairing such “failed” files, to restore them (or rather, correct them), you need to use a completely different tool, for example, RS File Repair.

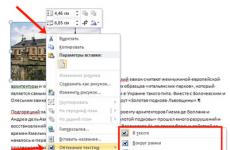
Repairing or fixing files means fixing their internal structures and/or “rearranging” or adding to their contents so that corresponding applications (for example, Microsoft Office for documents) can open these files without problems. To recover damaged images, use RS File Repair. When working with this tool, your files must be on working disks (memory cards, USB flash drives, etc.). In other words, you cannot fix deleted files before undoing their deletion using a file recovery tool, and you cannot recover those files from formatted partitions until they are recovered using a partition recovery tool. The idea, I think, is clear. In order for files to be corrected, they must be available, that is, exist in any form on any serviceable medium.
RS File Repair can open damaged files, analyze their titles and contents, and then correct their structure and make them completely suitable for further use.

Of course, the result of the program will be so successful only if you have only the first piece of a long video or JPEG file With high resolution. However, RS File Repair is unlikely to help you recover data that disappeared as a result of an unsuccessful recovery. The tool will only be useful if there are small inconsistencies and minor errors in file structures files.
Restoration or correction?
So what should you use in your case – a file recovery tool or a file correction (repair) tool? Let's look at some typical cases.
1 . Let's say you have a document called "MyDocument1.doc". When you try to open this document with Microsoft Word you will receive a message stating that the file is damaged and a question: would you like to restore the file? If you agree, the program crashes or an error message appears.
In this case, you can restore the file using a similar tool as RS File Repair. Such tools will help you fix files that the built-in MS Office file repair tools cannot help you recover.
2. Now - about a more complex case. Let's say a file named “MyDocument2.doc” was saved on your disk, but you accidentally deleted the document and emptied the Recycle Bin (or deleted the file using the Shift + Del key combination, that is, it did not end up in the Recycle Bin at all).
In such a case, use a file recovery tool such as RS File Recovery. In addition, you can use one of the specialized recovery tools Microsoft files
Office, for example, RS Office Recovery or RS Word Recovery. In any case, if you use one of these tools in the proper order (download and install it on another drive or additional device data storage) pretty soon, you'll likely get the data you need back quickly, and you won't need a file repair tool.
3. What if you want to recover a file named “MyDocument3.doc” that was deleted a week ago? In this case, there is a high probability that some parts of the file have already been overwritten by data belonging to other files. If you try to use a file recovery tool such as RS File Recovery, you will recover the file but will not be able to open it in Microsoft Word (the application will give you an error message). If you try to use one of the specialized tools for recovering Microsoft Office files, such as RS Office Recovery or RS Word Recovery, you will not see the file in the list of recoverable files at all, because these tools check the files for integrity and simply refuse to add damaged files to the final list .
In this case, the most successful recovery would be using two tools together. First, use a file recovery tool like RS File Recovery to directly recover the document. Then use the patch utility to fix it.
This article allows you to take several steps through which you can recover corrupted files on your system, be it Windows, Mac, or Linux. So read on, there is a lot to see here. Word an error occurred when trying to open the file You're familiar with it, aren't you? This can be a big problem if the file is damaged, which is very important. When you try to open a certain file, it shows the message “cannot open file” or “data file unavailable”, you must understand that the file is damaged. The file will also be corrupted if it is accessible but the contents are shown as some "/" junk" characters instead of numbers and alphabet.
So what will you do next? Here are various ways, using which you can try to recover your important files on your system.
Word on Windows
Here are some methods to recover word files. If you cannot restore word files then you can at least try to recover data from these files.
Method 1:
The easiest way to recover files is the File option in the toolbar Word document by clicking Open.
A dialog box will appear with all existing doc/docx files.
Select the file you want to recover and click the small arrow on the 'open' side.
In the drop-down window that appears, select Open and the Repair option.
Method 2:
The second way is to change the file extension from the current standard .doc extension. It will be new file, which is not corrupted but will contain the same document information.
Way 3:
Another way to recover damaged files is to create a file link to a new, undamaged file. To do this, open Word and select the File menu on the toolbar. Select New option, and in the dialog box select the Blank Document type.
You can enter some initial data into this file and then save it.
Select the text you wrote and copy it.
From the File menu, select the New option, and then select Blank Document.
In this document, go to the Edit menu and select Special Insert. In the dialog box that opens, select the Rich Text (RTF) option, check the Insert Links option, and click OK.
Go to the Edit menu, click on Links.
In the dialog box that appears, select the File name of the document that is linked, and then select the Change Source option.
In the new dialog box, select the file that is damaged that you cannot open, and click on the Open option.
Now go to the Edit menu again and click on the Links option.
In the dialog box that appears, click on the Cancel Link option. You will be prompted to split the selected links, click on Yes. The data from the damaged file will be transferred to this new document. You can save this new document and format it accordingly.
JPEG/JPG files in Windows
This file type contains a photograph or picture. When a JPEG file does not open in any of the standard programs, such as P aints, Windows Fax Viewer photo album, and everything else, it may be damaged. And if the file is damaged, you will not be able to view the images. You should first try to retrieve the file by renaming it and keeping its .jpg file extension. If this doesn't work then next step will get the help of some JPEG image recovery app. JPEG Recovery and D octor image Here are some applications that can be used to repair damaged JPEG files.
Excel files on Windows
Follow the below methods to recover excel files.
Method 1:
Open Excel file.
In the toolbar menu, go to File and click on Open. A new Open dialog box will appear.
Click on the excel file you want to open. There will be a small arrow towards the ‘Open’ button.
Click on it, a drop-down menu will appear. Select the “Open and Repair” option.
A window will appear asking if you want to restore or extract data from the file. Select the Recover option and check if this suits your purposes. Alternatively, you can extract the data from the file and save it in a new file.
Method 2:
Method 3:
If you can open the damaged file, then go to the File menu and select the Save As option.
Select the books that are damaged and select an extension such as .slk. Then you can close the book.
Now again click on the File option on the toolbar, click on the Open button.
This time select the SYLK file type, and open the file.
Now go to File and select the Save As option. Now you can save the file with a new name and select the extension .xls/xlsx. Your new file will have the same data as the previous one.
Method 4:
If you are unable to recover the file using the above methods, then this method may be useful. Open your Excel spreadsheet and click on the File button and then Open.
Browse to the file you want to restore and click Cancel.
Now open a New Excel Sheet, and in cell A1, enter =filename.xls!A1. You will be able to see all the data in the damaged file in this cell. You can increase the cell width so that the entire contents of the file are clearly visible.
Media files in Windows
There are many types of media files that we usually store on the hard drive, such as AVI, DAT, MP4, .mpeg3, etc. Just like other documents, images and program files, these files can become corrupted. The typical way to recover media files is to use certain software. There are many applications that can repair damaged files of all types of media files. Working with these applications is very simple. You just need to open the program, click the browse button, select the damaged file that will be restored and select the recovery option.
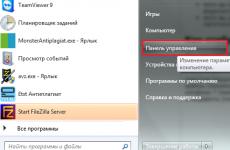
The best way to recover your files is to let Windows run a self-test. Go to Start, in the Search window, type cmd. Right-click cmd.exe and select Run as administrator. Now, enter chkdsk x: /r at the command prompt, replacing 'x', which is the first letter of the drive where the corrupted file is located. This disk will be checked for errors and damaged files will be repaired.
Working in Safe Mode
If your file is damaged and you cannot open it, you can try to open it in Safe mode. You can enter winword.exe /safe in Start → Search.
Note: Similar modules may be used in other Office applications.
OpenOffice files on Windows
In the majority computer systems, OpenOffice is installed instead of the standard Microsoft Office. In any case of damage to the file in this format, you can restore it using the following method. However, you need to remember that if the file is damaged and has not been saved again, it cannot be recovered.
All files that were developed for OpenOffice formats are saved in a separate folder. Find out the exact Folder Reserve copy, go to Tools ➛ Option ➛ OpenOffice.org. Check the backup and browse this folder to get the desired file. You can restore the previous version, and thus restore the file.
Damaged files in Linux
In case you are running on Linux platform, here are some methods you can follow to recover damaged files. On Linux, fsck is a system utility that is most useful for checking the integrity of files. This option checks the file system and can repair the file if necessary when the following syntax is used.
fsck Fs-name-here, where Fs-name-here can be the name of the device, mount point, ext2 label, or UUID descriptor.
fsck /dev/xyz
fsck /home
fsck.ext3/dev/hdc1
fsck.ext2 /dev/flash/devices/name
You can only perform a restore if the file is broken. So, first move the system down one level and turn it off.
# init 1
# disable /home
# fsck.ext3 /dev/hda3
When the file system asks you to fix the problem, press the y key.
# fsck-y /dev/hda3
After the repair is done, remount the file system.
# mount /home
# init 3
Damaged files on Mac
operating room Mac system can recover most damaged or accidentally deleted files. For convenience, the document mentions recovery. You can recover other Office files in a similar way.
Method 1:
You can change the file to another format, i.e., Rich Text Format (RTF), to recover the file.
Go to File and click on Save As.
Select Text In Rtf Format from the drop-down window and save the file.
Now, open the file in Word and save it again in the original format. If the problem is not too complex, this method will fix it.
Method 2:
In case the file cannot be opened, then you must paste it into a new document to restore its contents. Create a new document and go to Insert. Now, select the damaged file, and click OK. This should work.
Method 3:
In case you are not yet able to open files in this format, you can use the following method to do so. Open a blank document in word and enter any word, for example. Type Test.
Now, press Ctrl+C or go to Edit and click on Copy to copy this word.
Go to the File menu and open new document.
From the Edit menu, click Paste Special, and then select the Insert Link option.
In How To, select Rich Text (RTF), and then click OK.
Now, from the Edit menu, click on Links and select Change Source.
From the Open menu, select the damaged file and open it. Once the document is open, save it under a new name.
Now go to Links in the Edit menu and click on Break Links. Click Yes to terminate the connection and make changes to the file.
If you still cannot recover the damaged file, then you must have the necessary software and follow the steps that lead to file repair and data recovery.
When it comes to saving important files, it is always recommended to save backup copy on a storage device. This will allow you to keep a copy of the original file. There are also a number of recovery software available for download on the Internet. If these applications are not free, you always have the option of downloading the free version temporarily, just to repair the damaged file.
For many users, the data stored on the hard drive is much more important than the device itself. If the device fails or was inadvertently formatted, then remove it from it. important information(documents, photographs, videos) can be done using special software.
To restore data, you can use an emergency bootable USB flash drive or connect the faulty HDD to another computer. In general, the methods do not differ in their effectiveness, but are suitable for use in different situations. Next we will look at how to recover data from damaged hard disk.
Method 1: Zero Assumption Recovery
Professional software for recovering information from damaged HDDs. The program can be installed on Windows operating systems and supports working with long file names and Cyrillic alphabet. Recovery instructions:
- Download and install ZAR on your computer. It is advisable that the software is not loaded onto the damaged disk (on which scanning is planned).
- Disable antivirus programs and close other applications. This will help reduce system load and increase scanning speed.
- In the main window, click on the button "Data Recovery for Windows and Linux" so that the program finds all disks and removable storage media connected to the computer.
- Select the HDD or USB flash drive from the list (which you plan to access) and click "Next".
- The scanning process will begin. As soon as the utility finishes its work, the screen will display the directories and individual files available for recovery.
- Check the box next to the folders you want and click "Next" to overwrite the information.
- Will open additional window, where you can configure file recording options.
- In field "Destination" specify the path to the folder in which the information will be written.
- After that click "Start copying the selected files" to start transferring data.


As soon as the program finishes working, the files can be freely used or rewritten to USB drives. Unlike other similar software, ZAR restores all data while maintaining the same directory structure.
Method 2: EaseUS Data Recovery Wizard
The trial version of the program is available for free download from the official website. The product is suitable for recovering data from damaged HDDs and then rewriting them to other media or Flash drives. Procedure:
- Install the program on the computer from which you plan to recover files. To avoid data loss, do not download EaseUS Data Recovery Wizard onto a damaged drive.
- Select a location to search for files on the faulty HDD. If you need to recover information from a stationary disk, select it from the list at the top of the program.
- You can optionally enter a specific directory path. To do this, click on the block “ Specify a location" and using the button "Browse" select the desired folder. After that click "OK".
- Click on the button "Scan" to start searching for files on the damaged media.
- The results will be displayed on home page programs. Check the box next to the folders you want to return and click "Recover".
- Specify the location on your computer where you plan to create a folder for the information found, and click "OK".


Method 3: R-Studio
Suitable for recovering information from any damaged media (flash drives, SD cards, hard drives). The program is a professional type and can be used on computers with operating Windows system. Operating instructions:
- Download and install R-Studio on your computer. Connect a non-working HDD or other storage medium and run the program.
- In the main R-Studio window, select required device and on the toolbar click "Scan".
- An additional window will appear. Select a scan area if you want to check a specific area of the disk. Additionally, specify the desired type of scanning (simple, detailed, quick). After that, click on the button "Scanning".
- Information about the operation will be displayed on the right side of the program. Here you can monitor your progress and approximately the remaining time.
- When the scan is completed, additional partitions will appear on the left side of R-Studio, next to the disk that was analyzed. Inscription "Recognized" means that the program was able to find the files.
- Click on a section to view the contents of the found documents.

Check the box necessary files and in the menu "File" select "Restore marked".
- Specify the path to the folder where you plan to make a copy of the found files and click "Yes" to start copying.


After this, files can be freely opened and transferred to other logical drives and removable media. If you plan to scan a large HDD, the process may take more than an hour.
If your hard drive fails, you can still recover information from it. To do this, use special software and conduct a full system scan. To avoid data loss, try not to save found files to a faulty HDD, but use other devices for this purpose.
Damage to important data on flash cards is not a rare occurrence and at the same time extremely unpleasant. We are accustomed to thinking that flash cards are a more reliable means of storing files than a computer or laptop, because they are more likely to break down and lose documents due to viruses and any other malware. However, flash cards are not protected against file loss; fortunately, they can be recovered.
Before you learn how to recover files from a damaged flash drive, you should first understand what causes the damage. Prevention is better than cure, moreover, this knowledge will help you learn more about how to repair a damaged flash drive.

Reasons for failure and loss of files from a flash drive:

These reasons are the most common, but in addition to them there are others, less common, such as wear of a flash drive. Repeated cycles of writing and reading, downloading and deleting can damage the flash drive. One way or another, you don’t have to worry about this, since it’s extremely difficult to use the drive until it wears out. There are more serious factors that worsen the condition of flash drives, these are increased temperature and humidity.
Recover accidentally deleted or damaged files
Unlike deleting documents from the computer desktop, when deleting documents from flash cards, they do not go into the trash, but are deleted permanently. You can recover such files using special program for USB data recovery.

Important! Remember that such software only recovers deleted files that have not yet been overwritten.
To understand this, you need to know how a flash drive works. When you delete a file, it is not erased from the drive itself, but remains on it, but when you download new files, they take the place of the previous ones. Therefore, if you accidentally deleted important file, try not to use the flash card temporarily to avoid overwriting.
The same method is also suitable for recovering data lost after a quick format or after an unsuccessful copy. Like deletion, it does not erase data, but only makes it possible to overwrite it. Again - the sooner you start recovering, the more data you will be able to recover.

| Program | Description |
|---|---|
| Piriform Recuva | The main advantage of this program is the many ways it can be used. For users who feel like they need help using the software, there is a wizard on hand that provides scanning and recovery guidance. The program is available in two versions: free version Limited & Professional for $19.95 |
| Wise Data Recovery | Perhaps this is the most simple program in terms of its use. She doesn't have any hints on how to use them, she doesn't need them. To recover files you only need to take two simple steps |
| EaseUS Data Recovery | Finding recoverable data using EaseUS Data Recovery is very simple: select the disk that contained the lost or damaged file, run a scan and select from the found files those that you need to recover. It is important to note that the available free version of the program allows you to recover up to 2 GB of data |
| PhotoRec | PhotoRec is software designed exclusively for recovering lost documents. It is available in two versions: as a command line and as a full-fledged GUI program for less confident users. It is highly effective, but may not be as easy to use as other similar programs. PhotoRec is a cross-platform program that can also be launched from a flash card |
Recovering Files Using EaseUS

Step 1. Download and install the selected program; working with EaseUS will be considered as an example.


Note! Many of the programs presented above work on the same principle, so if you familiarize yourself with one of them, you will most likely cope with the others.
Step 2. Select a location to start searching for data. Launch EaseUS Data Recovery Wizard, select the location where your data was stored before deletion - on the flash card, and start scanning.

Step 3. To start scanning, click on the orange “Scan” button.


Step 4. View and restore lost files. EaseUS Data Recovery Wizard allows you to preview files before recovery. Click the "Recover" button to restore the file, or "Cancel" to cancel the process and close the preview window.

On a note! After preview and file filtering, you can target the monitored files and click the "Recover" button to get all your files back.

Recovering files damaged by viruses
Damage to files on a flash drive can be caused by worms or Trojans. One of the common actions of malware is to hide files and folders, turning them into small shortcuts that cannot be opened.
To recover files you will need:
- Windows PC;
- infected removable media data, that is, a USB drive;
- antivirus and/or malware removal software;
- file search program;
Step 1. Check whether your files are hidden or not. First, open the command line application via search in the Start menu.

Then enter this command "attrib -h -r -s /s /d f: *. *" same as shown in the screenshot.

Enter the command attrib -h -r -s - s - d f- in the " Command line", press "Enter"
Important! This command assumes that "f:" is the name of your flash drive. Remember to replace "f" if the drive letter you want is different.
Now press Enter and check if the files and folders appear on your drive. If yes, then the problem is solved, if not, then go to the second step.
Step 2. Scan and remove malware.
Launch your security software. McAfee 2018 AntiVirus, Kaspersky or any other antivirus installed on your computer will work well. Open the program and perform a thorough hard check disk of your PC and flash drive.

Now check the items on your device, see if the shortcuts have disappeared. If yes, that's great. Otherwise, it is possible that a virus or malware has deleted your files. Go to Step 3.
Step 3. Data recovery and disk formatting. First of all, you will have to format the flash drive, that is, “delete” all files. There's nothing wrong with that. After formatting, you can restore them in the same way as with accidental formatting, which was discussed above.


Video - How to recover damaged files
The article describes the principles and methods of software data recovery for users who do not have special knowledge.
If the value of the information is very high and/or the information carrier has physical damage- you should think about contacting specialists. In this case, the probability of complete data recovery will be highest.
When recovering data yourself, you should take note of the following information:
- Writing to a partition with recoverable information can reduce the likelihood of data recovery because data may be written over existing data. This also applies to installing data recovery programs and saving recovered files.
- It is advisable to minimize all work on the original drive to increase the chances of recovery. A good practice is to create a sector-by-sector copy of the drive and use various methods restore to a copy.
- If the storage medium is physically damaged (primarily this applies to hard drives), then any impact can aggravate the situation. You should continue recovery yourself only if the cost of the data itself is lower than the cost of restoring it by specialists.
- Checking the disk for errors using Windows will create additional difficulties for data recovery, up to the complete impossibility of their recovery.
Disk structure
For better understanding further actions let's talk about logical structure disk and file systems. If you are not interested in theory and need to quickly recover data, you can skip this section and go directly to the algorithm of actions.
MBR
Master Boot Record - the master boot record - is located in sector zero of the disk, contains part of the executable code, as well as information about the four partitions and which partition is bootable.
If the MBR is healthy, then after receiving control, the code contained in it reads the partition table and transfers control to the code contained in the first sector of the boot partition (VBR - Volume Boot Record), if it contains the 55AAh signature at the end of the sector.
Otherwise, you may receive an error message such as: "Reboot and select a proper boot device" or "Invalid partition table" or "Missing operating system". All of the above messages may occur due to a malfunction in the MBR or VBR, or for other reasons (the wrong boot disk etc.).
To recover a damaged MBR or boot partition, there are specialized utilities such as testdisk (Windows) and gpart (Linux), you can also use the “Recovery Console” with installation disk Windows. Their use will not always give a positive result when recovering data, since in addition to damage to the MBR and VBR, there may be other faults, so these options will not be covered in the article. And although there are enough instructions on the Internet for troubleshooting such problems, it is recommended to first recover important data from the drive, and then try to restore its correct operation.
File systems
Any partition containing a file system consists of the following parts:
- The bootloader region (VBR), which contains information about the partition structure as well as executable code.
- An area of data that is divided into equal parts, called clusters, with each cluster having a unique number. The cluster size is set during formatting.
- An area of file system service data that can store information about folders, files, their names, attributes, as well as information about which cluster chains a particular file occupies.
The locations of the parts, as well as copies of the service data, depend on the type of file system.
Let's take a closer look at the most popular file systems on user computers: FAT and NTFS.
NTFS
The structure of the NTFS file system is shown schematically in the figure.
The partition begins with a boot area, which contains information about the partition as well as executable code. A copy of the bootloader is most often located at the end of the partition.
The next area is the MFT (Master File Table). It stores information about directories, files and their attributes. Typically, a disk area equal to 12.5% of the partition size is reserved for MFT. The size of the reserved area can change (both up and down), and the table itself can be fragmented.
In addition, a certain area of the section contains a copy of the first 4 service records of the table.
The user data area occupies the remaining space of the partition.
When deleting a file standard means The OS only puts a mark in the file record that the file has been deleted, and the space it occupies is marked as free. If, after deleting a file, no writing was made to the disk, the file remains in place and its recovery is possible.
When formatting a partition a new MFT is created in place of the old one. Initially, the size of the new table is small enough (several hundred MFT records), so some service records from the previous file system can still be restored. The more files were written to the formatted partition, the less likely it is to successfully recover data.
In this case, the data physically remains in its place, and some of the information about it stored in previous version MFT. These files cannot be read using standard OS tools.
Sometimes full formatting is called low-level formatting, which is a mistake. Low-level formatting is a technological operation that is performed during the manufacture of a drive, and it cannot be carried out using software methods.
Actually from operating system Only high-level formatting of two types is available: full and quick. A quick format simply creates a partition table, while a full format first checks the entire disk for bad sectors. In Windows XP, this check occurs using a read operation (that is, the data remains in place, and therefore, in terms of recovery, this situation is no different from the quick format discussed above), and in Windows 7, sectors are checked by writing, and the data is destroyed irrevocably, and there is no way to restore them.
FAT
File structure FAT systems is shown schematically in the figure.
At the beginning of the section there is a VBR, its copy is usually located through 6 sectors. After a certain number of sectors there is the FAT (File Allocation Table) file table itself, followed by its copy.
The file table stores information only about the chains of clusters that occupy files. File names and attributes are stored in directories located in the user area.
The user area in FAT starts from the root directory, all other directories and files are located in it. Directory entries point to the first entry in the file table, which contains information about the file's clusters.
When deleting a file the first character of the file record is changed to special code, which means the file has been deleted. Clusters are also marked free and information about the chain of clusters occupied by the file is deleted, which complicates the procedure for restoring fragmented files. The data area remains unchanged, meaning the files are still recoverable.
When formatting a new file table and root directory are formed, the size of the table is indicated at the beginning. The data itself, in general case, remain on disk. What follows on the disk after the newly created table remains untouched (that is, information about the location of the files that were on the disk before formatting). As new files are written, directory and file structure data is replaced by new ones, reducing the likelihood of recovering existing information.
Data Recovery Methods
Exist as purely software methods data recovery, as well as hardware and software. The latter require special, expensive equipment, relevant experience and knowledge, while software recovery using automated utilities is available to almost any PC user. It is this method that will be described below.
Recovering Deleted Files
To restore files deleted by standard operating system tools, you need to read service data, bypassing the file system interface. In this case, you can obtain information about the location of files that are marked deleted.
If no subsequent recording to the disk was made, then the required file can be read from this location.
Reconstructing a damaged file system
This method is used when the file system has been damaged or formatted. To reconstruct the file system, it is necessary to scan the entire partition to search for remnants of service data, on the basis of which the file table will be reproduced and, if successful, access to files and folders stored in the partition will be obtained.
Recovery after changing the disk partition structure
Specialized utilities scan the drive for file system structures that exist on the disk. Based on the scan, a list of possible file systems is built with a preliminary assessment of their state. The next step is to check the found systems for the presence of the necessary data.
Recovery by signatures
RAW-recovery - signature-based recovery, used in cases where other methods have not given satisfactory results. In this case, the drives are scanned sector-by-sector for the presence of known signatures (a unique set of characters characteristic of a specific file type).
For the found files, neither the names, nor the logical location, nor the attributes are known. In case the files are fragmented, this method recovery will be ineffective.
If the signature of the beginning of the file has been found, then the next task is to find the end of the file. Typically, any next known signature is used for this, which may give unsatisfactory results. Modern programs apply methods that use remnants of data about the file system and its features to improve the result. In some cases, such algorithms can help restore even a fragmented file, which is impossible when using standard algorithms. For example, the IntelliRAW algorithm used in the UFS Explorer family of programs works in conjunction with file system reconstruction algorithms and uses this information to determine the end of files. This implementation allows you to achieve better results than using simple methods recovery by signatures.
A rough recovery can give a good result when the files on the drive are located sequentially, without displacement or fragmentation. For example, when recovering files from memory cards of cameras, camcorders, etc.
Data recovery algorithm
We will give an example of the algorithm free program, which is available for non-commercial use in the former CIS. It is compact, easy to use and does not require installation. Uses commercial software algorithms and produces results at the level of professional utilities. NTFS, FAT and exFAT file systems are supported.
You can download it from the support page on the official website: .
The archive with the program must be unpacked onto a partition different from the one from which the recovery will be carried out. If the system has only one partition, the best solution The disk with the recovered data will be connected to another computer. If this is not possible, you can unpack the program to an external drive (if it is large enough to save the recovered data).
Section selection
After unpacking the program, you need to run it. On the left side of the main window you can see the drives connected to the system and the partitions on them. If the desired section was automatically found and displayed in the list, select it and move on to the next item.

If the required partition is not in the list (for example, the drive was formatted or partition sizes were changed), you can search for the lost partition or set it yourself (only if you know the exact parameters of the partition). You can select these functions in context menu drive or on the toolbar.
Let's take a closer look at the lost partition search function:
After launching it, a new window will open in which you need to click on the “Find Now” button, which will start a search for known file systems on the disk. As they are found, the list will be supplemented with information about the sections found. The most likely options will have an icon of blue color, which means the partition is in good condition. If the icon is yellow or red, then the found partition is either very damaged or found incorrectly (some types of files can give this effect).
From the list of partitions, you need to tick those that most closely match the parameters of the partition you are looking for: beginning (in sectors), size (in sectors and megabytes), label, file system type.
If the value in the "size" column less than value in the “beginning” column, then most likely this section is not valid. Typically these "bad" partitions are disk images stored on the drive.
To continue, click the “Use Selected” button.
Scanning

If you selected a partition with a file NTFS system, you will be offered a choice: run a full or quick scan.
The scope of application of quick scanning is to search for files deleted using standard operating system tools. This scan only reads service records in the file table and analyzes them.
Full scan is used in most cases. This involves searching for remaining service records in the file table, virtual reconstruction of the file system, and sector-by-sector scanning using IntelliRAW technology. Gives excellent result, but takes longer.
For FAT16/FAT32 and exFAT file systems, only full scan mode is available. This is due to the fact that due to the nature of these file systems, in many cases a quick scan is not enough to effectively recover data.
Saving results
After the scan is completed, the program will show the result of the reconstruction in the form of a tree of files and folders that were found.
Blue icons display elements that are visible by standard operating system tools, red icons indicate those that have been deleted or lost and are inaccessible by standard operating system tools.
In addition, service folders will be available:
- contains files and folders whose location could not be linked to the root directory
- contains files sorted by type found using signature recovery (with IntelliRAW technology)
To save the recovered data, either in the element’s context menu, select “Copy to...”, or click the “Mass selection” button on the toolbar, then select all necessary elements and click the “Save Selection” button.
Let us remind you that it is necessary to save the recovered data only on a partition different from the one from which the recovery is being carried out - otherwise the data may be damaged.