Show hidden files in windows 7
Are you aware that not all files and folders are shown in Windows 7 Explorer? Some of them are hidden. This was done, first of all, for security reasons, because a user with administrative rights can accidentally or unknowingly delete, move, rename something...
However, protecting Windows 7 by hiding files is a double-edged sword: on the one hand, the user will not see them and will not be able to damage them, and on the other hand, this creates additional opportunities for masking malware.
So which is better? Make hidden files visible or leave them as is? Optimally, according to the author, this is:
- if you would not classify yourself as an experienced user, even if hidden files remain hidden, their visibility will still not mean anything to you;
- If you have a good understanding of the system structure and are able to “by eye” distinguish a malicious file from a legitimate one, turn on the display of hidden files.
How to show invisible files in Explorer?
For Windows 7 users, the entire procedure is as follows.
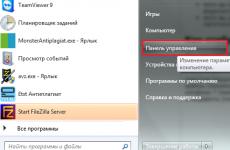
- Open Control Panel via the Start menu

or the “Run” program, to launch which you need to press “Windows” + “R” on the keyboard and enter the command in the “Open” field: control.

- Open Folder Options.

- Go to the “View” tab. Scroll all the way down the “Advanced options” list. Open “Hidden files and folders”, then check the box next to “Show hidden files, folders, drives”.
- Here, a little higher, there is another parameter responsible for showing invisible files: “Hide protected system files.” By default, it is selected, that is, protected files are not shown to the user. Uncheck this item and click OK.

- After you uncheck “Hide protected system files,” Windows 7 will ask you if you have thought carefully and if you foresee the possible consequences of this choice. If you are confident that your actions are correct, click “Yes”.

Now on the desktop, as well as in other directories, you will see some translucent elements:
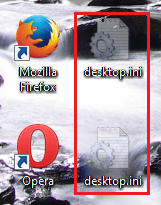
These are the files marked with the “hidden” attribute (a few words about attributes will be said below).
How to remove the visibility of hidden files
To restore the original file visibility settings, you need to open “Folder Options” – “View” again and click the “Restore Defaults” button.

How to hide your file or folder?
Not only Windows 7 files, but also user files can be hidden from prying eyes. And you yourself can make any of your documents invisible, but provided that showing hidden files is disabled in the folder options. How to do it?
File attributes
Files created in Windows can have attributes—characteristics that give them special properties. Here are the most important of them:
- "Only for reading". This attribute marks files that are read-only by the operating system. They should not be modified as this may break the functionality of Windows.
- “System” – files marked with this attribute have a higher degree of protection than “read-only”. System files are critical to the operation of Windows, so they do not appear in File Explorer.
- “Hidden” – files and folders with this attribute are also not shown in Explorer. Hidden files are important to varying degrees for the functioning of Windows; often they are invisible only for the convenience of viewing data in directories.
- “Archive” is an obsolete attribute inherited by the NTFS file system from its predecessor FAT. In earlier versions of Windows, it was used to mark data for backup.
When you checked “Show hidden files, folders and drives” in the folder options settings, you made files with the “Hidden” attribute visible.
When you unchecked the “Hide protected system files” option, you made files with the “System” attribute visible.
Compare what the “Drive C:” directory looks like with only hidden files shown:

and here it is – hidden and systemic:

This means that to hide your user file or folder, you need to change its attributes accordingly. For this:
- Right-click the context menu of the desired file and select “Properties”.

- Open the “General” tab and in the “Attributes” section check the “Hidden” checkbox, then click OK.

The same action can be performed using the command line by running the command: attrib +h “C:UsersUser_1DesktopMoya_Papka” /s /d
- attrib– launch the attrib.exe system utility, which sets the attributes of files and folders;
- +h– setting the attribute “hidden”, the “+” sign means “assign the attribute”, and “-” means remove it;
- “C:UsersUser_1DesktopMoya_Papka”– the path to the folder or file whose attributes we are changing; if the path contains non-Latin characters or spaces – quotes are required;
- parameter /s means “apply the action to all subfiles and subdirectories of the folder”;
- parameter /d means “process files and directories.”

Other programs for working with hidden files
You can also view hidden and system files through alternative file managers - Total Commander and its analogues.
To do this, in the Total Commander settings, as well as in the Windows 7 folder properties, the “Show hidden and system files” option must be active. In Total Commander, this is located in the “Configuration” - “Settings” and “Panel Contents” menu.

To use Total Commander to make a file hidden or, conversely, visible, you need to open the “Files” menu, select “Change attributes” and set the appropriate settings in the window of the same name.

Another file manager is the console FAR Manager, which by default shows all hidden and system files in Windows. Here, what is not visible in the explorer appears darkened.

At the bottom of the table there is a command line with which you can assign the desired attributes to any file or directory:

There are other tools for working with hidden Windows files, but what we've covered here is sufficient in most cases.
By default, the ability to see hidden files is disabled in any version of Windows. This is necessary so that inexperienced “dummies” do not accidentally delete anything and disrupt the operation of the OS. The solution is quite logical, since these folders are rarely needed. And even then - only to a few users. But sometimes there is a need to look at hidden files.
For example, during Windows optimization and garbage cleaning. Many programs (Microsoft Word, Skype) create hidden files during operation. Over time, they become unnecessary, but are stored on disk and take up extra space.
Very often gamers need to enable hidden folders and files. After all, they are where saves from many games are stored.
Also, displaying hidden files is required by users who want to hide documents on a flash drive, but do not yet know how to find them later. In general, there are a lot of reasons.
I should immediately note that this setting is carried out differently in different versions of Windows. Although some methods may be the same. Therefore, below are several instructions on how to enable hidden files in all Windows - “seven”, “eight”, “ten” and XP. Plus, there is a universal method that works on all operating systems.

If you need to disable their display, then in the same window, check the box “Do not show...”.
Second way:
- Go to Start, open Control Panel and click on the Folder Options shortcut.
- Select the “View” section, scroll the slider down and activate the “Show...” item.
- Save your changes by clicking Apply.
And the third way:
- Open any folder you like.
- Click the Alt button and a menu like this will appear.
- Click Tools – Folder Options.
- A familiar window will open: to enable showing hidden files, go to the “View” tab and check the “Show...” checkbox.
As you can see, there is nothing complicated here. Choose any method that suits you best and use it at the right time.
When you enable viewing of hidden files in Windows 7 using any of the methods described above, they will be visible everywhere. Including on a flash drive. You just need to connect it to your PC or laptop - and you will see the hidden folders (provided that they are there). The same applies to an external HDD.
We've sorted out the "seven", now let's move on to the "eight".
How to enable hidden files in Windows 8?
There are also 3 options to choose from. The first two are described above in the instructions for Windows 7. That is, you can enable hidden files in Windows 8 by entering the control folders command. Or by selecting the “Folder Options” shortcut in the Control Panel.
But there is another way to show hidden files in Windows 8:
- Open any folder you like.
- Select the "View" section.
- Click on “Show or hide”, and then check the “Hidden elements” checkbox.

Ready. And not only in the current folder, but also in others. The same methods will help you display hidden files on a flash drive or external HDD – you just need to connect them to your computer or laptop.
The last method, which works on Windows 8, is also suitable for the “ten”
To enable hidden files in Windows 10:
- Open any folder.
- Select the "View" section.
- Check the "Hidden Elements" box.

After this, you will be able to see hidden folders and documents in any partition of your hard drive or on a flash drive (it must be connected to the PC).
If you want to hide the folders again, uncheck this box.
There is also another way to enable the display of hidden files in Windows 10:


Ready. Now you can open any hidden files on Windows 10. As you can see, the methods on different versions of the OS are quite similar, but differ in minor nuances.
Not many users use Piggy today, but we’ll still consider it. You can view hidden files in XP like this:


That's it - now you can open or delete hidden folders and documents.
If you don’t want to understand the differences between different versions of Windows, you can use the universal method
In this case, you just need to install the Total Commander file manager (download link). The program sees hidden documents and works on all Windows.
How to see hidden files in Total Commander? To do this you need to do the following:


Now all folders and documents in Total Commander will be visible. And to do this, you don’t even have to go into Windows settings and change folder display settings.
Need to see hidden documents? Launch Total Commander and go to the desired hard drive partition. Or connect the USB flash drive and then open it through this file manager.
As you can see, all ingenious is simple. Now you know how to show hidden files and make them visible. And if necessary, you can easily find them. My only advice: if you find any unfamiliar folders, do not delete them. After all, they may contain important system files, the removal of which will disrupt the operation of Windows.
Detailed instructions on how to enable the display of hidden folders in Windows 7, Windows 10, Windows 8.1. In any of the listed systems, hidden files and folders can be detected in an almost identical way; you just need to check one box. Let's start with Windows 10, since this is a new product and it will gain popularity.
windows 10 two ways to enable folder display
To show hidden folders and files in Win10, you need to go to Explorer, click “View”, then “Options”, “Change Folder and Search Options”. Let's look further, there is another picture.

Now in the window that opens, you need to click “View”, move the slider down and check the box, as in the picture. If you wish, you can remove the ban on displaying system files. This is the method I used when I first encountered this problem, but there are simpler ones!

Second way. Open Start, then search bar. In the search bar, enter “folder”, in the search results, click “Show hidden files and folders”. In the menu that opens, you need to go to “Advanced options”, then select “Show hidden files and folders”, click “Ok”.
windows 7 enable display of hidden files and folders
“Start”, “Control Panel”, “Ok”, then “Folder Options”. Open the “View” tab, then drag the slider down, click “show hidden files, folders and drives”
windows 8.1
- Swipe left from the right edge of the screen and select Search (if you're using a mouse, point to the top-right corner of the screen, move it down, and then select Search).
- Type folder in the search box, and then select Folder Options from the search results.
- Open the View tab.
- Under Advanced options, select Show hidden files, folders, and drives, and then click OK.
myinformatika.ru
How to enable showing hidden files

If you need to enter the AppData or ProgramData folder and you cannot find them on your computer, then it is because they are hidden folders. You need to enable the display of hidden files and folders to see them.
1. Enable display of hidden files and folders on Windows XP.
We go into the computer, click Tools and click on Folder Options.

Go to the View tab.


And check the Show hidden files and folders item and click OK.

Ready. Now hidden files and folders have appeared, they are displayed as translucent folders and files.

2. Enable display of hidden files and folders on Windows 7.
We go into the computer, click Arrange, select View, and click on Menu Bar to display the menu bar.

Now in the menu bar that appears, click on Tools and select Folder Options.

Having entered the folder options, go to the View tab.

Scroll the slider to the very bottom.

Check the Show hidden files, folders and drives checkbox and click OK.

Ready. Hidden files and folders now appear in Windows 7.

3. Enable display of hidden files and folders on Windows 8.
We go into the computer.
Click on View.
Select Show or hide and check the Hidden items box to display hidden files and folders in Windows 8.
Ready. A hidden ProgramData folder has appeared on drive C, and hidden files and folders that can be entered will now be displayed everywhere. For example ApplicationData and so on.

Other articles on the topic Windows:
smotrisoft.ru
Opening hidden folders and files in the Windows operating system
In Windows OS there are so-called hidden files and folders. They can be hidden either on the hard drive or on a flash drive. Sometimes, in order to perform any operations, these files need to be opened by the user, but how can this be done? First, let's figure out why the system hides them. She hides them from prying eyes to protect them from the user himself, so that he does not accidentally delete them. So to speak, a kind of protection “from fools.”
Hidden files are mainly system files, the deletion of which may result in a malfunction of the OS.
Some users themselves hide certain files and folders from other users on purpose.
By default, hidden files are not displayed at all. If you turn them on, hidden folders will appear translucent, unlike regular, opaque folders.
Enable display of hidden folders in Windows 7
In Windows 7, enabling the display of hidden folders is quite simple: go to “My Computer” and press the “ALT” key. A window with a menu will pop up at the top, there we select the “Service” item and there we look for the “Folder Options” item. There we go to the “View” section and drag the list to the bottom. At the very bottom of the list you will see items that turn on and off the display of hidden files and folders.
That's all. No more wisdom is needed. You can also view hidden files and folders using Total Commander and WinRar programs. The main thing is to remember that changing or deleting hidden files may lead to unstable system operation, so be careful.
In Windows 7, Windows 8, Windows 10 and Vista, for security and safety purposes, you can hide important files and folders so that other users do not accidentally delete/change important data, or simply from being seen by prying eyes. If necessary, these same files are quite easy to display, which we will look at later in this article.
Also, recently there has been a very common case when users have all their files and folders become hidden, as if everything that was deleted has been deleted, and instead of them, shortcuts with the same names are created, which is a consequence of the computer/removable storage being infected with a virus.
This can also happen after installing or scanning your computer with an antivirus. If you have just such a case associated with a virus, the instructions below will also help you display hidden files and folders. But to completely remove the virus, read the article How to remove a virus with shortcuts.
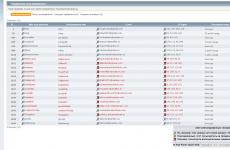
The first and easiest method I always use is using the Total Commander program. Open the program, select the drive you want and simply click the "Hidden Items" button and you will see everything that has been hidden (marked with a red exclamation point).
If you do not have the program installed, also use the fairly simple methods described below.
Show hidden files and folders in Windows 8.x or 10
Use the View tab and click the Options button.

On the View tab, check the “Show hidden files, folders and drives” option at the very bottom. If you want to get to hidden Windows system files, uncheck the "Hide protected system files" option

Hidden files will appear semi-transparent. If you want to completely remove the “hidden” attribute from a file or folder, right-click on it and select properties. On the General tab, uncheck the Hidden option.

In most cases, this helps, but sometimes it happens that the checkbox from the option cannot be removed, because the hidden attribute is inactive. If so, scroll down a little and follow the instructions provided.
Windows 7 or Vista
Open any folder and select Folder and Search Options from the Organize menu.

Just like in the previous example, check or uncheck the desired options and click OK.

What to do if the folder's hidden attribute is inactive
In case you cannot remove the attribute hidden folder using the above method, the code below can help you in this situation. Just copy it, paste it into notepad and save it as folder with the extension .vbs instead of txt to get folder.vbs. Then copy and paste the file into the drive you need (USB flash drive, SD card or HDD), where you want to display hidden files and launch it with a standard double-click.
Don't forget to change "d:" to your drive letter.
‘ Reset file attributes for all folders within a specific drive
‘ Change d: to the drive letter where the script will be applied
cDrive = "d:"
Set FSO = CreateObject("Scripting.FileSystemObject")
ShowSubfolders FSO.GetFolder(cDrive)
WScript.Echo "Done with fix."Sub ShowSubFolders(Folder)
str = ""
For Each Subfolder in Folder.SubFolders
str = str & » » & Subfolder.Path
subFolder.Attributes = 0
ShowSubFolders Subfolder
Next
End Sub
After running the file, you should see all hidden folders, but not files (note) since this method only applies to folders. And for files use the following method:
- Open the Run dialog box, enter cmd and press Enter.
- Enter your drive letter, for example d: and press Enter.
- Then enter the following command:
attrib d:\*.* /d /s -h -r -s
Now, all hidden files should appear.
Surely, every personal computer user has sooner or later encountered such a phenomenon as disappearance some files or folders from a hard drive or other storage device. You cannot find them where they simply must be.
In such a situation, most ordinary PC users immediately have only one thought - someone deleted the data. However, their sudden disappearance may be associated with more than just this. Often they just invisible.
Later in the article we will look at the main ways to show hidden folders and files using the operating system as an example Windows 7(however, this will also work in XP, Vista, 7 and 8). But first, let’s tell you why such situations arise.
Attributes of files and folders or how data becomes hidden
As you know, any modern operating system has many options for managing files and folders. These are not only well-known operations for creating, deleting, copying and moving data, but also operations for setting them up. Each file or folder can be assigned a so-called attribute, responsible for certain properties of an object. For example, a file can be assigned an attribute such as " Only reading", and the user will no longer be able to edit it, since the system itself will not allow him to do this.
These also include the attribute - “ Hidden" As the name suggests, it will make the object invisible. And if the system is not configured to display such objects, the user will not see elements hidden in this way.
Making files or folders invisible is quite simple. To do this you just need to go to properties the desired object and assign this attribute to it.
Let's try:
This suggests conclusion - Any user can make any element hidden.
But if I didn’t hide my files and folders and no one else uses my computer, what then?
If in your case any elements from the disk disappeared on their own, then the answer is obvious - virus programs were at work.
Unfortunately, manage attributes files can not only be used by users, but also any programs. There are many different virus programs on the network that, once they get into the system, can do whatever they want with its settings and data stored on the disk. If in your case such viruses have hidden some of your folders or files, then do not be upset - there are more of them can I return.
There are many ways to open hidden folders in Windows 7. Let's look at the simplest of them.
Setting up the system
Each operating system (including all versions of Windows from XP and even earlier to 10) has internal settings that are responsible for displaying any data stored on the disk and any other media. So, to make files and folders visible, you need to do the following:

This method is suitable if files and folders hidden on your computer only had the attribute “ Hidden" Usually when they are working viruses, they additionally make objects systemic, which will still be impossible to see even if you enable viewing in this way. To detect such files, in the menu " Folders settings"You need to additionally uncheck the box " Hide protected system files", as it shown on the picture:

If you try to uncheck this item, the system will issue a warning that this is not recommended. It's okay - we just agree.
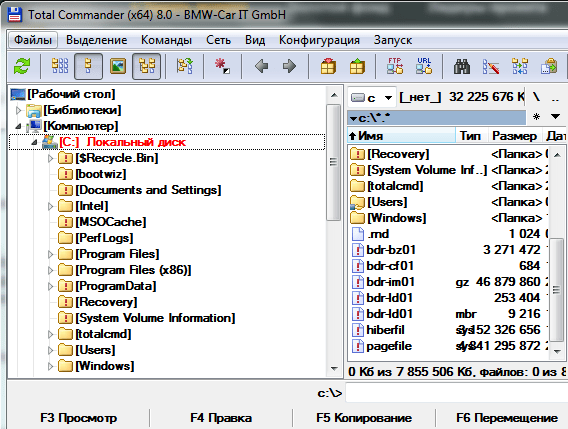
Unfortunately, and it doesn't always help, since some viruses can easily change system settings immediately after the user tries to enable or disable certain OS parameters. In such cases, programs that can “see” hidden objects come to the rescue. One of these is Total Commander. This is a file manager, very similar in functionality to the standard " Windows Explorer».
Using Total Commander
Finding this program on the Internet is not difficult. Although it is paid, you can use it for free for a while - this is more than enough to see all the hidden folders or files on the system.
To get started, download Total Commander and install the application. After launching it, you will see a window divided into two panels - they display the folders and files on the disk.
Initially, the program does not allow you to view hidden elements - you must enable this function. To do this, open the menu “ Configuration" (at the top of the window), and then click on the item " Setting...».

All that remains is to find the item “ Panel Contents" We go into it and put a tick on “ Show hidden files" And " Show system files", then click Apply. Now the program will see hidden objects.

In the image below, you may notice that some folders are displayed with a red " ! ».

These are the hidden folders.
Video on the topic