How to create html text wrapping around an image? Floating elements Streamline shapes
It's quite common to see various images in Microsoft Word documents. I’m sure that from time to time you have to dilute what is written by inserting pictures according to their meaning, because this way the information is perceived much better.
The site has various articles that will help you figure out how to properly work with an image inserted into Word. The added picture can be cropped, or the image can be rotated in Word to the required angle. If you come across the right or just a beautiful picture in a document, you can save the image to your computer.
This is what we will deal with in this article. In Word, text can flow around a picture not only from the side. It can be placed behind it, along the outline or around the frame. I have MS Word 2010 installed, but the screenshots taken will also be suitable for those who have 2007, 2013 or 2016 installed, except that the names of the items may differ slightly.
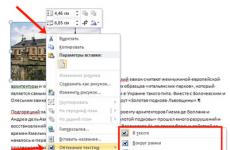
Add a picture to the document and double-click on it to open the tab "Working with drawings"– “Format”. Then, in the “Arrange” group, click on the button "Text Wrap". In the context menu that opens, select the appropriate option.
The desired menu can be opened in another way. Right-click on the image and select "Text Wrap". After this, possible options will open again.

Let's take a closer look at all the available types of wrapping.
– placement of the written object around the frame. A frame appears if you click on the picture with the mouse - it is a rectangle with markers along the contour. That is, if the photo is of irregular shape, the text will still be printed in a rectangle.

– this wrapping is best used for objects of arbitrary shape, so that the words are placed along the contour and not along the frame.

“Through” – the flow will be around the frame. It is better to use when the object is not completely filled, but there are empty areas of some shape.

– even if the image is small in size, there will be nothing written to the right or left of it.

– the object will be placed behind the printed text. Please note that while the image is selected, there is a frame with markers along the contour; you can move and edit it. But as soon as you move on to editing or typing words, you will no longer be able to select the drawing, unless its borders extend beyond what is written, that is, into the margins on the right or left.
In order to make a picture a background in Word, just this type of wrapping is used. You can read more about this in the article by following the link.

“Before text” – the image will be placed on the text itself and will cover it.

– this item can be selected if the picture is irregular in shape, or you want the words on it to be partially written. In this case, a red outline with black markers will appear around the image. Move the handles to change the outline. You can add new markers by simply clicking on the red line in the desired place and moving the mouse cursor to another place.

Most often you have to print something right next to the picture, on the right or left side. Of all the described methods, flow is suitable for this. Select it for the image, then move the object to the desired part of the document, so that the text is located on the right side, as in the example, or on the left side.

If the distance from the text to the picture is not suitable, then you can change it and set values that are more suitable.

To do this, right-click on the image and select from the context menu "Text Wrap" – .

A separate “Markup” window will open. In chapter "Distance from text" indicate the required values in the fields on which sides the text is located from the image. Then click "OK".

For example, I increased this distance.

Experiment, see how the text will look to the right of the image, along its outline, etc. Choose the arrangement of the image and text in the document that suits you best.
Rate this article:Lay out a block consisting of a picture and text, and the text should not flow around the picture.
Left is correct, right is not
Additional condition: the width of neither the text nor the image is strictly defined. If there is no image, the text occupies the entire allocated width.
Solution

Let's try to write styles. Everything is clear with the left column:
Photo ( float: left; /* set the wrapping */ margin:10px; /* indentation for beauty */ display:inline; /* for IE6, so that the left indentation does not double */ )
Now the drawing is on the left, and the text goes around it on the right. But if there is more text, it will “dive” under the drawing (see picture above), and we don’t need this.
The first thing that comes to mind is to “float” the text. But in this case, if you do not specify the width, the text will fall under the picture!
 float:left/right will require width - otherwise nothing will work!
Let's think further... .description( : XXXpx) might seem like a good solution. Indeed, in some situations this option works. For example, if the image size is still set. Let's say it's a rubber news block. The image cannot be wider, say 200px, but the text already stretches and occupies the entire remaining width.
However, this option has a significant drawback. If there is no block with a picture, the indentation will still remain an awkward hole. Of course, you can remove it using the sister element selector, as described in the article, but in our case there is another solution.
You can prevent wrapping by simply adding :hidden; for a text column. By doing this, we will set a new formatting context for it (this topic will be covered in more detail soon).
The only browser that will react to this incorrectly is, of course, IE6. We set the column specifically for it, for example, “float” (you don’t need to set the width).
So, the solution to the problem looks like this:
Photo ( float: left; /* set the float */ margin:10px; /* indentation for beauty */ display:inline; /* for IE6, so that the left indentation does not double */ ) .description( overflow:hidden; ) * html .description( float:left; )
As always, in combat conditions we use .
Typically, text wrapping around a picture is done in newspaper publications, books, and abstracts, but very rarely in business papers. This arrangement of the picture visually improves the perception of the text, since the picture combines very nicely with it.
You can configure this wrapping in many text editors and Microsoft Word. Now I will tell you in more detail how to do this.
First, you need to place the image on your worksheet in Word. We discussed how to insert a picture onto a page in Microsoft Word in the previous article.

Then you select the image and in the " Format"find the option" Text wrapping»

Click on " Text wrapping" and select the option you need from the drop-down list.

Now, using examples, I will show you how the text and image will look when you select one or another option.
In the text – a standard wrapping that is enabled by default when adding an image.
Around the frame – an invisible frame is automatically placed around the picture and no matter where you move the image, the text will always surround it (except for the edges of the sheet).

Along the contour – almost the same as “Around the Frame”. The only thing I noticed was that the text began to align more “correctly” around the image.

Behind the text – the image is placed in the background, and text is placed on top of it.

Before text – the opposite of the “Behind the text” option, the picture appears in front of the text and covers it (the size of the closed part depends on the parameters of the picture).

Up and down – text wraps around the image only at the top and bottom, leaving free space on the sides.

Through – the text wraps around the image from all sides (I also call this option “Full wrap”).

Additional markup options– when clicked, a dialog box will open in which there are all the above options, and it also includes the ability to change the size of the image frame around which the text flows.

That's all, learn, practice, experiment.
In this lesson you learned how to wrap text around a picture in the Microsoft Word 2007 text editor.
Last update: 04/21/2016
Typically, all blocks and elements on a web page appear in the browser in the order in which they are defined in the html code. However, CSS provides a special float property that allows us to set elements to float, so we can create more interesting and varied web pages in their design.
This property can take one of the following values:
left: The element moves to the left, and all content that goes below it wraps around the right edge of the element
right: element moves to the right
none: cancels the wrap and returns the object to its normal position
When using the float property on elements other than the img element to be styled, it is recommended to set the width property.
So, imagine that we need to display an image on the page to the left of the main text, a sidebar should be on the right, and the rest of the space should be occupied by the main text of the article. Let's first define the page interface without the float property:

The old oak tree, completely transformed, spread out like a tent of lush, dark greenery, swayed slightly, swaying slightly in the rays of the evening sun...
“No, life is not over at the age of 31,” Prince Andrei suddenly finally and irrevocably decided...
In this case, we will get a sequential placement of elements on the page:
Now on the same page we will apply the float property, changing the styles as follows:
Image ( float:left; /* float left */ margin:10px; margin-top:0px; ) .sidebar( border: 2px solid #ccc; background-color: #eee; width: 150px; padding: 10px; margin- left:10px; font-size: 20px; float: right; /* wrap to the right */ )
The placement of elements on the page will change accordingly:
Elements to which the float property is applied are also called floating elements.
No flow around. clear property
Sometimes it becomes necessary to prohibit flows. A similar task may be relevant if some block should be moved down to a new line, and not wrap around a floating element. For example, the footer, as a rule, should be located strictly at the bottom and stretch across the entire width of the page. If there is a floating element in front of the footer, then the footer may flow around this element, which is not desirable.
To prevent elements from wrapping, CSS uses the clear property, which tells the browser that the element being styled should not have wrapping applied to it.
The clear property can take the following values:
left: The styled element can wrap around the floated element to the right. On the left the flow does not work
right: The styled element can only float to the left of the floated element. And on the right the flow doesn't work
both: the styled element can wrap around floating elements and moves down relative to them
none: the styled element behaves in a standard way, that is, it takes part in right and left flow
For example, let's say a footer is defined on a web page:

The presence of a wrap will create an incorrect display in which the footer moves upward:
Let's change the footer style:
Footer( border-top: 1px solid #ccc; clear: both; )
Now the footer will not flow around the image, but will go down.
Canceling block flow (float) is the most common operation when laying out HTML pages. We'll look at all the known ways to override the effect of the CSS float property.
Before we dive into stream cleaning techniques, let's take a look at the problem we're trying to solve.
Typical case of HTML layout
Blocks .el-1 And .el-2 placed side by side inside the container .container, and one element .main follows after .container:
We want the height of the container .container was equal to the height of the longest of its children (i.e. either .el-1, or .el-2) and so that the block .main to be after the block .container.
And here's what we see: .container(black frame) collapsed as if there was nothing in it, block .main(block with red background) is located under the block .container, as we wanted, but at the same time he hides behind the blocks .el-1(with yellow background) and .el-2(with pink background). God knows what! If my boss saw this, he would certainly tell me, "Use, Shurik, table layout". Fortunately, the times when web pages were laid out in tables are long gone and we can get along just fine without them. Don't believe me? Read on.
Despite the fact that many consider this a browser bug, this is just the principle by which floating elements work. Therefore, we need to force the parent element to expand to fully accommodate the child elements. Then, the following elements will be located under the container.
Method 1: Old School Method
As you know, the CSS property clear sets on which side of the element it is prohibited for other elements to flow around it, therefore this property can prevent elements from overlapping on top of floating ones. The idea is this: insert an empty element that has the clear property under the floated blocks. It's a long-standing tradition to use a specific class for an element like this, so you can use it in your HTML. Here's the classic CSS code:
Clear ( clear: both; )
Which is applicable to our HTML layout:
Our demo example implemented using this method:
If you don't care about the collapsing container, just the misplaced block .main, then you can also place a "cleansing flow" element after the container. But, if you decide to do this, then it will be much easier to simply add the clear property to the element itself .main.
This is a simple and straightforward method. However, modern layout practices tend to separate content from style, so it's best not to use it.
Method 2: overflow property
Using the property overflow in the tag .container, we can force the container to expand to the height of the placed elements. Our CSS will look like this:
Container ( overflow: hidden; /* or "auto" */ )
Our HTML will remain the same as it was originally, without additional elements. This is what we get as a result:
Unfortunately, this method has a drawback: any child element that extends beyond the container will either be clipped (in the case of overflow: hidden;) or cause scrollbars to appear (in the case of overflow: auto;).
Method 3: “clearfix” class
We create a class .clearfix with pseudo elements ::before And ::after and give them display: table , which creates an anonymous table cell. This class will be used to clear floating elements. The CSS code looks like this:
Clearfix:before, .clearfix:after ( content: ""; display: table; ) .clearfix:after ( clear: both; ) .clearfix ( zoom: 1; /* ie 6/7 */ )
Let's change the HTML code a little by adding to the class container Class clearfix:
Here is the result of our new class:
If you don't need support for browsers below IE8, then our code will be significantly reduced:
Clearfix:after ( content: ""; display: table; clear: both; )
Method 4: contain-floats value for min-height
Container ( min-height: contain-floats; )
This code gives almost the same effect as clearfix or overflow, but with one line of code and, moreover, it does not have the disadvantages that we talked about earlier. Unfortunately, no browsers support this property yet, so just keep it in mind.
So you have a whole bunch of different "clearfix" methods. Application of a class .clearfix has become the standard and I highly recommend using it over the previous two methods.