How to properly reinstall the system. How to reinstall Windows: step-by-step instructions Installing Windows for dummies
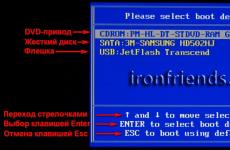
We use the easiest way to download - using the “Boot Menu”. To call the “Boot Menu” on different motherboards and laptops, the “F8”, “F9”, “F10”, “F11”, “F12” or “Esc” keys can be used. Often this key is indicated in the prompts that appear when you turn on the computer.
Immediately after turning on the computer, press and hold the “Boot Menu” key until the boot device selection menu appears.

Use the down and up arrows to navigate to the DVD drive or flash drive and press Enter.
Transcend JetFlash 790 8Gb
If the call key is not indicated in the prompts at the initial stage of booting the computer, then you can find out this information from the instructions, on the website of the motherboard or laptop manufacturer, by searching on the Internet, or at random.
The first thing you should see after the BIOS messages is a line like “Press any key to boot from CD or DVD...” or “Press any key to boot from USB...” (“Press any button to boot from USB...”) if you are booting from a flash drive.

When you see this message, you should press any key on your keyboard within a few seconds, I usually press Spacebar. If you miss this moment, the Windows installation will not begin and you will have to restart the computer again from the old operating system using the “Ctrl-Alt-Del” key combination or the “Reset” button on the system unit.
I would like to draw your attention to the fact that during the Windows installation process, the computer reboots several times and each time such a message may appear, but pressing “any key” on the keyboard is no longer necessary, otherwise you will simply start reinstalling Windows from the beginning many times and you will never finish it!
Sometimes a message like the one in the screenshot below may also appear.

In this case, you just need to press the “Enter” key on your keyboard. And by switching with the “Tab” key to the “Windows Memory Diagnostic” item, you can check the computer’s RAM for serviceability.

Wait for the blue “Install Windows” window to appear.
Installing Windows 7 begins with choosing languages.
3.1. Language selection
At this stage you are asked to select languages.

“Installed language” is the language in which all messages will be displayed in the operating system. If the version of Windows is multilingual, then you will have a choice. Most editions of Windows have only one operating system language and it is advisable that you understand it well.
“Time and Currency Format” – defines the names of months, days of the week, main currency, digital separators accepted in your country (period or comma), etc. What does it mean? Well, for example, if you select “Ukrainian”, then in programs for typing and tables, days of the week, months and monetary units will be automatically entered in Ukrainian, regardless of the language of the entire document. Therefore, choosing a national format only makes sense if the majority of your documents will be in the national language. However, this can be easily changed in Windows at any time.
“Keyboard Layout” is simply the default input language that will be used when starting Windows and all programs. It makes sense to install the one on which you communicate and write. If you will use the computer primarily for programming, it may be more convenient to select the “US” (English) layout. After installing Windows, you can add and set any language as default.
For Russian-speaking residents of the CIS, I recommend leaving “Russian” everywhere, since when installing some programs that have a multilingual interface, they may not be in Russian, but in the language that you specified in one of the fields when installing the system.
To continue the installation, click the “Next” button.
3.2. Starting the installation
In the next window, click the “Install” button under the “Windows 7” logo.

3.3. License agreement
Check the box “I accept the license terms” and click “Next”.

4. Windows 7 installation type
We offer two types of installation.

“Update” – allows you to update the previous version of Windows (Vista) to the new Windows 7 while saving files, programs and settings. Windows XP cannot be updated this way. In any case, I do not recommend using this installation method, since it inherits the problems of the previous operating system and it is likely that the computer will slow down and malfunction.
“Full installation” - installs a new copy of Windows on a new or existing hard drive partition. When installing on a new computer, partitions are created on the hard drive, and when installing on an old computer, the partitions are either deleted and created again, or a partition is selected that has enough space for installation. With this type of installation, you can also install Windows 7 as a second operating system, for example, alongside your existing Windows XP. In this case, when you turn on the computer, you will be asked which operating system you want to load.
We select “Full installation” and a window for selecting a disk for installing Windows 7 will open in front of us.
5. Disk configuration
Disk configuration is the process of creating, deleting, formatting hard disk partitions for installing Windows on it.
5.1. Disk configuration on an old computer
If you are reinstalling Windows on an old computer, then it already has one (“C”) or several partitions (“C”, “D”…). I hope that you did not forget from the “C” drive to the external drive, since during the process of reinstalling Windows, the “C” drive will be cleared.
Hard drive Transcend StoreJet 25M TS500GSJ25M 500 GB
If your disk has only one partition, then it is better to delete it and create two new ones - one of small size for the operating system and programs, the second for all the remaining space for your files. This disk configuration will be more convenient and reliable in terms of backing up and restoring the operating system and your files.
If your disk has several partitions, then the first one, on which Windows is installed, can be deleted and a new one created in its place, and the second one with your files can be left as is.
5.2. Disk configuration on a new computer
When installed on a new computer, your disk is completely empty and has no partitions. The best option would be to create two partitions - one of small size for the operating system and programs, the second for all the remaining space for your files. This disk configuration will be more convenient and reliable in terms of backup and recovery of the operating system and your files.
5.3. Dual drive configuration
If you have two hard drives, or one SSD and one regular drive, then it is advisable to create one partition on each of them and install Windows 7 on the one that is faster (SSD) or smaller in volume, and the second one is completely dedicated to storing your files .
If both disks are large, then you can create two partitions on the first one - one small for the system, one for storing your files. On the second disk, you can create a partition for the entire volume and use it to install programs and games, or you can also create two partitions - the first for programs and games, the second for files. This configuration will ensure maximum loading speed for programs and games, since Windows and the page file will be on one drive, and programs and games on another.
6. Disk setup for Windows 7
The screenshot below shows a computer with a 500 GB disk.

Don't be surprised that the actual size is 465.7 GB. Manufacturers round up hard drive sizes to the nearest round number. A table with actual hard drive sizes can be downloaded at the end of the article in the “” section.
It is better not to divide the SSD disk into several partitions, but to allocate it entirely to the “C” drive for installing Windows, programs and games. Then you will get unrivaled computer speed!
Hard drive A-Data Ultimate SU650 120GBClick on “Disk Setup” and additional buttons will appear.

The optimal size of the system partition is 10-20% of the total hard drive volume. For Windows 7, I recommend a partition size of at least 40 and no more than 200 GB.
I usually take 10% of the declared disk capacity, that is, 50 GB from a 500 GB disk and 100 GB from a 1000 GB disk. Since this is enough to install basic programs, it is better to install games on the second partition along with other files, since they take up a large amount of space and make it difficult to backup and restore the system, which we will talk about later.
But if you like to experiment and plan to install a lot of serious programs and games, then it is better to make the system partition larger, about 20% of the disk capacity or 100-200 GB in physical terms. Since some of the data still ends up on the system partition and in the future there may be a lack of space on it.
Let's make everything sure, create a system partition of 100 GB in size. To do this, click the “Create” button and enter the size in megabytes.

Please note that 1 GB = 1024 MB. In addition, Windows 7 takes 100 MB of this volume to create a hidden boot partition.
I like everything to be beautiful and the system to display a 100 GB disk, not 97.6 GB, so I calculate the volume in megabytes as follows:
100 GB x 1024 + 100 MB = 102,500 MB
This number must be entered in the “Size” field and click the “Apply” button.

Here is the result of the performed operation.

As you can see, two sections have been created. “Partition 1”, only 100 MB in size, is used for the operating system bootloader and we will not see it in Windows. “Partition 2” has a size of exactly 100 GB and we will install Windows 7 on it.
There is still “Unallocated space…” with a volume of 365.6 GB, on which we will create another partition for storing user files.


By default, all remaining space is allocated for it. It can be divided into several more sections if you know what you need it for. But we will leave everything as it is by simply clicking the “Apply” button.

As a result, we get “Section 3”, which took up all the remaining space. Now you need to click the “Format” button and confirm this action.

You can create this partition after installing Windows, but you will have to perform more steps and possibly change the drive letters. We will also consider this option after installing Windows.
7. Nuances of marking and large-volume disks
A 100 MB hidden boot partition is created when a new partition is created. If you install Windows 7 on an existing partition, the bootloader files will be located on it and a separate partition will not be created.
This configuration will occur if the Windows 7 installer partitions the disk in the old MBR system. If Windows Installer partitions the disk in a new GPT system, several service partitions may be created.
MBR is an older partition type that supports disks up to 2 TB. GPT is a new type of partition that supports disks larger than 2 TB and requires support from the motherboard.
There are usually fewer problems with disks marked in MBR, but this is not essential. If you install Windows 7 on a disk with a capacity of 3 TB or more, then you need it to have GPT partitioning, otherwise not all of its capacity (about 2.3 TB) will be used.
The problem is that the Windows 7 installer does not always partition large drives in GPT partitioning, even with support from the motherboard. In this case, check that in the BIOS settings of your motherboard or laptop, in the “Boot” section, UEFI boot devices are given priority.

In a modern motherboard Setup GUI, it might look like this.

Write this folder onto a USB flash drive and insert it before turning on the computer to install Windows. In this case, the Windows 7 distribution can be located either on the installation DVD or on this flash drive.
When you reach the hard drive selection window, in which it is not displayed, click on the “Download” button and specify the location of the driver files (folder on the flash drive).

If the driver is suitable, the installer should detect your hard drive and it will appear in the window for selecting a disk for installation. After this, you can create partitions on the disk and install Windows on them.
9. Copying and unpacking files
Now select “Partition 2” of 100 GB in size, on which we install Windows 7 and click “Next”.

Copying and unpacking of files begins, which will take some time.

Sometimes this process may stop at 0% or any other place for a while, and then quickly end. Please be patient and do not touch your computer. You may need to wait 15-30 minutes. If after 30 minutes of waiting nothing happens, then most likely the computer has frozen or the installation disk is hard to read. You'll have to start all over again and if it freezes again, perhaps replace the installation disk. The problem may also be caused by a malfunction of the hard drive, RAM, or motherboard.
After copying and unpacking the files, the computer will restart several times and the installation process will continue, requiring user interaction.
Let me remind you that when the message “Press any key to boot from CD or DVD...” appears, there is NO NEED to press anything.
10. Configuring Windows 7 settings
Setting up Windows 7 settings begins with entering your username.
10.1. Entering your username and computer
In the next window, you need to enter the name of the main user, who will be the computer administrator, and the name of the computer on the network.

I recommend entering the name in English letters without spaces, since the user profile folder will have the same name, into which program and game settings can be saved. And some, even modern, programs and games cannot save files to folders with Russian names.
Names can have capital letters and numbers, and the input language can be switched using the Alt-Shift key combination.
As for the computer name, my recommendations are the same, but you can use a hyphen (minus sign) in the name. For example, for the main home computer, you can name it PC-1, PK-1 or Home-1, for the second computer - PC-2, PK-2 or Home-2, for a laptop - HP, ACER, Samsung, etc. . If you have several laptops at home, you can add a username to the computer name, for example, Notebook-Vera or Misha-PC. This will make it easier for you to navigate later, but in principle it doesn’t really matter and you can always change the computer name. Please also note that the username and computer name must not be the same.
10.2. Entering your password
The next window prompts you to enter the password for the user whose name was entered in the previous window, as well as a hint for this password in case you forget it.

I recommend not entering a password at this step, since during the process of setting up the computer it will reboot more than once and you will simply get tired of entering it. It is better to do this after completely setting up the computer and creating a backup copy of the system. In principle, if no one except you will use the computer, you have nothing to hide and you do not plan to exchange files over a local network, then you don’t need to use a password at all. In other cases, using a password is highly desirable and we will talk about this in one of the articles about setting up Windows. For now, just click Next.
10.3. Entering the key and activating Windows 7
The next window asks you to enter your Windows 7 license key.

If you have officially purchased the operating system and are sure that this key has not been used on another computer, then enter the 25-digit code indicated on the disk or certificate sticker. In this case, you can leave the “Automatically activate Windows when you connect to the Internet” checkbox and click “Next”. Activation will occur 3 days after the first login.
If you do not yet have a license key or are installing Windows 7 for evaluation purposes, then do not enter anything. In this case, you need to uncheck the automatic activation checkbox and click the “Next” button. After installation, you will have a 30-day trial period. In the future, you can extend it 3 times, thereby increasing the time of familiarization with the operating system to 120 days.
10.4. Setting up Windows 7 updates
In the next window, you need to select one of three modes for installing Windows updates.

“Use recommended settings” – all important and recommended updates will be installed automatically. Important ones include security updates and bug fixes. Recommended ones include updating drivers, software components and much more. Most experts advise using this mode.
“Install only the most important updates” – only security updates and bug fixes will be installed automatically.
“Postpone decision” – does not enable automatic updating, but configures it later in the operating system.
On a personal note, I want to say that if the protection of your data is important to you and you don’t know how to protect yourself from security threats on the Internet, then important updates need to be installed. On the other hand, multiple updates eventually lead to a slowdown of the computer, and along with recommended updates, a large number of unnecessary components are installed into the operating system. If you use your computer mainly for games, your security is well set up, you have a backup copy of the system and all your personal files, then in principle you can do without updates and your computer will work as quickly as possible. But I still recommend installing at least the most important updates.
10.5. Setting the date and time
The next step asks you to select your time zone, date and time.

There is nothing complicated about this and although it can be configured after installing the system, it is better to do it right away. First you need to set the time zone, and only after that the time. If your locality is not in the list of time zones, then choose any other one that is in the same time zone with you, for example, for Kyiv the time zone is UTC +02:00 as in Athens.
If you live in Russia, then uncheck the “Automatic change to daylight saving time and back” checkbox, since time change is canceled in Russia. In other cases, follow the accepted regulations in your country. For example, in Ukraine, the time change is still in effect and the checkbox must be left. The computer clock will be automatically adjusted to the correct time and day. Click "Next".
10.6. Computer location
If your computer is connected to the network and during Windows installation you were able to install the required driver for the network card, the “Select the current location of your computer” window will appear.

“Home network” - select this item if your computer or laptop is now at your home, connected to the Internet via a router, and you want to exchange files with other home computers.
“Work network” - select this item if your computer or laptop is currently at work, where there is a computer network for exchanging files with other work computers.
“Public network” – select this item if your computer or laptop is connected to the Internet directly by cable. In this case, additional protection against attacks from the Internet will be used.
10.7. Home group

This functionality was introduced in Windows 7 to simplify file sharing between home computers, but in principle it is not necessary. You need to check the boxes for the folders with which types of data you want to provide access to. You can also enable sharing of the printer connected to this computer. You can check all the boxes, it won't harm you.
If a computer with Windows 7 or higher was detected on the network, you will be prompted to enter the homegroup password, which can be viewed on that computer. After entering your password, click Next. If you don’t have a lot of time, you can skip entering the password and click the “Skip” button, and enter the password later.
If a homegroup was not detected, it will be created on this computer and you will be given a random password. You can record it, or you can watch it later in Windows at any time. But it’s better to write it down or take a photo and click the “Next” button.
11. Login
After this, the user should automatically log in and display the main Windows screen, called the “Desktop”. This completes the installation of Windows 7.
12. Links
Hard drive A-Data Ultimate SU650 240GB
Hard drive Transcend StoreJet 25M3 1 TB
Sandisk Cruzer
In this article you will learn how to reinstall Windows XP yourself. The material is designed for users who will be installing Windows on a computer or laptop for the first time. As scary as it may sound, reinstalling Windows is very simple. In the days of Windows 95 and 98, to an inexperienced person, the procedure of reinstalling the operating system could seem like a mystical rite. The person who was invited to do this was necessarily called a programmer and was considered a guru in the computer field.
For their part, such gurus, inflating their value, intimidated their clients in every possible way with scary computer terms and stories about viruses and burned-out computers. In this guide, you will see that this is not at all true and that installing or reinstalling Windows on your laptop or computer is very simple and accessible to almost anyone who knows how to use a computer mouse.
I will make a small reservation. This article will tell you how to install Windows XP yourself using a DVD or CD. If your computer or laptop does not have a DVD drive, then you will need to install Windows from a USB flash drive or from a memory card, I will talk about this in another lesson.
Before you start reinstalling Windows XP, read the entire article to the end, and if you have a printer, print it out.
Reinstalling Windows XP consists of several steps:
- Preparing your computer for installing Windows XP;
- Preparing an installation disk with Windows XP;
- Setting up the computer's BIOS to boot from a DVD;
Now let's go through all the stages in detail.
1. Preparing to install Windows XP
Before reinstalling Windows, you need to do a little preparation.
First you need to copy all valuable information from the disk " WITH:"Of course you know better, but I’ll still tell you where to look. Places where on the disk" C:"there may not be much of your useful information, usually it is " Desktop" And " My Documents"It's also worth looking at the root of the disk" WITH:"Sometimes people, in a hurry or simply out of ignorance, save files there. Copy all the files you need to another drive (for example, “ D:"), DVD disc or flash drive.
For the future, keep in mind that it is best to store information not on the same disk partition on which the system is installed, and, of course, create backup copies.
If you just purchased a computer or are sure that there is no valuable information in it, then naturally you don’t have to bother
Another point that is worth considering before installing Windows is the drivers for the network card. If after installation it turns out that your Windows distribution did not have drivers for your network card, or for some reason they were not installed correctly, then you will find yourself without drivers and without the Internet. Therefore, download the latest drivers in advance, at least for the network card.
2. Preparing an installation disk with Windows XP
For those who already have an installation disk with Windows XP, you can skip this step. If you don’t have such a disc, then you need to burn it or purchase it. Those who want to download Windows on the Internet, look for clean MSDN builds.
This will protect you from possible errors in the operation of the installed system.
Installation disks with Windows XP on the Internet are usually distributed in the form of disk images in the format " .iso". I won’t say where to download because it’s not entirely legal to promote their distribution. I can advise that before downloading the image, read the comments on the release; problematic disks are usually quickly identified in the form of a bunch of angry reviews.
After the image is downloaded, you need to burn it to a DVD disc, and you can begin installation.
3. Setting up the computer BIOS to boot from disk
To install Windows, it is not enough just to insert the disk into the drive; you also need to make sure that the computer starts booting from this disk when you turn it on. This is done in the BIOS. There is a BIOS in almost any computer or laptop; all sorts of important settings are stored in it, one of these settings is the boot order of devices. This setting is what interests us at the moment.
In order to get into the BIOS, you need to immediately press a certain key on the keyboard when you turn on the computer. Usually, when booting, it is written on the screen what exactly you need to press to get to the BIOS menu. Most often this is the Delete, Esc, or F2 key. You will know that you have entered when you see the BIOS menu in front of you.
The most common options are:


If the attempt is unsuccessful, then reboot the computer and try again. Below are tables with possible login options. BIOS.
| BIOS Manufacturer | Keys |
| ALR Advanced Logic Research, Inc. | F2, Ctrl+Alt+Esc |
| AMD (Advanced Micro Devices, Inc.) BIOS | F1 |
| AMI (American Megatrends, Inc.) BIOS | Del |
| Award BIOS | Ctrl+Alt+Esc, Del |
| DTK (Datatech Enterprises Co.) BIOS | Esc |
| Phoenix BIOS | Ctrl+Alt+Esc, Ctrl+Alt+S, Ctrl+Alt+Ins |
| PC Manufacturer | Keys |
| Acer | F1, F2, Ctrl+Alt+Esc |
| AST | Ctrl+Alt+Esc, Ctrl+Alt+Del |
| Compaq | F10 |
| CompUSA | Del |
| Cybermax | Esc |
| Dell 400 | F3, F1 |
| Dell Dimension | F2, Del |
| Dell Inspiron | F2 |
| Dell Latitude | Fn+F1 |
| Dell Latitude | F2 |
| Dell Optiplex | Del, F2 |
| Dell Precision | F2 |
| eMachine | Del |
| Gateway | F1, F2 |
| HP | F1, F2 |
| IBM | F1 |
| IBM E-pro Laptop | F2 |
| IBM PS/2 | Ctrl+Alt+Ins then Ctrl+Alt+Del |
| IBM Thinkpad | from Windows: Programs >Thinkpad CFG |
| Intel Tangent | Del |
| Micron | F1, F2, or Del |
| Packard Bell | F1, F2, Del |
| Sony VAIO | F2, F3 |
| Tiger | Del |
| Toshiba | ESC, F1 |
After you went out to BIOS you need to find the option responsible for the boot order of devices. As a rule, these settings need to be looked for in a menu whose name contains the word BOOT, of course, there are other options, but as they say - “He who seeks will always find.”
To make your search easier, here are a few examples of what it looks like in real life:


Selecting the device to boot first is usually done using the arrow keys on the keyboard, but there are other ways to navigate through the menu BIOS, so if you can’t figure it out, you can look at the help, which is usually in BIOS in sight.
Select your CD/DVD drive as the first boot device and exit BIOS saving all changes. To do this, use the item " Save and Exit Setup"The computer will reboot and we have thus approached the next stage, for which everything was actually started.
If the disc is recorded correctly and in BIOS the settings are set, that's right, we will see this inscription in front of us "Press any key to boot from CD or DVD", which means Press any key to boot from CD or DVD.
It looks like this:

Press any key
If you don’t see such an inscription, then perhaps you did something written above incorrectly. In this case, check again BIOS, is the boot from disk setting saved, if in BIOS everything is installed correctly, then most likely your disk is not bootable and you will have to look for another installation disk or download another Windows XP image.
At this point I will make a small disclaimer. You may come across a Windows XP installation disk that contains, in addition to Windows itself, additional utilities; in this case, to start the installation, you will need to select the desired item from the menu of your disk. It is also worth noting that in some disks, most of the operations described below will take place automatically, without your participation. There is no need to worry about this; all these settings can be changed if desired after the installation of Windows is completed.
The installation of Windows XP will begin, wait until the initial download of files takes place

Since we are planning to install Windows, we press the button " Enter" on keyboard

Reading " Windows XP License Agreement". To scroll down, use the " key Page Down". To agree and continue the installation, click " F8"

Consider the option of installing on a clean hard drive.
Press the key " WITH"

Now you need to specify the size of the partition to be created in megabytes, for example, if you need a partition ~20 gigabytes, then you need to drive 20000

If the size of the first partition that you specified in the previous paragraph is less than the disk capacity, then you will be left with " Unallocated area", which can also be turned into a partition. Thus, the system will have two disks " WITH:" And " D:"

Set the size of the second disk; if you are not going to create a third partition, then specify the maximum possible size.

Now, after creating the partitions, you need to select the partition on which Windows will be installed, if you do not have any special preferences, I strongly recommend choosing the drive " WITH:"

Before starting the installation, the selected partition needs to be formatted, you just need to decide how. Select the item " Format partition in NTFS system", why exactly him, the answer to this question is a whole topic for a separate article.

Now the process will proceed without our participation; after the first reboot, you can set it to BIOS The first boot device is your hard drive ( HDD), how to do this is described above in paragraph


language and regional standards. Here again we will need our participation, make the necessary settings and click " Further"...

Here we will be asked to introduce ourselves

We enter the 25-digit product key, which can be found on the license sticker or in the documents, depending on which version of Windows you purchased. As I said above, a Windows XP installation may not have all the dialogs discussed here, it depends on your installation disk.

We indicate the computer name, this name is mainly needed for identification on the network. We either don’t specify the administrator password at all or remember it well.
In the process, you will format the local drive that contains the current version of Windows. Simply put, before installing a new system there, you will have to erase all old data from it. The contents of the remaining disks should remain unchanged. But it’s better to play it safe and first copy absolutely all data from your computer that you are afraid of losing to the cloud or to physical media.
If paid programs are installed on your computer, be sure to read their documentation for the rules for working with licenses when reinstalling Windows, otherwise you may lose them.
2. Create a boot disk or flash drive
If you want to install/reinstall a licensed version of Windows, make sure you have the appropriate activation key. Even if you are already using an activated system and just want to install the same version again, the old activation key may come in handy again.
- If you already have a bootable USB flash drive or disk with the version of Windows that you are going to install, you can proceed to step 3. Otherwise, you need to download a Windows image from the Internet and burn it to any of the listed media according to the instructions below.
- Decide on the version of Windows you will be installing and check that your computer meets its system requirements. This information can be found on the official Microsoft website or on the disk with your purchased Windows. Don't forget to also check that your computer supports the new version's bit depth: 32 or 64 bits. To be on the safe side, you can install a version with the same bit depth as your current version of Windows.
- To create a bootable USB flash drive with any Windows image found on the Internet, you can use the program (with UEFI support) and proceed to step 3.
And below I will tell you how to create a boot disk or flash drive with an official system image using Windows 10 as an example.
3. Boot the system from a disk or flash drive
Now that you have physical media with the desired Windows image, you need to go to the special BIOS software environment and select a disk or flash drive here as the boot source.

Perhaps instead of the classic BIOS you will see a more modern graphical interface. In addition, even in different older BIOS versions, the settings may differ. But in any case, the procedure will be approximately the same: go to the boot menu, select the desired media as the source and save the changes.
After this, the computer should boot from the selected disk or flash drive.
4. Run the installation wizard
 If you did everything correctly, the Windows Setup Wizard will appear on the screen. Further actions are no more complex than installing an ordinary office program. All you have to do is follow the system prompts and wait for the files to be unpacked. Unless you have to select a local disk to install the operating system and format it.
 Also, be prepared to enter your activation key during the process. But if you are reinstalling Windows 10 that has already been activated on your computer, then you can skip the step with the key.
Once the installation is complete, your computer should boot into normal operating mode.
5. Install drivers
Modern versions of Windows load drivers themselves. But if, after reinstalling the system, you notice that the video card, speakers, or anything else is not working correctly, you can use the driver autoload utility. For example, the free Driver Booster is suitable.
Having completed all of the above, you can get to work. The computer must be ready.
Sooner or later, every PC user encounters problems that can be solved by one single method - reinstalling the OS. Knowledge and ability to correctly install the Windows XP operating system will be useful when purchasing a new PC, especially when the computer is not supplied assembled, but piecemeal, without an operating system.
This method is especially popular in our country due to the lower cost of the final device. This article provides instructions for reinstalling the Windows XP operating system. To understand how to properly reinstall the Windows XP operating system, you need to remember that the installation process is divided into several simple steps. The user who knows how to reinstall Windows XP will be able to safely install any other version of the Windows operating system. All installation steps for these operating systems are almost the same.
Instructions for reinstalling Windows XP
- It is necessary to transfer all valuable information from the system partition to removable media or to a logical partition that is intended for storing data.
- You need to find a bootable CD or any other media that contains WindowsXP. You can make up legends about how to find such a medium. But how the system was obtained has nothing to do with the installation process. It is only necessary to note that installing WindowsXP from drives other than CDs is becoming more popular today. In any case, the installation process is the same for any media. Only the method of preparing the media differs. But this is a topic for another day. In this case, we consider that the corresponding media is already ready for use.
- The most difficult step for a novice user is setting up the BIOS to boot from disk. Calling up BIOS settings in most modern motherboards is done by pressing the Del or F2 keys when the PC starts. There are also other options. They can be described in the instructions for the motherboard. When the BIOS settings screen appears, you must select AdvancedSetup by pressing the arrow keys. Then you need to go to this item by pressing the Enter key. After this, you need to find the item called Bootdevices and set the boot priority in it. It is necessary that the first place here be a CD-ROM or other medium from which the operating system is supposed to be installed. Detailed information on how to correctly set installation priority and what settings to choose can be found in the instructions for the motherboard. Once the boot priority is selected, you must save the BIOS settings and exit the setup program. Most often, the F key is used for this purpose. After this, you need to restart the PC. If the CD is inserted into the drive, the operating system installation program will begin loading.
- After the files necessary for installation have been copied, the user will be given the opportunity to choose an installation scenario: installation over an existing OS with saving settings, programs and files, restoring the operating system and “clean installation”. The last option is the most preferable, although it involves the loss of all user data stored on the system partition. The problem is that in case of a clean installation, the data stored on the system partition will be completely deleted. However, this also removes all errors that arose during the work process, and also guarantees the removal of viruses that have settled in the system partition.
- After the installation script is selected, a window will appear allowing you to select the hard drive partition for installation. If you choose a clean installation, the system partition must be formatted.
- After selecting and formatting the partition, the process of copying operating system files from the removable media to the computer’s hard drive will begin. This is the installation process itself. Usually it lasts no more than an hour. This process does not require user intervention and is accompanied by a reboot of the PC. Upon completion of the installation process, the system will ask the user to enter personal data, as well as select a language and enter information about geographic location and time zone.
- When the installation process is complete, the computer will restart again. The interface of a freshly installed operating system will appear before the user's eyes.
Windows is one of the most popular operating systems. Unfortunately, novice users may encounter many problems, including installing the OS and replacing it.
Before changing one Windows to another, you need to find out about the minimum system requirements that the operating system imposes, and only then proceed to choosing one or another Windows operating system. Today, users can install almost any Windows operating system they need.
The most popular today: Windows XP, Windows Vista, Windows 7 and Windows 8. Selecting an OS Until recently, personal computer users believed that the best option was Windows XP, and to some extent they were right. This is directly due to the fact that this particular operating system consumes much less system resources. Windows Vista is not very popular today, as it is considered to have not been improved and at the same time it consumes much more system resources. Windows 7 and Windows 8 are similar to each other. Of course, not in visual terms, but in its requirements for the computer. Both versions of Windows consume approximately 512 MB - 1 GB of RAM. As for compatibility (for the most part, this applies to games), Windows XP today supports a minimum number of applications, unlike Windows 7 and Windows 8. Before you begin installation, you need to understand which version of Windows is best to install - x86 or x64. The first option is best suited if you have less than 6 GB of RAM on your computer, and x64 is suitable just if there is more memory than 6 GB. Changing and installing the OS Before proceeding directly to the procedure for installing the operating system, you need to make sure that that there are no important files left on the hard drive of the personal computer. If they are, then it is better to transfer them to another medium. After this, the hard drive must be completely formatted (all data stored on the hard drive will be deleted). Then you need to change the Boot Device Priority in the BIOS settings, namely in the Boot field. After clicking, a new window will appear, where in the 1st Boot Device line, you need to select your drive for disks (for example, CDROM: PM-Optiarc D). This simple action allows the computer to load information not from the hard drive, as was previously the case, but from the DVD located in the drive. The next step is to install Windows directly. After these settings in the BIOS have been changed, you need to insert the installation disc and restart the computer. A window will appear in front of the user informing about the installation of the operating system, and here he will simply have to follow the instructions that appear.