Windows 8.1 system recovery file. Windows System Restore. Using a backup
This article discusses steps that can be used to restore Windows 8.1 without deleting user data.
If computer malfunctions cannot be resolved using conventional methods, there is only one radical solution left - reinstalling the operating system. Many users are frightened by the prospect of reinstalling the system.
In Windows 8.1, the problem of reinstalling the operating system is almost solved. Of course, the operating system will not do everything for you, but many users who previously called specialists or experienced friends to reinstall the operating system will now be able to do it themselves. The fact is that in Windows 8, Windows 8.1 appeared new feature reset, which allows you to quickly, in just a few mouse clicks, restore the operating system or return it to its original state.
In the event of serious system failures that cannot be resolved using conventional methods, you can restore the operating system while preserving your personal files, accounts and contacts. To do this, you need to reset the operating system. We will need installation disk Windows 8.1 or bootable USB flash drive with Windows 8.1
Press the key combination + I in the panel that opens Options click Change computer settings

A window will open Computer settings, select Update and recovery

In the window Update and recovery press Recovery


We wait a little

If your computer does not have an active partition for Windows recovery 8.1, the system will issue a warning. You will need an installation Windows disk 8.1 or bootable USB flash drive with Windows 8.1

Insert the Windows 8.1 installation disc or bootable USB flash drive with Windows 8.1. An update wizard window will open, which lists the consequences of the update, namely:
● Your files and personalization settings will not change.
● Your computer settings will be restored to their default values.
● Windows Store apps will be retained.
● Applications you installed from drives or websites will be removed.
● List remote applications will be saved to your desktop.
If you accept the terms listed above, click the button Next


The computer will restart, after which the system recovery process will begin.
System recovery may take some time. The recovery time can range from several minutes to several tens of minutes (depending on the speed of the computer).
The recovery is completely automatic. Your presence at the computer is not required. Once the recovery process is complete and rebooted, your computer is ready to use. All you have to do is install programs that were removed as a result of system recovery. All your accounts and passwords will remain intact, so use your old password to log in.
Recovery Windows systems 8 may be required when critical errors in PC operation. So that the user does not have to completely reinstall the OS, special tools are provided that allow you to restore your computer even without deleting files or changing general parameters systems. In this article you will learn how to start restoring a computer or laptop on Win 8 in different ways.
Below are two options for the development of events: from the working operating system and with a faulty one. In the first case, you can perform recovery from the Windows 8 interface without a disk or flash drive, and in the second you will need bootable media for copying system files. All methods are presented below:
- rollback from a restore point;
- using Refresh your PC;
- reset to factory settings on laptop;
- recovery using boot disk or flash drives.
Let's consider each of the methods in detail. All instructions are fully working and suitable for any build of Windows 8 32/64 Bit.
System restore point
This method allows you to roll back the OS to a certain state. You must do the following:
- Open File Explorer using the icon on the taskbar.
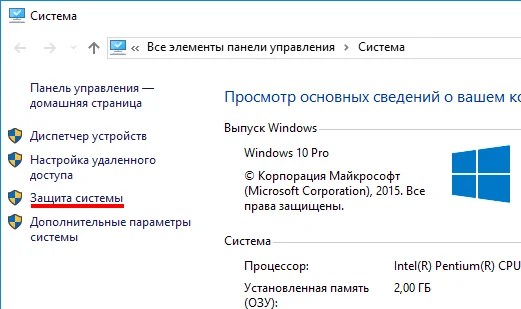
- In the left directory, find the “This PC” item and right-click on it to select “Properties” from the menu.
- In the window that opens, click on the “System Protection” button.
- In the selected tab, click on the “Restore” button.
- On the first screen, click on “Next”.
- From the list, select a checkpoint according to the date when the computer was stable and working. Click "Next".
- To start the procedure, click the “Finish” button.
Now you know how to use a checkpoint to rollback the OS state.
Creating a checkpoint
If you don't have it configured automatic creation checkpoints, you can do this manually. This option will be useful if problems arise with the OS in the future:
- Open the Properties window again and click on System Protection.
- Next, click on the “Create” button marked in the screenshot.
- Enter a name and click "Create".
- Wait until the procedure is completed. After it, the current OS configuration will be saved as a checkpoint. You can easily restore this state in case of Windows 8 malfunction using the instructions described above.
Rollback via Options
Windows 8 debuted the Refresh Your PC tool. With its help, the user can roll back the OS state to the required state. You can save applications and settings, return your PC to factory settings, completely reinstall the system, or launch a safe environment and perform necessary actions through her.
First you need to open “Computer Settings”:
- Right-click on the Start icon and select Find.
- In the search bar, enter the query “PC settings” and open the corresponding application.
- In the list of sections, select "Update and Recovery".
- Go to the “Recovery” subsection. Here are the tools to help you get back initial state OS or start safe mode.
The first option (1) allows you to restore factory defaults. Windows settings 8 without losing personal files, music, photos, etc. Using the second item (2), you can call up a menu to completely reinstall the OS and return it to the factory preset settings. Moreover, all personal files and installed applications will be deleted. By clicking on the button in the third paragraph (3), you can call up the safe environment and continue settings through it. The first two options allow you to roll back the system from the Windows 8 interface.
It’s worth taking a closer look at the safe environment, since advanced functionality awaits you there.
Click on the “Restart now” button and wait - on the screen you will see a menu launching with a choice of action. Click on "Diagnostics".
As you can see, here you can perform all the same operations as in Windows interface 8. However, the diagnostic menu can be useful if the OS does not boot. Click on the button Additional options" to go to advanced functionality. With it you can:
- roll back the OS to a checkpoint;
- use wim image for recovery;
- roll back the system via the command line.
Let's consider all the possibilities in more detail. We dealt with the first point above - the procedure is no different from doing it in running Windows 8.
By clicking on “Restore system image”, you launch a program to automatically unpack a pre-created wim archive. It should contain the entire OS with personal settings and programs. You can connect a disk or flash drive to your computer to unpack a third-party wim image. This way you will get a complete system.
"Command Prompt" allows you to start the rollback procedure using simple commands. Click on the appropriate button to launch the application. Now enter the command “rstrui.exe” and press Enter to run. After this, you will have access to the PC recovery menu via checkpoint.
You can launch this menu through bootable media if the installed OS does not work correctly and does not start. Let's consider this situation.
Performing the procedure using a flash drive
Performing the procedure this way will require some preparation. First, you need to create bootable media. To do this, you need to visit the official Microsoft website, where the Windows 8 web installer is located and download it to another computer. The bootloader will download the OS files and create a boot drive automatically.
Secondly, you need to make settings through the BIOS. To do this, when starting the PC, press the button responsible for entering the BIOS menu (it is indicated on home screen turning on the computer). Go to the "Boot" menu and install bootable USB flash drive first place in boot priority. To save the settings, press F10 and restart your PC again.
Now when you turn it on you will see the installer menu. Here you will find the option to uninstall, reinstall the system, format hard drive. The creators also included the recovery function in a separate menu:
- Select the desired item and start the procedure.
Rollback on a laptop with a pre-installed operating system
Laptop manufacturers that sell devices with pre-installed software provide the ability to rollback using proprietary utilities and tools. Part of the hard drive space is allocated for recovery, so you can start the process of returning your PC to its original settings in a couple of steps.
This applies to Asus laptops, Lenovo, Acer, HP and many others. Let's look at the procedure using Acer as an example Iconia tab w5100. By default, this company uses the keyboard shortcut Alt +F10, which must be pressed at the initial loading screen with Acer logo.
You will see the "Acer eRecovery Management" menu. Select the marked item.
After this, wait until the procedure is completed. During the process, the laptop may reboot several times. The only way to cancel the recovery process is to restart the PC. After the rollback is complete, you will receive the device with factory settings.
The names of the utilities and how to access them differ depending on the laptop manufacturer, but according to this example you can easily restore Windows 8 on any device.
Conclusion
Using the methods described, you can return Windows 8 to its working or original state in almost any situation. Use checkpoints to restore your computer to its previous state. The Refresh Your PC functionality is useful when restoring your PC to factory settings. Safe environment useful if Windows 8 does not start - necessary tools can be opened via a bootable USB flash drive.
Video
Below you can watch a training video that clearly shows all the steps from this article. Together with the video instructions, you will be able to figure out the difficulties and restore your computer without outside help.
Due to viruses, driver inconsistencies, or software, the OS may malfunction. If your Windows crashes, don’t rush to panic. The situation can be corrected by returning the state of files and programs to the moment when the PC was working properly.
While running OS Windows 7, 10 or 8, certain errors and problems may occur. As a result of such failures new launch operating system in operating mode becomes impossible. In this case, it is not at all necessary to do a time-consuming reinstallation of the OS. All you need to do is perform a system restore.
Recovering the OS using the recovery environment
When working we use the following scheme of actions:
- Restart the computer, press the F8 key while loading;
- Troubleshooting;
- System restore, selecting an OS restore point;
- Click "Next" and again "Next";
- Press the button "Ready", we reboot the system (in the Menu, select boot with the last successful configuration).
There are several methods you can use to get your OS running again. Some of them rely on rolling back to saved settings. Others simply clear the data.
You can “reanimate” the OS in one of the following ways:
- by selecting restore points;
- using the command line;
- through safe mode;
- using a recovery environment;
- using an image/boot disk.
Restoring the operating system using system “resuscitation” checkpoints is one of the most affordable, effective and popular options. To apply it, you need to make a series of clicks:
- Panel "Start";
- "System Restore";
- "Next";
- "Select a restore point";
- "Ready".
With such an operation, problems with the computer will be corrected, changes will be canceled and the system will be returned to the operating state that allowed the PC to boot normally. There is no loss of data, files and documents with this type of recovery. All data is saved. The operation is reversible. You can roll back the system to a previous computer state and use a different restore point.
Many people wonder how to make a recovery point on their own (manually) in order to choose it in the future? To do this in the same menu "Start" - "System Restore" You can create such a point yourself at any time convenient and suitable for you. It will be saved indicating the current date, which you just have to remember.
From restore point
In computer engineering there is such a thing as a recovery point. These are saved PC settings. As a rule, saving occurs automatically with each successful OS boot. Most easy way Windows 7 renewal is to use exactly this data.
Press F8 when your computer boots. This command will bring up a menu of system startup options. Next, you need to select the Last Known Good Configuration option.
Another method can be used. Go to the properties of the My Computer folder. Find the System Protection line, clicking on it will open the dialog box of the same name. Click Recovery – Next. We set a target date, indicate the disks that need to be fixed, and confirm the actions. After rebooting, the PC should work normally.
No restore points
You can fix problems with the OS even without restore points. To do this you will need to resort to the LiveCD program. You need to download it and burn it to a flash drive with the .iso extension.
Further all actions will take place in the BIOS. You need to configure booting from a flash drive. For this purpose in Boot section select USB-HDD in the First boot device line.
Before proceeding directly with the recovery, copy everything necessary files on removable disk. The LiveCD program provides a special menu for these purposes.
We'll fix it system error using an archived copy. Connect the USB flash drive, open the Windows\System32\config\ folder. Files with the names default, sam, security, software, system must be moved to any other folder. In their place, transfer similar files from the RegBack folder and restart the computer.

The described method will only help if the problem is related to the registry.
Command line
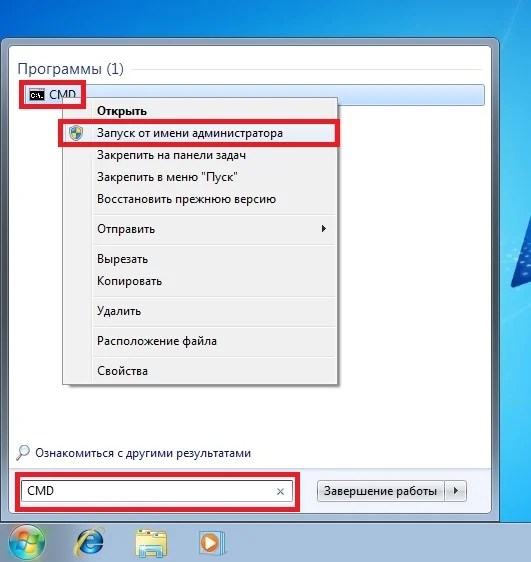
You can resort to “reanimating” Windows 7 from the command line if the PC begins to freeze or works slowly, however, the system still boots. Enter the menu "Start" and using the right mouse button, launch the command prompt as administrator. Run the rstrui.exe command, which will open the system restore program. Click "Next". In the next window, select the desired rollback point and click again "Next". Once the process is complete, the PC should work normally.
There is another way to access the utility. Let's go to "Start". To open the command line, click "Run" and register CMD command. We click on the found CMD.exe file and wait for it to launch. Next we enter in command line rstrui.exe and confirm the action with the Enter key on the keyboard.
It is not always possible to play it safe and create OS restore points in advance. Problems may arise that block the option of such “reanimation” of the PC. Then you can use another, no less effective and easy option - restoring the Windows system using the system itself.
We rely on the diagram:
- Icon "My computer"- right mouse button "Properties";
- "System protection";
- In the new window click "System protection", recovery button;
- "Next";
- Select a restore point according to the date;
- Specify the system disks to be restored;
- We confirm the operations and reboot the system.
Restoring Windows 7 using Safe Mode
This method is preferred if the usual system boot is not possible. Then after pressing the PC power button on system unit hold down the F8 key to call "Start Menu". One of the "Menu" options is « Safe Mode» . Select it and press Enter on the keyboard. As soon as Windows boots, we carry out the algorithm of actions that we described earlier.
System recovery Windows 8/8.1
If you managed to start the OS, you can resume Windows 8 via "Options". Hover over right top corner and enter them. Click on "Change computer settings" – . Chapter "Recovery" will offer several options:
- "Regular recovery with information preservation".
- “Deleting data and reinstalling the OS”.
- "Special option".
Decide what exactly needs to be done. Next, follow the menu prompts.
If you choose last method, in the window that opens, click on the diagnostics item. You will be offered the following options:
- "Restore";
- "Return to original state";
- "Advanced options". This item includes the ability to roll back to the desired resume point.

To resume Windows 8.1, press Win+R and call sysdm.cpl. In the system properties window in the tab "Protection" indicate the required system disk. Click "Restore". Clicking "Next", you will be able to see a list of rollback points. Select the one you want and click "Search for affected programs". Changes that have been made to the PC since the selected moment will be deleted. Complete the process by clicking "Ready".
If you work with Windows 8, problems may occur, the Internet may not work correctly, etc. To fix this, you can use the classic recovery method through restore points.
Another option is a system rollback. To do this, open the menu "Start" - "Control Panel" - "Center Windows updates» . Select an item "Removing updates". The same can be done using the command line.
So, in the list of updates that opens, we delete those from the moment of installation of which (we look by date) problems and malfunctions began. Delete unnecessary files and do a reboot.
You can perform a factory reset on Windows 8.1. Important files will not be affected during such an operation. The method is effective, but to implement it, the OS needs to boot without problems. We use the algorithm:
- Right side of the monitor - "Options";
- "Changing settings";
- "Update and Recovery" - "Recovery";
- "Recovery without deleting files".
If you log in in the usual way You can’t, you need to use the disk with the system. Load the installation disk, select "System Restore". Press the button "Diagnostics", And "Restore".
If you are having problems with Windows 10, press Windows + Pause. Go to "System protection" and press "Restore" – "Next". Select the desired indicator and click again "Next". When finished, click "Ready". The computer will automatically restart and the changes will take effect.
One of the advantages of the “ten” is the ability to return the settings to factory settings. This helps avoid having to install the system all over again. To reset your data go to "Computer Settings" – "Update and Security" – "Recovery" – "Return the computer to its original state". Click "Begin".
You can take care of the possibility of a rollback in case of failure in advance. You can create resume points yourself or configure their automatic creation at the desired frequency. To do this, in the settings, in the Update and security item, select Backup service. Specify where to save copies, click Add disk. After selecting the device, the function will be activated.
You can restore your Windows 10 system again by using restore points. In this case, the system will be rolled back to the moment when it loaded smoothly and worked without failures. This method recovery is described at the beginning of the article.
If the OS does not boot, a warning table with a key appears on the screen "Additional recovery options". Click it and select "Diagnostics" - "System Restore". We select a Windows restore point, wait for the system to roll back and reboot.
If such operations do not help and the computer continues to work incorrectly, you can roll back to the basic settings. Some programs and utilities, personal PC settings will be reset, and personal data will be deleted.
This technique is used extremely rarely if the other options described above do not help. The algorithm of actions is as follows:
- "Start" - "Selecting parameters"- tab "Updates and Security";
- Paragraph "Recovery"- button "Begin";
- We choose to delete all files or keep some of them.
Recovering the system after this will take 40-90 minutes.
Resuming using the installation disc
One of the radical methods of fixing the error involves using an installation disk. After launching it in BIOS, click System Restore. In the Troubleshooting section, specify the desired action. Next, follow the system prompts to complete the process.
Hello dear admin, thank you for a really very useful, exclusive project, of which there are not many in RuNet. I spent 5 days studying the materials on your site, learned a lot of interesting things, but unfortunately, after this period of time, I was unable to fix my recently encountered problem on my laptop, so I would like to turn to you for help in the hope of figuring out my problem and finally then solve it. I apologize in advance that there will be a lot of “letters”).
I bought a laptop 2 years ago Acer Aspire v5-122p with pre-installed Windows 8 64-bit OS (I don’t remember the edition). Then after some time it was automatically updated to 8.1. Over the past 2 months there have been frequent freezes in the system, and I kept putting off restoring Windows systems. A week ago, the system once again froze severely and I had to urgently turn off the laptop by holding down the power button. After this, the following problem arose and is not resolved. After turning on the laptop, the acer logo appears and the loading icon spins for about 40 seconds and the message “There is a problem with your computer, you need to restart it” is displayed on a blue background. After this message, the computer reboots itself and “Preparing automatic recovery” starts, the loading icon spins for 30 seconds and then everything disappears, there is nothing, just a black background without any messages, but the laptop seems to continue to work, but does not respond to any What actions, other than an emergency shutdown of the laptop. And so all the time.
I didn’t bother to make a boot disk or flash drive from under the system in advance, when the system was still working normally. After studying the materials on your site, I tried the following. I downloaded images with Windows 8 and Windows 8.1 in English through mediacreationtool, in it I also made bootable flash drives separately with Windows 8 and Windows 8.1 in English, I also tried to make bootable flash drives through the WinSetupFromUSB_1-4_x64 and rufus programs with these images. I made it based on your materials, initially I tried using these programs to make a bootable USB flash drive for BIOS UEFI formatted in FAT32 with a GPT scheme, but I didn’t change anything in the BIOS, UEFI was enabled with secure boot, set the loading priority to the first USB HDD, and also specifically by pressing the f12 button I could select a bootable flash drive connected to the laptop, as a result, after these manipulations, the acer logo and the boot icon still appeared for a short time, and after that the black background glowed again without anything. I also tried disabling D2D RECOVERY, even then in the BIOS I wrote the path in the select an uefi file as trusted for executing in usb1 path to the BOOTX64.efi file, which is on the flash drive, but the result is the same.
Next, I decided to go differently. According to the article "How to disable Secure Boot on Acer laptop Aspire" I disabled secure boot to disabled by setting a password, then in boot mode I switched UEFI to Legacy. I set boot priorities from usb hdd in the BIOS, then using the WinSetupFromUSB_1-4_x64 and rufus programs I formatted it in NTFS with MBR and made bootable flash drives. When I connected this flash drive to the laptop in usb 2.0 and by pressing F12 I selected my bootable USB flash drive, the laptop rebooted, after a while the Windows 8 logo appeared with a blue background with a download icon, but it didn’t get to the points of installing Windows and restoring the system, again the black background covered the boot.
This black background that appears is the whole problem; for some reason I can’t fully launch bootable flash drives with Windows.
But two other facts are noteworthy: when I write all sorts of programs like eset.nod32, Victoria and some others onto a bootable flash drive Live programs CD, then everything is fine, they load from a flash drive and there is no black background, there are not even any freezes.
These days it got to the point that I even had to initially disassemble my laptop because of this problem, removed the RAM, hard drive. I disconnected the wires, the disk drive, cleaned the video card from dust, carefully applied new thermal paste, but unfortunately this did not have any effect on solving this problem. And I wondered if it was a hardware problem or a software one.
In the end, I decided to start a laptop without a hard drive with a bootable USB flash drive not from UEFI, it turned out interesting fact, the Windows 8 logo with a blue background, the download icon, and finally the options to install Windows and restore the system appeared, i.e. there were no black screens, at that moment I decided to put the hard drive back in, there was no black screen, but when I tried to recover or install the system there were such errors, the drive is locked, unlock it and reboot, also the blue background "Your PC needs to be repeired" file:boot/BCD.......
As a result, I spent 1 day experimenting with the Victoria program from under DOS, SMART seemed to give a status to the disk “GOOD”, I found 8 defective bad blocks during the test, ADVANCED REMAP seemed to first correct them, then when I went through again about 6 I found it at the same addresses, but the SMART status for the disk like “GOOD” remained.
Therefore, now I am puzzled and cannot understand whether the black screen is a trick of the hard drive due to some hardware problem or a software problem, but then what is this paradox with the black screen and how can I get rid of it?
Those. At the moment I can’t achieve anything so that I can fully launch a bootable USB flash drive with Windows without a black background with the connected hard drive, and as I said earlier, many other programs eset.nod.32, Victoria from LIVE CD with a connected hard drive run normally without a black background.
Thank you in advance for your answer.
In just a few clicks, you will return the systems to their original state, getting rid of the problems that arose after installing faulty drivers or buggy software.
Recover Windows without losing data
Soft Windows reset 8 is called " Recovery"(Refresh). To do this, first press the " Win+C» open « Miracle panel", and then call the menu " Options | Change computer settings" In the first version of Windows 8, the recovery function is located in the " General».
Here you will have to scroll far down the list. Windows 8.1 has better menu organization. In this system, click on " Update and recovery" and then to " Recovery" Function " Refresh» in Russian Windows versions 8 and 8.1 was called " Updating your PC without deleting files" Click the mouse on the button " Next» will start the Wizard's work.
Recovery from storage media
In the next step, your computer will start in the so-called recovery environment ( Windows Recovery Environment - RE). If this console is not configured on your PC, Windows will ask for an installation disc.

Insert a DVD or USB drive from installation files Windows. Windows RE will then analyze your hard drive, save your data, settings, and applications, reinstall Windows, and finally copy everything back to it. After the reboot, you will receive a “fresh” Windows with all the data saved during the update.
Hard Reset Windows
A real reset in Windows 8 is launched in a similar way. Open the Miracle Bar again and "Options | Change computer settings" On Windows 8, go to " General", and in Windows 8.1 select " Update and recovery | Recovery" Function " Reset"here called " Delete all data and reinstalling Windows " Clicking on " Next" launches the Windows RE recovery environment, so keep the installation or recovery disk handy.

With such a reset, however, no data will be saved: Windows environment RE will erase and format all partitions and reinstall the system. Some manufacturers, such as Sony, have integrated a recovery function into their laptop menus that uses a hidden Recovery section. On some models there is a separate button for this.
Recovery Image Configuration
The "Refresh" function does not affect only "tiled" applications installed classical programs disappear. On the Desktop, you will be prompted to view a list of uninstalled applications, which can be used as a starting point for later installation of programs.
Professionals can take advantage of the customizable recovery feature. First, configure the computer to your liking, select the necessary parameters and programs, and then press the " Win + X"call the menu in the lower left corner of the screen and run " Windows PowerShell(Administrator)».

Confirm the User Account Control prompt and enter " mkdir C:\RefreshImage" After this, the command “ recimg –CreateImage C:\RefreshImage» create a new image that will be used for recovery.
Photo: manufacturing company


