1 earphone does not work, what should I do? One earphone does not work - diagnostics and repair. In general it is done like this
With modern headphones - both in-ear and on-ear, and vacuum models - it is rarely possible to predict their service life. Manufacturers may provide guarantees, but at any time it may happen that one of the headphones does not work; How to fix it depends on the nature of the breakdown.
Most common causes of problems
If we take into account the different types of ear designs, the most common types of problems with them are as follows:
- Broken wire. The cable leading to one of the speakers can be accidentally interrupted, torn or frayed. This is especially likely if you frequently bend the cord.
- Broken speaker membrane. More often found in over-ear models, where the speakers are larger and less protected by the housing.
- Plug failure. This happens if you bend it carelessly when pulling it out of your player or phone.
- Software problems with a sound source (incorrect installed driver, incorrect output setting)
Each of these cases is worth considering separately.
Sound source
Before you think about how to fix your headphones if one doesn't work, you should test them on a different sound source. Connect them to another player, smartphone or amplifier. If everything is correct on another device, then look for the problem in your player. The most common problems encountered are:
- Shifted balance. Sometimes, confusing the balance knob with the volume, the user turns it to one side. Then, of course, the sound in one of the channels will be zero.
- Poorly inserted plug. This happens especially often with stationary devices. Check connections.
- There is a break inside the amplifier or DAC. Then it is not the headphones that need to be repaired, but the sound source.
Broken wire
It is not always possible to immediately determine whether the cable on the left or right is damaged. The gap may be hidden under insulation that is apparently intact. The best way determine the break - try to feel the cable along its entire length, from the speaker input to the input plug. In this case, the music must be turned on.

When a problem area is detected, the following effects may occur:
- A sound appears that was previously missing
- The sound that was previously produced normally disappears
- Crackling sounds and other side effects
What to do if one earphone does not work due to a break is clear: you need to solder the damaged cable again.
We present brief instructions:
- Prepare your tools. You will need a soldering iron with a tip as thin as possible, solder, flux, and a wooden or ceramic stand for work.
- Cut the cable on both sides a few millimeters before the break.
- Carefully strip the wires with a knife. The cable usually contains three wires; if the gap is located above the branching into the right and left channels, there may be two of them. Conscientious manufacturers supply them with insulation of different colors, which makes repairs easier in such cases.
- Tin the stripped ends of the wire with a soldering iron. To do this, place the cleaned end on the work surface, apply flux to it with a soldering iron, and after a few seconds make a gesture with the tip of the soldering iron, similar to the movement when removing varnish. As a result, the wire should receive a kind of hard “tip”, which improves conductivity.
- Place a piece of insulating tube (cambric) on each wire. Do the same with the cable as a whole.
- Solder wires whose insulation colors are the same.
- Protect the solder areas by moving the insulating tube over them. Fix the tube with a lighter, slightly melting it. For reliability, the resulting tourniquet can be bent in the shape of the letter Z and tied with thread, which will reduce the likelihood of repeated rupture.
- Do the same for the cable as a whole. For aesthetic reasons, you can choose an insulating tube of the appropriate color.
This method is suitable for any of the above types.
It happens that the wire breaks inside the housing of one of the headphones. To repair in this case, it is necessary to disassemble the body, which is quite simple with overhead models, but difficult with vacuum or liners. Sometimes the disassembly method is obvious. In other cases, you may need advice on forums, where there are likely to be other users of this or a similar model.
To disassemble you may need a scalpel or just a sharp knife. If the body is glued, then you will have to clamp it in a vice so that a crack appears at the place where the glue is glued. After the repair, the seam will have to be glued again.
Membrane damage
As a rule, this is a problem with large models that are often subjected to mechanical stress. Drops may cause the speaker membrane to become deformed or cracked. If you determine that the problem is not with the cable connection, then perhaps the problem area is the membrane.

Unfortunately, you can correct only slight deformations in the form of concavities on your own. As a rule, light pressure is enough for the membrane to regain its shape. But if it is cracked, the headphones need to be repaired by professionals (if they are expensive enough). Budget models There is no point in taking it to the service center - it’s easier and cheaper to buy new ones.
Plug failure
Another weak point of all audio systems is the plug. Careless movement and the plug may break in the connector of your player or smartphone. It happens that this is precisely why one earphone does not work; How to fix it - just replace the plug.

It is important to purchase the correct replacement model: for simple headphones it is a three-pin plug, for a headset it is a four-pin plug. Since the wiring may differ from one manufacturer to another, check on specialized forums which model of plug to buy for your headphones or headset and how to connect the wires. Although the latter can be seen in the damaged plug itself.
In general, this is done like this:
- Cut off the defective plug at a distance of 5-7 mm from the connection.
- Strip the insulation from the cable approximately 1 cm in total
- Remove 3-4 mm of insulation from each cable core using a stationery or regular knife. One of the wires in each core must be coated with paint; clean it off to the same 3-4 mm.
- Twist those cables that are not covered with paint into one.
- Unscrew the plug and slide its housing onto the wire before starting soldering.
- Solder the twisted cable to the center pin of the plug.
- Solder the wires covered with paint to the contacts of the corresponding color.
- Once the solder has cooled, connect the headphones to the sound source to make sure that both channels are working and there is a stereo effect. It is better to use specialized test recordings or music with pronounced stereo for testing (for example, Nirvana – Rape Me, Pink Floyd – One of These Days)
- If everything works correctly, screw the plug housing onto the connector.
We hope these instructions have helped you understand what to do if one earbud isn't working.
Just replace the cable
If you prefer high quality sound and expensive players or smartphones with a dedicated DAC, then perhaps good decision You will get headphones with a replaceable wire. Today there are two main standards:
- MMCX connector. It has a round shape with a contact in the middle, resembling a miniature version of a plug TV antenna. Used by such manufacturers as Shure, iBasso, FiiO, Dunu, TinAudio and others.
- The connector is two-pin. It looks like two contact pins that are inserted into the headphone body. Used by QKZ and other manufacturers from the budget segment.
This solution has many advantages:
- Easy replacement. Instead of a long repair, you simply buy a new cable and connect your headphones to it.
- Affordable price. Basic models Replacement cables cost from 300 rubles in online stores.
- Large selection of cables. There are regular models, options with a built-in microphone, with a Bluetooth receiver, as well as audiophile ones made from premium materials. You can also choose a design to suit your taste.
The icing on the cake will be the ability to order the conversion of any headphones to the MMCX standard, so that the cable becomes replaceable. However, this option is not the cheapest and only makes sense for premium headphones.
Today they have become an essential accessory for almost every person. They are presented in an unusually wide and varied variety on the market, and choosing the optimal headset is not the least difficult.
Despite the reliability of the product, it is susceptible to various kinds breakdowns and malfunctions. Moreover, often the problem lies in the failure of not two, but just one element. Let's look at how to fix one earphone and talk about the problems that occur most often in their operation.
One big earphone doesn't work
When using large headphones, the problem of failure of any element occurs quite often. In this case, there is predominantly a hardware failure. We are talking about bending the wire and losing full contact. It is very easy to identify the location of the fault. Just connect the headset to the sound source and feel the wire while listening to the song. The appearance of wheezing and crackling will accurately indicate the location of the wire break. Fixing such a problem is not the least effort. You need to cut out the problem area, strip the ends of the wire and solder them. It is better to cover the junction with electrical tape.
But what to do if one earphone does not work, but the wire is in perfect order? In this case, the cause of the malfunction is a damaged or deformed membrane. Getting there won't be an effort. You just need to unscrew a couple of screws and look inside the device. Quite often, the membrane can be covered with debris or slightly bent. It needs to be straightened, all excess removed and the base wiped with alcohol. You should be extremely careful. The surface is extremely sensitive, and even light pressure can damage it.

One vacuum earphone does not work
In a situation with vacuum micro-earphones, the reason for playing sound in only one of them may be caused by clogging of the second element with earwax. This problem is quite common, but its solution can be dealt with without excessive effort. To do this you will need:
- Remove the dirty filter from inside;
- Clean the speaker itself and the space around it from existing contamination;
- Place the new felt filter in place;
- Check the functionality of the headset.
If one earphone stops working, and there is no hint of dust or dirt inside it, then you can check it using the methods described above.
When using wireless modules, pay attention to the location of the battery. In this case, polarity must be observed, and you can study the markings on the inside of the device.
The correct placement of the headset is also important. For a clear and strong signal, the cable should be placed around the neck. The capsules must be installed in the ear at the correct angle to achieve the maximum volume level of the songs being played.

One earphone on the computer does not work
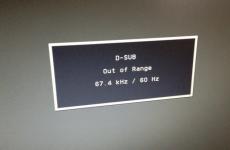
Quite often, one headphone does not work when connected to a PC via the front panel connector. There may be several reasons for the problem. The connection of this input may well not be carried out on program level. To do this, just activate the desired input in the sound settings and the headset will immediately start working.
You can also replace the sound reproducing device. This option is located in the settings section called “Sound”. It is also possible that the connector is not connected to motherboard. To connect, you need to open the cover of the SB and install the plug into the desired socket.
If all the steps have been carried out, but any of the modules do not play, then it’s all about the drivers. They should be reinstalled. This can be done in the Device Manager by selecting an inactive item and specifying the “Update Drivers” command.
You should also check the sound level in the system. Perhaps it's just exposed minimum value. In this case, setting it up via the control panel or system tray will completely solve the problem.

One earphone on the phone does not work
Quite often, one earphone plays quieter than the other when connected to a phone. What is the reason? Most likely it's the accessory itself. It's very easy to check. You just need to connect it to any other sound source. If the problem persists, then the problem is with the headset. You can try to clean it or check the condition of the membrane with the wire. You can also examine the condition of the battery and its correct placement. To do this, you should use the tips and recommendations outlined above.
But if one of the headphones breaks, and they themselves are under warranty, then it is better to take them to a specialized workshop. Full testing will be carried out there, which will allow us to determine the breakdown and choose the optimal way to fix it. If you intervene independently, the opportunity for free service will be lost, and no one will be able to guarantee successful repairs with your own hands.
Music lovers often face the problem of one earphone failing. Mechanical damage are more often characteristic of Chinese products. Branded headphones may simply fail due to driver mismatch. In any case, you should not immediately throw away the headset. Now we will look at how to fix headphones if one does not work, and methods for identifying the cause of the breakdown.
Determining the cause of the breakdown
Headphones are a rather fragile headset. If one speaker fails, you shouldn’t immediately start disassembling it. To repair a product, you need to identify the cause of the breakdown.
If the headset does not fall into water, fire or a strong blow, look for the problem in three places:
- Driver mismatch on laptop, computer and other electronic device. For this reason, one or two speakers may not work, and the sound may be distorted.
- Broken wire. This happens in places where there are frequent bends or from a sharp jerk. In cheap Chinese models, low-quality wires “fall out” for no good reason.
- A crack has appeared on the speaker membrane. This reason is considered first if the headphones are dropped on the floor or hit with a hard object.
When the cause of the breakdown is identified, we begin to eliminate it.
Recommendations: If water gets on the headphones or inside the mobile phone connector  How to fix headphones yourself if one stops working
  , DIY headphone repair
Working with drivers

Every electronic device has sound driver. If software If the device is outdated, lost, or damaged by user intervention, no sound is received through the earphone. An easy way to identify driver problems is to have another working device on hand. We connected work headphones to the laptop, but there was no sound. This means you need to reinstall the sound driver:
In the case of a computer or laptop, first check the native sound driver installed system Windows - Realtek. There are many sliders in the program settings, moving which you can change the volume, sound inputs and outputs, and channels. There are situations where, for unknown reasons, one of the sliders switches on its own. The result is one channel operation or no sound output at all. The problem is solved by moving the sliders until sound appears in the headphones.
The second problem is related to the incorrect operation of the native headphone drivers. Over time, the software becomes outdated and requires updating. The driver may simply fail. To solve the problem, go to the website of the headset manufacturer. Select the model driver from the list and then download installation file BY. The uninitiated need to know that there is only one sound driver, and it is responsible for the operation of both headphones, and not each speaker separately. The downloaded driver is installed on the system as regular program. To activate, perform a reboot.
If restoring the drivers is not successful, it means the headphones have mechanical damage.
Broken wire

A common cause of failure of one earphone is a broken wire. The copper core “crumbles” in places where there are frequent bends. This area needs to be found and repaired.
Finding the break point
A broken wire is looked for mechanically. The headset plug is connected to mobile phone, computer or MP3 player. Turn on the music file and begin to carefully knead the wire with your fingers from the plug to each earphone. When a crackling or sound appears in a non-working speaker, mark the area on the wire with a marker. There is a cliff at this place.
When diagnosing the wires, carefully probe the cable input plug, to the speakers and the branch on the jumper. This is where the wire most often bends and a break occurs.
Soldering wires: instructions with step-by-step photos
If the wire falls right next to the headphone or plug, then the problem area is simply cut off. To solder the cable, you will have to get to the speaker. The earphone is disassembled and the cut piece with the fallen wire is unsoldered from its contacts. The end of a working cable is cleaned, the copper core is tinned with tin and flux, and then soldered to the speaker contacts. Similar actions are performed with the plug.
The method of disassembling the earphone depends on its design:
- The branded headset is connected with screws, often hidden under decorative covers. You just need to find them and unscrew them.
- A computer headset is usually assembled with latches.
- The body of the earbuds is glued together. The junction is cut with a knife. The body can be lightly pressed with pliers. Pressure will cause the glued area to burst.
It is better to buy a detachable plug. The old element can only be picked out from the rubber shell. After soldering the wires, the plug is glued into the rubber socket with epoxy resin.
If the damaged area is in the middle of the wire, cut the break with a knife and begin to restore the cable:

The first is to clean the top insulation - the braid. Release three wires 3–5 cm long to make soldering easier. Copper wire also has a coating of different colors. It is impossible to confuse them. All three wires must be soldered in matching colors, but first, 5 mm long insulation is removed from the ends. The stripped ends of the wires are heated with a soldering iron and tinned with tin and flux.

When all ends of the wires are ready for soldering, put heat-shrink tubing on the cable. Similar tubes of only smaller diameter are placed on each core. The wires are laid on a board for a solid stop and soldered with a soldering iron in accordance with the colors of the insulation.
A heat-shrink tube is placed over the soldering area of each wire, heated with a lighter, and then crimped with fingers. To prevent the connection from breaking, it is reinforced with a strong thread, tying all three wires together.

Now all that's left to do is to make it beautiful. A thick heat-shrinkable tube placed on the cable is pushed onto a bandage with a strong thread, heated with a lighter and crimped.
The wire has been repaired. You can connect headphones and enjoy music.
Membrane problem

No sound from the earphone may be caused by a damaged membrane. This element in the form of a thin plate stands on the speaker. There are two possible faults:
1. Membrane deformation. The element is carefully bent with your fingers, giving it its original shape.
2. The membrane has burst. There are no repair options. Buy new speaker or full headphones.
The membrane may produce poor sound if the earphone mesh is clogged with earwax. This problem is typical for closed-type headsets - earplugs. Dirt can be washed away with alcohol, but the earphone will have to be disassembled so that dirty liquid does not get on the speaker.
Many people know that sometimes even almost new headphones stop working normally. In one of them, interference may appear, the sound fades, and sometimes disappears altogether. In this situation, you should not immediately run to service center. Most problems with headphones can be solved yourself at home. Even those who are not at all versed in technology can handle the repair.
In order to quickly repair headphones, it is worth preparing tools and materials. If they are large and fastened with small screws, then you should choose a suitable screwdriver. You will also need a stationery knife and a lighter. You can connect the parts using electrical tape or epoxy glue, but it is better to use tubes that have a heat shrink function. Broken wires are most often connected with a soldering iron. On the other hand, you can do without it. The wires are stripped and then twisted together. From additional accessories You may need a multimeter. He easily determines the location of the cliff.
DIY headphone repair
Breakdowns often occur due to breaks inside the cord and low quality assemblies. To eliminate them you do not need any special skills or tools. You may need a screwdriver and a soldering iron. First you need to find out what the problem is and find the place where the breakdown occurred. Let's look at the most common options and ways to eliminate them.
A broken wire appears extraneous noise and interference. Over time, the sound in the first earphone disappears completely. In this situation, they look for the break point. Run your fingers along the entire cord after connecting the headphones and turning on the music. Pay special attention to the bend area and the area where the wire enters the earphone. In the right place you will hear characteristic sounds.
Next, you can act in different ways - in accordance with where the breakdown is located. If a wire break occurs inside the earphone, then it must be untwisted. Large ones usually use screws. Small earbuds can be opened using a regular sharp knife. They are usually glued on the sides.
In an open earphone, a wire break can also be determined by touch. Walk along the entire cord and listen to the sound. Once you have found the right location, you will need to cut the wire below it. Next, the cord is stripped down to the wire and soldered in the same way as it was originally. Many headphones are tied inside with a knot. If the wire is connected in this way, then after cutting it you need to tie it, and only then solder it. Check the sound in the headphone. If everything is in order, then put it back together. If this cannot be done, use epoxy glue.
The wire may also break inside the plug. This problem can also be heard in working headphones when probing with your fingers. In such a situation, you need to get to the inner wire and cut it in the right place. The plug is first cleared of rubber. Next, look for the junction of the wire and the connector. The non-working section is cut off and soldered. Instead of stripped rubber, an epoxy “shell” is made over the plug. Additionally, the plug can be wrapped with thread on top or a plastic sheath made from thick wire can be used.
One earphone doesn't work: how to fix it?

This situation is very common because the cord becomes kinked during use. As a result, the headphone wire breaks in these places. The problem also occurs near the base. There is only one way out in this situation - to find a break and cut off the non-working part.
Plug in the headphones and play music. Feel the cord with your fingers. Pay special attention to those places where obvious folds are visible. During the non-working period, wheezing or jamming sounds may appear in the headphones. Using a knife, cut the cord below the desired location. Strip the wire. Solder the sections. The coupling point can be reinforced with electrical tape to match the cord. Rubber bushings, which are sold in radio parts, look better. They are hollow tubes that are pulled over the cord.
One earphone does not work even if there are problems with the membrane plate. They are not used in all models. Most often, such membranes are placed in small acoustic headphones that are inserted into the ears. Sound problems arise if the channel is clogged or the surface is deformed. How to make headphones:
In the first case, it is necessary to open the case. Then carefully remove the plate. It is a small mesh. Take a cotton pad. Wet it with alcohol and carefully clean off any accumulated dirt. As a result, no particles should remain on the surface. Carefully reconnect the platinum. Close the earphone housing.
If the sound still does not pass through, then the problem is the deformation of the membrane. In this case, it must be disconnected and carefully straightened. Then the surface of the mesh is thoroughly wiped with a cotton pad and alcohol. The membrane is reconnected and the housing is closed.

- Sometimes it happens that the sound in the headphones becomes quieter due to a poor fit. There is an easy way to make your headphones louder and more comfortable. You will need some Sugru special silicone.
- First, let's take a small ball. From this amount of silicone we roll a sausage strip. Then we wrap it around the poorly functioning earphone. If the rim is too long, it should be cut with a stationery knife. Use your fingers to give the silicone the desired shape. We will do the same with the 2nd earphone. Leave the silicone for 1 hour to harden.
- Some tips:
- If there is a wire break below the beginning of the branching of the wires going to the headphones, then you should pay attention to the correctness of their twisting. Inside the cord you will notice that they are paired in pairs by color. After cutting, they are soldered according to the same principle.
- If you do not have a soldering iron, and the break occurred inside the cord, then connect the wires using simple spiral twisting. To do this, take both wires and pinch them with your fingers. Then secure their ends by rotating them together.
- More reliable twisting is linear. Place the 2 wires parallel to each other. Connect them so that the ends wrap around the opposite wire in a spiral from top to bottom.
- Sometimes it can be very difficult to determine the location of a broken wire. A multimeter will help solve the problem. To begin, use a utility knife to make an incision at the expected break point. Then carefully pull out the wires. Next, you need to remove the plastic that covers them. The easiest way to do this is with a lighter. When a little plastic comes off the wire, apply a multimeter to the supposed broken area. It will show whether the area is truly damaged. In this case, the multimeter must operate in resistance mode.
Music lovers have repeatedly encountered problems caused by malfunctions in the playback device; they stop working, the right earphone suddenly stops working, or the left one does not work. And iPhone headphones are no exception. Most users have taken their headphones to a service center more than once or gotten rid of a “broken” coil of wires. Over time, spending money on repairs and purchasing new headphones gets boring and the user puzzles himself with the question: “Is it possible to repair or fix a broken device yourself?” It’s possible, yes. There are many ways to “revive” a dead device without resorting to paid services technical services. This article will demonstrate this to you using useful instructions on the topic of how to fix headphones if one ear does not work, the bluetooth earphone is broken, wireless, large and droplets no longer work and music no longer plays on them, and for other problems with the device. Are you interested in the reasons why the second earphone breaks?
Headphone repair
Before you repair headphones without or with a soldering iron, you need to become familiar with the problem itself. What can you encounter when using such devices?
There are a number of problems that can most often be solved on your own:
- Frayed wire.
- One of the headphones is not working.
- Wheezing, static and other foreign sounds.
With soldering iron
The most common problem is abrasions at the bends. In this case, the wire will have to be cut, cleaned and soldered.
Important! Such an activity requires basic skills and knowledge of basic safety precautions.
For this method you will need:
- Soldering iron.
- Tin.
- Wire cutters or pliers.
- Multimeter (if you are going to test the device to detect damage).
- A spare plug or connector if the functionality of these components in your headphones is impaired.
- Glue and scissors. The glue must be flexible for the device plug, and also dry quickly.
- In some cases, heat shrink tubing will come in handy.

- First you will have to get rid of the insulation from the damaged area.
- Then you must test the wires for defects using a multimeter.
- Now you need to arm yourself with a soldering iron and tin to solder the defective area. Glue everything with special glue and return the insulation to its place.
- If you managed to avoid short circuit ( short circuits) and other things that radio amateurs encounter, you can safely use “brand new” headphones.
Important! Do not rush to grab the soldering iron if you do not find any damage. Perhaps the problem lies in the input of the playback device itself, and the headphones do not need repair.

Without soldering iron
How to fix headphones if the wire is broken, but the sound continues to work stably? Here we will need the heat shrink tube, which we mentioned in the previous paragraph.
To get your insulation in order, you will need:
- Using scissors, cut off the required amount of tube corresponding to the size of the defect to be covered.
- Place this piece on the part of the wire that is damaged.
- Hold a little over the flame from a lighter, blowtorch, gas or electric stove burner.
- From such actions the tube will settle, reliably protecting your headphones.
Important! Be careful when “burning” the heat pipe. Do not bring the elements too close to the fire. Doing so may result in fire.
Such methods will help repair a broken device and even extend its life. But it is worth paying attention to frequent cases of device breakdowns.

One earphone doesn't work. What to do?
If a problem occurs that your device only works “halfway,” we recommend that you immediately take out a multimeter and carry out testing by checking the wires with this device. The characteristic sound that the equipment makes will inform you that the circuit is not broken. If the work is accompanied by silence, we can conclude that the problem lies precisely in this place.
How to troubleshoot:
- Make two cuts near the plug and speaker.
- You will see a protective winding in front of you that must be carefully removed.
- This will help you verify the integrity of the wire. meter. If you use a multimeter as a measuring device, then you need to place the probes (black and red) at the cut points. A characteristic squeak will indicate that the wires are intact.
- If the device does not stop beeping, you need to make another cut, located between the first two. Repeat these steps until the measuring device finds the location of the breakdown.
- If “silence” cannot be found, the problem does not lie in the cable. And if a problem area has been discovered, pick up a soldering iron and remember the point “Repairing headphones with a soldering iron.”

Headphones with volume control and/or microphone
How to repair headphones at home if they are equipped with volume control and a microphone? These headphones are not much different from others, but you need to have an idea of how the microphone button or its control works.
The damage is of the same nature as in the previous examples. Sometimes the wire can simply stretch.
Important! Such a defect can be determined using your fingers, since you will feel the place where the wire decreases in thickness.
To solve this problem, you can follow the following instructions:
- Strip the wires by holding them over a flame.
- Tin the ends of a piece of wire and solder them.
- You can use a cambric for additional protection against external influence, simply placing it on the adhesion site.

Other problems:
- It happens that the microphone begins to transmit sound poorly. To get rid of this problem, disassemble the microphone and wipe its head with alcohol. Try to avoid getting any foreign particles into the structure.
- Some users experience damage to the device membrane. This problem is solved by mechanical action on the membrane. Just give it its original “position”. This method is correct, but will briefly return the device to its original operating state.
Video material
It is obvious that there are no particular difficulties in self-repair should not arise. Such manipulations with accessories will help not only return them to working condition, but will also significantly extend their service life.