How to change the brightness of a photo in paint. Editing photos using standard Microsoft tools - let's make the photo lighter in a couple of clicks. Changing screen brightness
Correction
Auto-leveling allows you to bring colors to the average value, that is, very light colors will become darker, dark colors will become lighter.
Invert colors allows you to put an additional color for each color instead of the color that is there. If you have the original drawing as shown below.
Then after completing this mode the next one will appear.

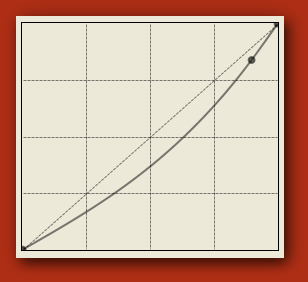
Curves allows you to lighten or darken a drawing according to a schedule. The following window will appear on the screen.

Shown here is a curve (a straight line in the figure) to which the color corresponds, that is, light will correspond to light, dark to dark. Now let's change the shape of the curve. To do this, move the cursor to the line and click on left button mouse and, without releasing the button, move the cursor to another place. Let's assume that the shape of the curve becomes as shown in the figure below.

Then the original drawing (shown in the previous mode) will become the following.

If you change the curve as shown in the figure below.
The drawing will be as follows.

Moreover, the curve may have an intricate appearance.

And the drawing too. The option for changing the brightness was discussed above, but you can change it according to the RGB scheme.

Moreover, according to this scheme, you can change the primary colors separately from each other.

In order to do this, check the Red box and remove the checkmarks in other colors. Then we move the red curve to the right place. Then we will do the same for green and separately for blue. We get different curves for different colors (and the figure shown below).

Note that the starting point can be moved from bottom to top (for this, when moving, the cursor must be slightly to the left of the graph border). Accordingly, the right point can be set lower.
Coarsening allows you to make the color more or less saturated. Uncheck the Sync option and change the position of the sliders.

As a result, the original drawing
Will be next.

Hue and Saturation allows you to change the hue, saturation, and lightness of a drawing.

Make Black and White removes colors, as shown in the image below.

Sepia allows you to add shades to a black and white image. If you apply this mode to the black and white drawing shown in the picture above, you will get the following picture.

Levels allows you to set color levels. When you enter this mode, a window with histograms will appear on the screen. You can change the level for all primary colors (check the boxes to the left of the color name, where R – red - red, G – green - green, B – blue). But you can set the level for separate color(leaving a tick only next to its name, and unchecking others).
Excel for Office 365 Word for Office 365 Outlook for Office 365 PowerPoint for Office 365 Excel 2019 Word 2019 Outlook 2019 PowerPoint 2019 Project Professional 2019 Excel 2016 Word 2016 Outlook 2016 PowerPoint 2016 Project Professional 2016 Excel 2013 Word 2013 Outlook 2013 PowerPoint 2013 Excel 2 010 Word 2010 Outlook 2010 PowerPoint 2010 Excel 2007 Word 2007 Outlook 2007 PowerPoint 2007 Project Online Desktop Client Project Professional 2013 Project Standard 2013 Project Standard 2016 Project Standard 2019 Less
Changing screen brightnessDo you want to adjust the brightness screen ?
Windows 10: Click the Start button, select Settings, and then select System > Display. In the Brightness and Color section, set the Change Brightness slider to adjust the brightness. More information see the article changing screen brightness
Windows 8: Click Windows keys+ C. Select Settings, and then Change PC settings. Select Computer and Devices > Show. Turn on automatic setup screen brightness. For more information, see: Adjusting Brightness and Contrast
Read the article for information about adjusting pictures in Office applications.
This video shows several ways to customize your design.
(Once you start playing the video, you can click the arrow resizing, in the lower right corner of the video frame to enlarge the video.)

Duration: 1:35
Adjusting brightness, sharpness and contrast
Note: even if you have made the necessary corrections. This feature is not available in Word and Excel.
Change the Office color scheme to improve contrastIs the color office diagram too bright for you? Is more contrast needed in Office applications? Check out the Change the Office Theme (Office 2016 and 2013) page.
You can change the brightness, contrast, and sharpness of a drawing using the correction tools.
Clockwise from left top corner: Original pattern, pattern with increased smoothness, increased contrast, and increased brightness.


Tip: If you use PowerPoint, you can still keep the original version of the picture even if you change the brightness of the picture. This feature is not available in Word and Excel.
The Adjustments menu in Paint.NET contains various commands for adjusting the color content of an image. There may be more commands in this menu depending on the number of connected external plugins for Paint.NET. The figure below shows a minimal view of the "Corrections" menu, as it looks just now installed editor Paint.NET.
To illustrate the effect of each command from the "Adjustments" menu item, we will use the image below. This is the original image. The description of most of the commands on this page will give an example - a drawing obtained from the original one by using one or another Paint.NET command from the "Correction" menu.
 Auto-leveling color levels in Paint.NET
 The "Auto Level Levels" menu item in the "Correction" menu of the Paint.NET graphic editor is designed to align the color of an image. Too dark or, conversely, too bright areas of the image will be displayed in the normal range. This command has no parameters. The result after applying level alignment to the original image can be seen in the image below. This command is equivalent to the "Levels" correction with the default parameters and the "Auto Level" button pressed.
 Adjusting the Brightness and Contrast of an Image in Paint.NET
 The menu item "Brightness and Contrast" is intended to make the colors in the picture darker or lighter, or to make them more contrasting. The dialog box for this function has two parameters: "brightness" and "contrast", respectively.
This is what the original image will look like if you make it brighter.

This is what the original image will look like if you make it more contrasty.

And this is what the original image will look like if you make it brighter and more contrasty at the same time.
 Size an image to fit the window in Paint.NET
 The "Fit to Window" command scales the image so that it fits completely into the work area. This is convenient for large images to see the entire drawing. However, executing this command does not increase the image scale by more than 100%, which can be seen when using it on a small image.
Adjusting Color Curves in Paint.NETThe "Curves" command is intended for visual control of color in the form of curves. A separate instruction page is devoted to this “Curves” menu item.
How to make an image black and white in Paint.NETThe "Make Black and White" menu option provides an easy way to remove the colors from an image and make it grayscale and black and white. An example of applying this correction to the original image can be seen in the figure below.
 Changing the hue and saturation of a drawing in Paint.NET
 The Hue and Saturation command is used to change the saturation of colors in an image or change their shades. In addition, using this command you can also change the brightness of colors. However, it is to change the brightness that you should use the special “Brightness and Contrast” command described above, because The results from using this function may vary.
If you apply the Hue and Saturation command to the original image? with the value of the "hue" parameter 88 and the "saturation" parameter 158, then the result will be the same as in the figure below.
 How to Make a Photo Negative in Paint.NET
 The "Invert Colors" command is similar in effect to turning a photograph into a negative. This command replaces the colors with the opposite ones. So, if you apply this command to an image twice, you will get the original image again. If we apply this command to the source image from our example, the result will be the same as in the figure below.
 Gamma and color range of an image in Paint.NET
 The Levels command is used to change the color gamut and range of colors in an image. The "Levels" command has a separate page dedicated to it.
Coarsening image colors in Paint.NETThe Roughen command allows you to reduce the number of available colors used in an image. Typically, 256 are used for each color channel: red, green and blue possible values(from 0 to 255). Using the Coarse command in Paint.NET, you can limit this value to between 2 and 64, per color channel. Reducing the number of colors gives the image the effect of an artificially aged or retro picture. Using the Roughen command for our example will give the following result.
 How to Create a Sepia Effect in Paint.NET
 The Sepia command first turns the image to black and white and then adds a sepia tone. From history, one of the meanings of the term "sepia" is paint. Natural sepia was made from the ink sac of cuttlefish. This paint was used by artists in the mid-eighteenth century when painting pictures. Natural sepia was used to tint photographs brown. The effect of sepia in photography is the transformation of silver into sulfide, which becomes more resistant to fading. That's why many old black and white photographs are brown, so they have a better chance of not fading and surviving to this day. The application of the Sepia command to our example can be seen in the following figure.

I often see nice photos, informative, clear, beautiful, but..... with gray background! Those. I understand that the photograph was taken on white, but the photo is gray! A white background shows the work much better. So I decided to make MK for people like me - people who are not capable of mastering Photoshop, but want to post beautiful photos.
(No advice on mastering Photoshop, please! I’ve been periodically trying to learn how to work with it for 3 years, but I can only figure out something by constantly looking at MK and online manuals on FS, and when I need to process 10-20-30 photos, it’s unrealistic - I’ll have to sit for a week, because If I don't look into step-by-step FS tutorials, I start to get lost )
So, I photograph 50/50: with light from a window at the brightest time, or under a lamp, which I adjust so that it gives even light to the surface being photographed. In 90% of cases, the techniques shown in this MK are enough for me to process photos.
This MK shows how to improve photographs in which objects are located on a white background or the photographed objects themselves have large “spots” of white.
On each computer on which the package is installed office programs Microsoft Office, there is a processing program photo Microsoft Office Picture Manager. (Note - in the version for Win. 7 the program is called "Picture Manager")
1) Open the photo by right-clicking on the photo through the program Microsoft Office Picture Manager.
2) In the window that appears with the photo at the top, click on the button that says “change picture”
3) A menu appears on the left with photo editing options
4) in this menu click on the inscription “color”
5) in the submenu that opens there is a button “improve colors” - just click it
6) After clicking this button, when you hover your mouse over the photo, instead of an arrow, we see a “sight”. This is the whole point of processing!
7) On the background (or on the product itself - on its white part) select the lightest place - i.e. the point where visually the light source gives the most of this same light. We point our “sight” at this area and click . The program automatically equalizes the white balance so that at this point inside the sight the color becomes pure white and, accordingly, automatically equalizes the colors throughout the photo, adjusting them to the new conditions - this is the most “lightened” area.
8) If we don’t have enough lightening and want to lighten it more, select the area next to the whitest (i.e., slightly noticeably non-white) and click on it with the crosshair. The photo brightens a little more.
8) If you aimed the sight somewhere in the wrong place and the result did not suit you, you can always press either the “back” arrow (signed “1” in the photo) or select top menu Edit--Cancel.
In 5-6, maximum 8 “poke” I always manage to get a pretty decent white background. This process takes about 3-4 minutes at most. If we are satisfied with everything in the resulting clarified photo, click the return button in the left menu (indicated “2” in the photo)
10) After trimming, click “ok”. If you cut off too much or just want to “re-crop” - the “back” arrow or Edit--Undo will return the photo to the “uncropped” view.
Here, for example, is what the photo looks like before and after such processing, which took me 3 minutes of time:
I hope this MK will help those who do not own FS make photographs of their works more pleasing to the eyes of our customers.
P.S. - the rest of the photo editing capabilities in this program are quite poor, so apart from the capabilities shown in MK, the rest are not even worth trying.
You will need
- - a computer with the ability to connect a camera to it
- - Microsoft program Office Picture Manager from the Microsoft Office software package
- Optional:
- - Paint.NET program or any other graphic editor
Instructions
Using any known and accessible method, transfer the required photo/picture to your computer and save it anywhere on your hard drive.
To increase the brightness of the picture, use one of the two methods below.
Method One. You will need the Microsoft Office Picture Manager from the Microsoft Office software package.
1. Open the desired picture in this program. This can be done by right-clicking on the file and selecting “Open with...”.
Tip: If Microsoft Office Picture Manager is the default program for viewing graphic files, then you just need to double-click on the picture to open it in the desired program.
2. Find the “Change Picture” icon on the toolbar or select the menu item Picture – Brightness and Contrast…
The settings area will open on the right.
3. Use the “Select brightness” button to let the program select the optimal settings. If the result does not suit you, you can cancel the action using the appropriate button.
Adjust the brightness of the picture, bringing it to the optimal level, in your opinion, using five different sliders. Microsoft program Office Picture Manager allows you to both increase/decrease the brightness and contrast of the picture as a whole, and adjust these parameters separately for light or dark parts of the picture.
Method Two. You will need any graphics editor. For example, free program Paint.NET, whose capabilities are quite wide.
1. Open the desired picture in this program. This can be done by selecting “Open...” from the “File” menu in the program, or simply dragging the file from the folder into the program with the mouse.
2. You can edit the overall brightness of the picture using this program in several ways. Select one of the following items from the “Adjustments” menu:
- Brightness/Contrast. Here you can increase the overall brightness of the picture.
- Hue/Saturation. The “Brightness” item in this submenu makes the picture lighter overall.
- Auto levels. Perhaps the program will be able to improve your picture on its own, and you will be satisfied with the result.
- Curves. This section of the menu is intended for more experienced users and allows you to make significant adjustments to the lighting/shading of a picture or photograph. You can try to figure out the settings yourself.
Tip: You can apply several of the above points at the same time to achieve the desired effect.


