All ways to uninstall a program from Mac OS X. Uninstalling programs on macOS How to uninstall programs on a macbook pro
Uninstalling programs in MAC OS X is different from uninstalling programs in Windows. This is due to the fact that Mac OS X does not have a system registry. In Windows, programs are removed through the Control Panel - Programs and Features; Apple does not have this. In MAC OS X, programs are simply moved to the trash, but sometimes quite a lot of program files remain in MAC OS X and gradually clutter up your MacBook Rro/ MacBook Air/ IMac/ MAC mini. You can remove programs in MAC OS X in various ways; in this article I will talk about all the possible ones that I know.
Let's start with the easiest ways to remove programs on MAC OS X.
Uninstalling programs in Launchpad.
Uninstalling programs in Launchpad is only available for apps that were installed through the App Store. In order to delete an application, you can click on it with the mouse cursor and drag it to the trash, that’s basically it :)
Another way to uninstall a program in Launchpad is to long-press on the icon of the app you want to uninstall (basically, you can long-press on any app). The icons will begin to shake, and a cross will appear above those applications that can be deleted.

Click on the cross and confirm deletion.
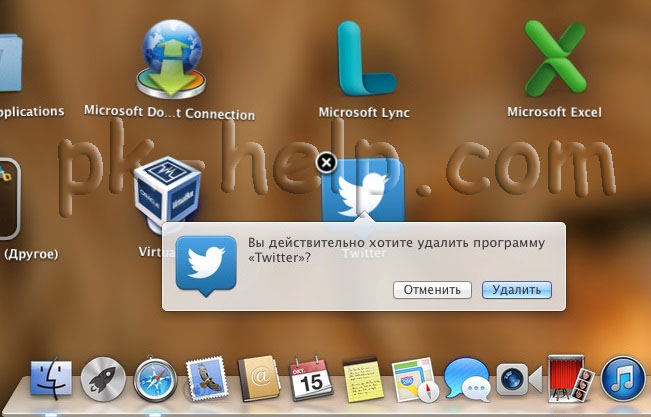
After this, you can empty the Trash.
Uninstalling programs in MAC OS X using Finder.
Another way to clean your computer of unnecessary programs is to open Finder, select the “Programs” tab, find the program that you want to remove and drag it to the Trash.

We must admit that this is the dirtiest way to remove programs, because it leaves behind a lot of “tails” (unnecessary files).
Uninstalling programs using AppCleaner.
You can use a third-party utility to remove programs. There are quite a few similar utilities, I suggest focusing on one of them - AppCleaner. AppCleaner is a very convenient, lightweight utility, plus it’s free. The first thing you need to do is download AppCleaner .

Run the downloaded file.

In the program interface, click the "Programs" button.

AppCleaner scans your MacBook Rro/ MacBook Air/ IMac/ MAC mini and shows a list of installed programs. Select the program you want to remove, check the box and click the "Search" button.

The utility will find all files associated with the program being removed and offer a list for removal. All you have to do is click the "Delete" button.
The mechanism for removing programs from a Macbook Air/Pro differs from similar actions in Windows. In Windows, the control panel is used for these purposes; in Mac OS, everything is simpler, since there is no system registry. To erase an application, simply place it in the trash. This is a quick and standard way to remove it from a Macbook, but it’s far from the only one.
Uninstall in Launchpad
Launchpad is a launch pad that contains shortcuts to work applications added by the user. The launch pad performs the same function as the desktop in Windows, and is also used to uninstall active software from a MacBook.
To erase it, you need to click on the icon of interest and drag it to the trash. As soon as it appears there, the utility is considered conditionally removed. Conditionally, because if necessary or an erroneous action, it can be restored in two clicks. To permanently delete the plugin, you need to open the MacBook trash and empty the contents.
Using the Launchpad tool is suitable for compact office or client software.

Software that is part of packaged software regularly interacts with the server (like games); sometimes it is not completely removed - individual files or settings remain in the device’s memory.
To erase remaining files, you need to:
- Login Finder.
- Select the item in the top line of the header Go.
- In the menu that opens, select Library.
- Select from the contents the folder containing the files of the software to be removed and move it to the trash.
- Clear the contents of the last one.
Sometimes failures occur - the system displays a “Try again” notification on the monitor. In such cases, you should restart the device and repeat the steps in the same sequence.
Removing from Macbook via Finder
Finder is a system utility used to search for files, configure the OS, and is responsible for the correct operation of the interface. It will not be possible to close it at the user's request - it is constantly active.
Unused applications are erased from the device’s memory via Finder in the following order:
- Using the mouse button or touchpad, you need to click on the Finder icon, after which the user will open a control window.
- In the window that opens, the user is interested in the Programs line - after clicking, a list of all applications available on this device will open.
- The software to be erased is selected from the list - right-clicking on it with the touchpad or mouse will open a context menu. Select the command from the menu "Add to cart".
- Once the action is completed, the name will disappear from the Finder list.
- You can completely remove the utility from your MacBook by opening the trash can and selecting the option "Clear". After uninstallation is complete, it is advisable to restart your PC.

Uninstallation via Uninstall
The two methods described above are suitable for software installed from the official App Store service. Correct uninstallation of software downloaded from third-party resources is carried out using an uninstaller.
To remove utilities from a MacBook Pro/Air, you need to:
- Click on the Finder icon.
- Login to Programs.
- Select the software you are interested in from the list that opens and click on its name.
- In the list of files related to the selected plugin, click on the icon Uninstall to launch the uninstaller.
- Next, act strictly according to the prompt instructions that pop up on the monitor.
- As soon as the process ends, the system will notify you about it.
How to remove a program on a Macbook using AppCleaner
AppCleaner is a special plugin designed to remove software and related files from personal computers. It is easy to use, convenient, and available for free download.

After installing and launching AppCleaner, you need to click on the Programs option to launch the scanner. Based on the scanning results, the user will see a list of installed applications. From it you need to select the application to remove, check the box next to it and click on the “Search” option.
In a few seconds, AppCleaner will find and create a list of files related to the application being uninstalled. The user will only have to click on “Delete” and wait for the process to complete. After restarting the computer, you can continue working.
Sooner or later, a lot of useless programs will accumulate on your laptop, with which there is no point in clogging up the memory. In this case, it is worth starting to delete them, but this must be done correctly, otherwise over time a large number of empty and unused folders will accumulate in the system, which, in turn, will confuse the computer and lead to a decrease in its performance.
There are only two ways you can go to erase a program - use the methods that exist natively in the Mac OS operating system, or install a third-party program that specializes in removing other programs.
Through the cart
Removing programs on Mac OS differs from deleting them on Windows, since on computers with an operating system from Microsoft, when deleting a shortcut, you do not delete the program itself, but on a Macbook it’s the other way around:
Launchpad
This method is only suitable for programs installed from the official App Sore store:
Through uninstallers
If you installed third-party applications not from the App Store, then in the folder in which the product was installed there is a special program - an uninstaller that will completely erase the application.
AppCleaner
Also, craftsmen have written more than one program for the Mac OS operating system, the general task of which is to remove other programs. One of them is AppCleaner. Its advantages are that it is easy to use and distributed completely free of charge.
Video tutorial: how to remove programs on a MacBook
How to remove built-in programs
Built-in or standard programs include Safari, FaceTime, iTunes, etc. If you try to remove them using the usual methods, you will receive a notification from the system that these applications are necessary and cannot be erased. There is still a way to get rid of them, but if you ever want to restore them, problems may arise, so proceed only if you are absolutely sure that you will never need these applications again.
Cleaning your Mac after deleting apps
If you want to be completely sure that there are no unnecessary folders and files left on your computer after removing another program, then download the CCleaner application. It will allow you to scan your entire laptop hard drive and clean it of unnecessary folders and files in just a couple of clicks.
Don't forget to regularly clean your laptop not only of outdated and unnecessary programs, but also of useless folders left over from erased programs. You can remove programs through the recycle bin, Launchpad, third-party programs such as AppCleaner, and the Unistall application located in the installed program folder. After you have uninstalled the program, it is recommended to scan your hard drive for unnecessary folders, for example, using CCleaner.
Uninstalling apps you don't use can be done in one simple step. Just drag the application icon to the trash. For this method to work, you need to check each file and its location on the system. This will ensure that it is removed. This is an important step because programs can be in different places.
Don't just disable the application, but look for the uninstall tool in each folder. Once launched, it will instruct you on how to properly get rid of the program. Follow these instructions and make sure that any unwanted application is not just disabled, but completely removed.
Useful advice! Designate one folder or location on your computer for all programs. Typically this is the downloads folder. Make sure to remove more than just the desktop shortcut icon by following the uninstallation process all the way through.

Another quick and easy way to reclaim space on your computer and improve its performance is to remove software that you don't need. Some are in the sort of dump we all know and love and call "Downloads". It can also hide in other applications, utilities and services that consume space and rob your Mac device of resources.

Attention! Before starting the software, make a backup copy of the file. Don't skip this step.
Select an external hard drive (you can buy one online or at any electronics store). Connect to your device and make a backup using the Time Machine utility. To do this:
- Select an external drive as your backup location.
- Select the files you want to save and let Time Machine do its thing.
Once the backup process is complete, follow this path:
Go to>Libraries>Application Support>Settings.

Another alternative (if you are willing to do the task) is to search Google for an uninstaller for advanced removal of programs and applications. Do this by opening the search engine and typing “Uninstaller for...(application name)” in the empty panel.
Find out which apps are slowing down your Mac

The short answer is any large program that takes up a lot of space and chews up a lot of data. It can also be any application that is unused or forgotten after downloading. Any programs that are constantly running in the background will slow down your device. Remove them from system startup or stop them from running in the background by following this path:
System Preferences>Users and Groups>User Name>Login Items
Uncheck any software you don't want to run every time you start your Mac.
Ready! Now you can run these programs only when you want.

Unfortunately, computer hackers with too much time on their hands are hard at work creating adware and malware that cleverly masquerade as innocent applications, deceptively intriguing files, and harmless software. They infiltrate the Mac device and run through the system. Then they degrade performance, can take away your control over your computer, and definitely slow it down. How to prevent this?

Select one browser (Chrome, Firefox, Safari) and remove the others
Here's how to remove the three most popular browsers:
Safari
Open Safari browser and follow this path:
Safari>Preferences>General>Delete.

Firefox
Open a Firefox browser window and follow this path:
Settings>Add-ons>Preferences>Delete.
Chrome
Open a Chrome browser window and follow these steps:
Settings>Tools>Advanced>Reset.

If malware is responsible for your browser degradation, follow these steps:
- go to the “Extensions” tab;
- Deselect ad extensions. You might find it difficult to decipher which ones are false and dangerous, since usually such add-ons try to appear genuine and necessary. Better remove search engines, weather and discounts;
- go to the “Settings” tab;
- look for suspicious adware and malware. It probably independently granted itself permission to read and change these sites. Get rid of them quickly;
- then restart your computer.

If you love your browser, then first follow the steps to remove it, and then start with a clean version. After all, a Mac without a browser installed is like a fishing rod without bait.
How to remove Steam games on Mac
Macs are ideal slot machines. If you're ready to install another game or want to get rid of an annoying one, then deleting it is a smart move. In the end, you will also free up space on your device. Here's how it's done.
Follow this path:
Applications>Steam>Libraries.
- Games installed directly to your hard drive.
- Games grayed out that are not on the disk and therefore do not need to be removed.
Select the game you want to get rid of and press the Command key. Select "Delete Local Content" and click the "Delete" button. Do this for every unwanted game.

Several useful tools for uninstalling applications
You may need help getting rid of unnecessary apps and potentially dangerous software that is slowing down your device. Check out these three resources:
- Uninstall Tool - easy to use, powerful Mac scanner and uninstaller;
- Uninstaller is a downloadable program to fix browser problems and improve system startup;
- Revo Uninstaller is a free program that does it all (from repairing drives to restoring services to start).
Video - How to uninstall a program on Mac OS
Well, it's time to learn something new! After reading this article to the end, you will learn how to install and remove programs in the MAC OS X operating system.
In fact, this process is completely simple, but a beginner (or a user accustomed to Windows) needs to know something, because the differences from Windows are fundamental. On a MAC, this process is much easier, faster and more enjoyable.
OK! Get to the point! Everything is just outrageous. Forget about the scary installer that came with Windows. Once upon a time, one of my Canadian employees, talking about his wife’s MacBook, said “ Yeah! Installing apps on MAC is super easy. All you do is just drug and drop app icon into Application folder».
For those who have learned German, I’ll explain in a few words - the installation process boils down to dragging the program into the Programs folder. Next, let's look at everything in more detail and with an example.
The first thing you need to do to install the program on MAC OS X is download (take it from a friend on a flash drive, copy it from the HDD, etc.) the program itself. MAC applications are distributed as a single file with the .dmg extension.
By the way, be sure to read the article “”, where I presented a list of vital programs.
.dmg files
DMG stands for Disk Image and is a format for distributing programs and other files between Apple computers. To understand what .dmg files are, mentally imagine a CD, USB flash drive or external hard drive.
The DMG file acts as the same device (only virtual) and contains all the information inside (documents, photographs, programs, etc.).
In order to get to the contents of the .dmg file, you need to mount it. There is no need to be intimidated by the word “mount”; you just need to double-click on the file name. The OS X operating system will download the image itself and add a new virtual disk and an icon in the disk section in Finder.
Manual installation of programs on MAC
The mounted disk usually contains the program itself (complete and not requiring any installations). It is this fact that misleads many beginners.
Attention! No need to run the program from a virtual disk! The disk image.dmg serves only as a container for transportation. First, copy the application to the Applications folder on your hard drive. After this, you can unmount the virtual disk (by clicking the triangle next to the disk name) and delete the .dmg file.
Many users, by mistake (not knowing), immediately drag the program to the Dock. Don't do that! This way you will create a shortcut to launch, but will not move it to the Programs folder.
In this case, each time you click on the icon in the dock, the .dmg file will mount the disk image on the system. On top of that, disk images are read-only, so your program won't be able to save any internal information.
Now let’s try everything with a clear example. Let's say you need to install Mozilla Firefox. To do this we do this:
- STEP 1 - Download one single Firefox28.0.dmg file from the official website (search on Google)
- STEP 2 - Double-click on the file name and mount the disk image. Usually, this will open another window with the content itself. For your convenience, a shortcut to the Programs folder is often inserted next to the program.
- STEP 3 - Drag the application (usually with the extension .app) into the folder Programs.
- STEP 4 - Be sure to wait until the copying process is complete
- STEP 5 - Unmount the image (the button is located to the right of the disk name)
- STEP 6 - Optionally delete the .dmg file

As you know, the Windows application installer can copy files wherever it wants. Therefore, the hard drives of Windows users are very often stuffed with unnecessary “file husks”.
On OS X, all program files are stored inside the .app package. More precisely, it looks like an .app file, but works like a folder. To get to all program files, right-click on the .app file and select “Show package contents”.
As you can see, files in OS X are stored more neatly, organized and most importantly in one place. By deleting a program, you are 95% likely to get rid of all the files you don’t need.
Installing programs from the App Store
The easiest way to install programs on MAC OS X, which you didn’t have to write about, is to use the App Store. There is a huge variety of software for you to choose from. The main thing is to know what you came for.
Installing programs from the AppStore comes down to selecting the desired application, pressing a button or price tag, and then confirming. Applications in this case will be automatically copied to the folder Programs.
To download applications from the AppStore you need. I described in detail how to do this in a separate article.

How to remove programs on macOS
You won't believe it, but uninstalling programs in MAC OS X is even easier than installing them. Go to the Programs folder, find an unnecessary application or game in it, right-click and select “ Move to cart».
Do not forget to periodically empty the contents of the trash can, because... Many GB of unnecessary information can accumulate there.

Here you go! Now each of you knows how to install and remove programs on a MAC. As you have already seen, this process is so simple that any grandmother can do it..
Got a question? Feel free to ask in the comments or on the “ “ page. Best wishes!


