Installation and configuration of Wi-Fi routers. How to open the router settings page The web interface opens
Before setting up, it is better to connect these types of routers directly to the computer, rather than connecting using a Wi-Fi connection.
The connection diagram is shown in the figure below:

The WAN Internet cable is indicated in yellow; LAN is the port through which the connection to a personal computer is made.
Important! After the router is connected to the computer, you will need to set the PC to automatically obtain an address in the network settings. Go to the Network and Sharing Center, click on the router's network and open the Internet Protocol properties window.
Set to receive IP automatically.

In the search bar, enter the address 192.168.1.1 and in the dialog box that opens, enter the name of the network administrator and password for accessing it. For Asus devices this is admin and admin.
After completing these steps, the router configuration management window will open:

Remember! You must connect to the settings panel after connecting the router to your computer. Otherwise, when trying to access viawifi, you may receive a message that the browser was unable to connect to the remote server.
Zyxel Keenetic router
Feature of the series Zyxel routers Keenetic lies in their powerful technical specifications. Thanks to them, the router has wide range actions.
However, such routers are quite expensive. Their price varies from 1500 to 5000 rubles.
For the device to work correctly, you need to configure its operation using the router control panel.
Follow the instructions:
- First, make sure your router firmware is updated to latest version. Current installed version can be viewed on the bottom panel of the device.
The new software will help the user avoid problems during setup and further operation of the device. You can download the current firmware version from the official website of the router manufacturer; - In the address bar of the browser, enter the address 192.168.0.1 and press Enter;
- In the window, enter your username and password to log in as the router administrator and gain access to all information and settings. Password – 1234, login – admin. Remember that case matters.

Routers Rostelecom
Rostelecom has been providing its users with their own branded routers for several years now.
As a rule, they are produced by well-known manufacturers on the market: D Link, QTech, Sagemcom or Huawei.
More than 80% of routers for Russian company produced by Sagemcom. Let's take a closer look at how to enter the settings of such a router:
- Connect your computer to the router via Wi-Fi;
- In the browser, enter the router web interface address 192.168.1.1 and press Enter;
- In the pop-up window, enter the password - admin or login - admin. If these data do not suit, try logging in using the superadmin login and the Is$uper@dmin password. This will log you into the control panel as a superuser.

If you can't connect to the router's web address
If, after entering the IP address 192.168.1.1 or 192.168.0.1, the browser window shown in the figure appears, this indicates that you need to additional settings router.

There are two possible reasons connection errors:
- The router is not connected correctly to the computer (in the case when the connection is made not through Wi-Fi, but through the ports of the computer and the router);
The correct diagram for connecting the router to the computer is shown in Figure 6 of the article. The connection to the computer or laptop itself will look like this:

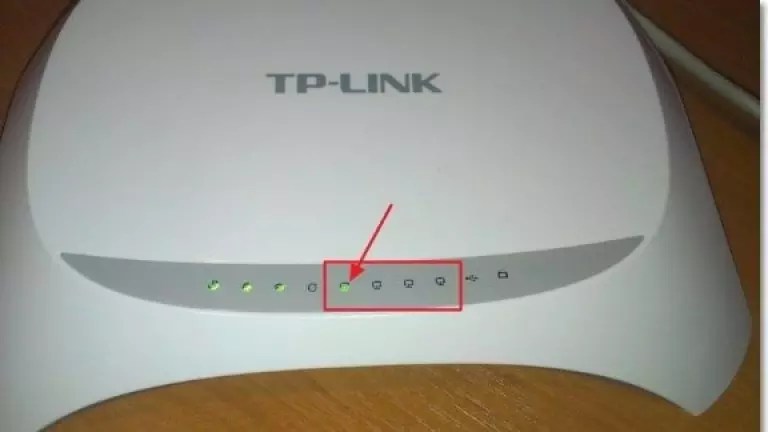
If everything is connected correctly, one of the indicators on the router will light up, which is responsible for the operation of the LAN port.
- Another reason for an error connecting a web address is that the network settings on the computer are incorrect.
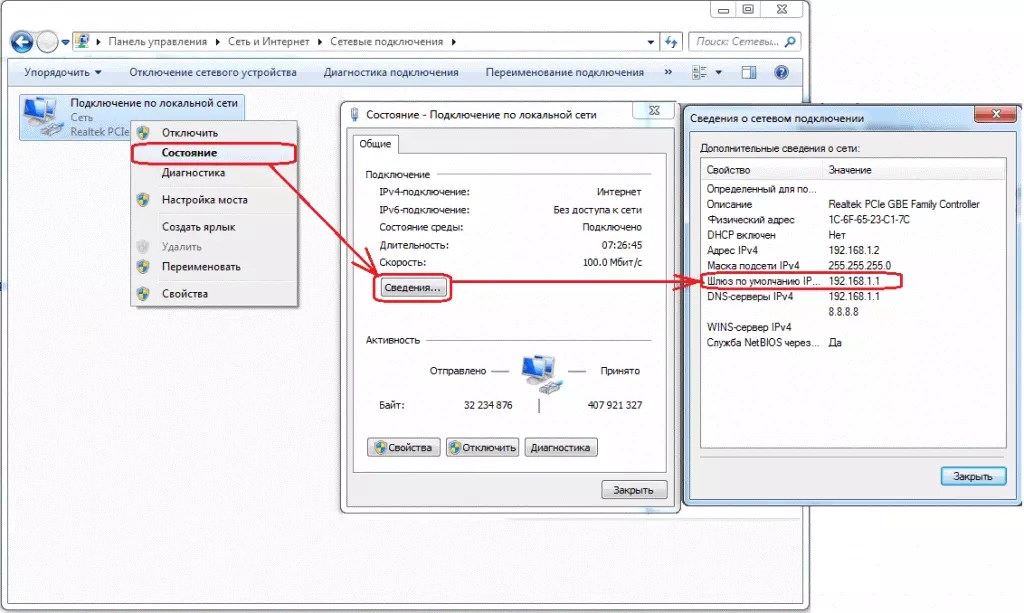
After correct connection router to the computer on the PC taskbar, open the current connections window:

The computer must be connected to the router. If the connection status is set to “Without Internet access”, you need to make network settings.
To do this, follow the instructions:
- Go to Network Sharing Center and shared access. To do this, right-click on the current connections icon and select the appropriate menu item, as shown in the figure below:

- Go to the window for changing network adapter settings;
- Select the connection icon by local network and open its properties window;

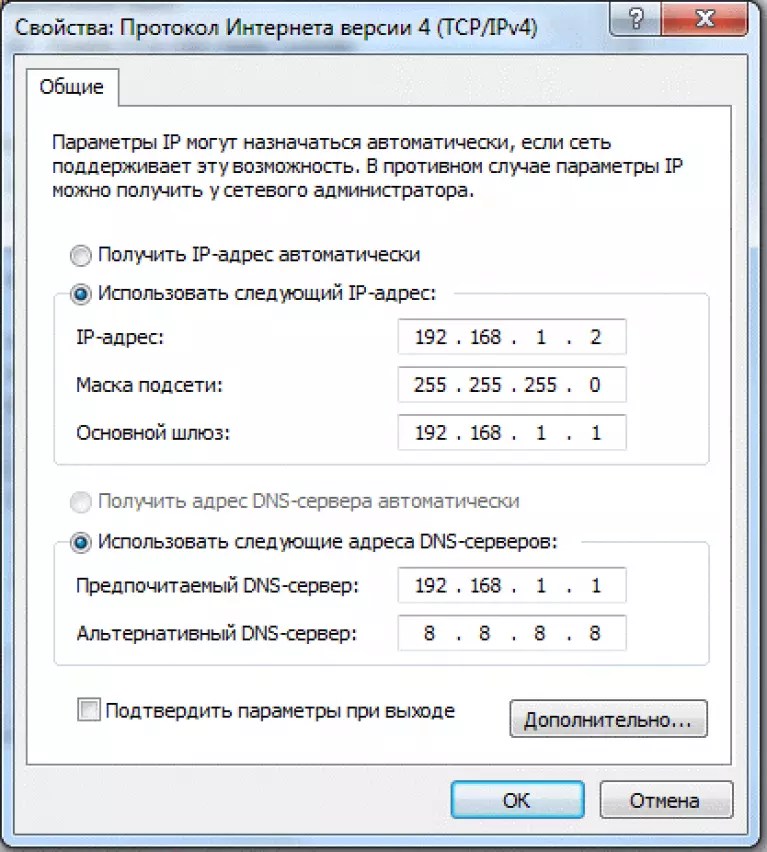
- In the list, select the network connection protocol version 4 and select its properties;
- In the window that opens, check the boxes next to the options for obtaining IP and DNS addresses, as shown in the figure;

- Save all changes and try logging into the router settings panel again (using a browser).
Determining the router's IP address
In ninety percent of cases, you can go to the router settings at 192.168.1.1 or 192.168.0.1.
If you have made all the necessary settings and access to the Internet appears on your PC, but you cannot connect to the router’s settings panel, your router may be using a special web address.
In this case, you need to look at the required IP in the connection settings on the user’s computer.
Go to the Network and Sharing Center. Now look for the LAN connection icon. Right-click on it and select “Status”.
In the window that opens, click on the “Details” button. will appear Additional Information about network connection.
Find the “Default Gateway IP” field; its value is the address that needs to be entered into the address bar of the browser.
Setting up a connection address manually
The network may not support the ability to automatically configure IP addresses. In this case, you need to configure the network parameters yourself.
Go to the connection protocol settings window (Figure 17).
Instead of automatic configuration, check the “Use the following IP address” and “Use the following DNS server” checkboxes.
For tp-link routers, enter the following parameters:
Users of routers from the manufacturer D Link must enter the following parameters to organize the connection:

Resetting authorization data
If you cannot remember a previously changed login and/or password at the authorization stage in the browser, the only way to solve the problem is to reset the router settings.
All parameters will be returned to the original (factory) configuration and the access password will become standard. It is indicated in the user manual or on the bottom cover of the router.
The reset process is very simple. There is a reset button on the back of the router; you need to press it with any sharp object for 10-15 seconds.
After clicking, all settings will be returned to factory settings, and you will be able to log into the router control panel using the standard login and password.

How to enter the settings of an Asus router
In order to connect to the Asus router interface, you first need to connect to this router using a cable or Wi-Fi. Next, launch your browser and enter the IP address 192.168.1.1 in the address bar. Next, log in to the window that opens.
How to find out the IP address of the router in order to enter its settings?
In this video we will look at the following question - how to find out the IP address of a router? This may be needed in cases where you need to go into the router settings.
Any router requires configuration, the only exceptions are already configured routers issued by the provider as a bonus when concluding a contract. In this article we will consider such issues as the router web interface, user authorization, menu structure and basic settings.
Let us immediately note that some manufacturers write programs for easy configuration of their routers, the work of which boils down to almost automatic configuration of the device. It all comes down to the fact that the user connects the router to the computer, inserts the supplied CD, and the wizard performs the setup step by step, only occasionally asking the user for passwords, IP addresses, and other necessary information specified in the agreement with the provider.
CD included with router
But this method settings is deprived of all the subtleties of setting, for this reason we will consider a more complex, but more effective manual setting method.
Connecting to a computer
Any setup is done using a computer combined with a custom router computer network. The network can be built both wired and wireless with Wi-Fi assistance, but wired is more preferable due to high fault tolerance, and in certain moments it is very important. For example, when updating the firmware (firmware). If during the update the connection between the computer and the router is lost, then in most cases this ends with a trip to the store for a new router.
A wired network is created using a network cable patch cord, which is almost always included with the router. We connect one end of the wire to any LAN port of the router, the other end to the network card of the computer from which the configuration will be carried out.
For wireless communication press the WPS button on the router (for some models it is called QSS), and the computer will make the connection itself.
Entering the router settings menu
Having connected the router to the computer, turn them on and wait for them to load. Next, open any web browser on your computer and enter the network address of the router in the address bar. The address can be found either in the included instructions for quickly installing the router, or from the sticker under the bottom of the router.

Sticker with the router address under the bottom of the device
The sticker also contains the name/login for entering the settings menu.

If the password and name are entered correctly, then we are taken to web interface router. If an error is displayed, then the password has probably been changed and you need to reset the settings. This is done simply - each router is equipped with a reset button, located either on the back of the case or under the bottom. Press it and press for 10-15 seconds.
Attention! When resetting, absolutely all settings will be reset to factory settings, not just the name/password!
Settings menu
start page
So, we went to the settings menu. Next we will consider this menu using the TP-Link WR740N router as an example, but you should remember that all other models from all manufacturers have approximately the same settings structure, that is, if you understand any router, then there should be no problems with others.
First of all, the start page opens, which displays the current status of the router and its connections.

Settings start page
At the top of the window we see the current hardware and firmware version. Below is the status of the local network, wireless network, wide area network and the traffic consumed.
Some more expensive routers have slightly more information home page, which displays the processor load, random access memory, connected subscribers and more are indicated in detail.
Settings menu structure
Having dealt with appearance settings menu, let's look at its structure, since for settings you need to select an item. All settings topics are assigned to the corresponding items, selecting which opens a nested list of subitems.
For example, we need to configure the wireless part of a Wi-Fi network. We look at the left tree and find the corresponding settings item - “Wireless”, which translates as “Wireless Network”.

Basic Wi-Fi settings
By selecting an item, a submenu will open, divided into specific Wi-Fi settings. The first sub-item is the basic settings, in which you set the Wi-Fi name, region, channel, transmission speed, etc.

Wi-Fi Security Settings
The second submenu is used for wireless network security settings, in which you select the password encryption method and specify the password itself.
In the third submenu you can configure filtering of computers by mac addresses (black list), in the fourth - advanced settings (for experienced users), in the fifth submenu – statistics of the wireless part.
Firmware update
Let's consider separately the issue related to updating the firmware of the router. The fact is that manufacturers, by virtue of human factor Sometimes errors are made in the firmware code, which leads to unstable work router. And sometimes they add new functionality to the firmware, thereby providing the old router with new functions. And in any case, a firmware update is required.
Let's look at this point step by step:
- Go to the router settings menu, the “System Tools” menu, then to the “Firmware Upgrade” submenu.
The first step is to download the firmware file from the manufacturer’s official website. You can install unofficial firmware, but entirely at your own risk, the warranty is automatically void. We remember where we saved the file (conveniently on the desktop)

Firmware update
- Click the “Browse...” button, indicate to the explorer the path to the saved new firmware. At the same time, in the current window you can see the currently installed firmware version and once again make sure that you are installing a more recent version;
- Click the “Upgrade” button, after which the update process will begin.
As already mentioned, at this time it is extremely forbidden to turn off the router, pull out network wire(with a wired connection) or turn off Wi-Fi (with a wireless connection) if you don’t want to end up with a “dead” piece of plastic.

The process of downloading and installing new firmware
The window will display the firmware installation process, which consists of several stages: first, downloading the file from the computer to the router’s memory, then installation. The entire process is displayed by an indicator scale with the percentage of the task completed.
After successful installation, the router will automatically reboot. Keep in mind that all settings from the previous firmware are not saved, this also applies to logins/passwords.
Other router models
For example, here is the settings menu for a router from another company – D-LINK.

Settings menu of another router
As you can see from the picture, there are no differences except the language, but this option depends on the firmware version, into which several translation languages are “sewn up”.
Setting a password for the interface of TP-Link routers:
A router is a convenient solution for building a local and wireless network, allowing you to simultaneously access the Internet from several devices. However, to configure the router, you first need to install it correctly and go to the web interface, where the basic parameters of the equipment are indicated.
Connecting equipment
Before you go into the router settings, you need to install the equipment correctly. You will need:
- Router.
- Network cable.
- LAN card on the computer.
Any user can handle installing a router - the main thing is to carefully inspect the ports and figure out what they are needed for. Explanatory inscriptions and different colors of connectors will help with this.
- The cable that the provider brought into the room is inserted into the WAN/Line/Internet port (usually it is blue).
- To one of the LAN ports (mostly yellow color) is installed network cable, which comes with the router. The second end of the patch cord is connected to network card computer.
- The power cable is installed in the appropriate connector.
Once all the wires are in place, press the power button. If everything is done correctly, several indicators on the router will light up: power, network connection and connection to the computer.
Setting up a router in the system
To open the router interface, you need to configure network connection. Usually the necessary parameters are set automatically, but it would be a good idea to check that they are correct.

These are standard settings that allow the router, using a DHCP server, to independently give an address to the connected device (computer in in this case).
Login to the interface
After connecting and configuring the equipment, you can proceed to resolving the issue of how to log into the router. On almost all routers, the interface address, login and password are indicated on a label located on the bottom of the device. 
If there is no sticker, then you can see the address for displaying the router web interface in the browser using software:
- Open Network and Sharing Center.
- Proceed to change adapter settings.
- Double-click the Local Area Connection icon.
- Click Details and look at the Default Gateway value.

If you changed your login and password yourself, but cannot remember the new values, then use the Reset button on the router to reset its settings to factory settings. After resetting the settings, the identification data will become standard - admin/admin.
It is not necessary to look at the router address. Most manufacturers use the same address, so the order in which the routers interface starts is different models not much different.
For example, TP-Link routers and D-Link use the IP address 192.168.0.1. After entering this value, an authorization window appears in the address bar of the browser; you need to enter your login and password in it. For some router models D-Link Dir You only need to specify your login; the password line can be left blank. 
U Asus routers and Netgear's default address is 192.168.1.1. The login and password are also usually standard – admin/admin. But there may be options: for example, for the NETGEAR WGR614 router the login will be “admin” and the password will be “password”.
For Huawei routers, the login information is slightly different from the usual values. The address to enter the interface is 192.168.100.1. The login and password are also not quite standard - root and admin, respectively. Some models have even more complex pairs for authorization. 
Zyxel Routers Keenetic have an easy to remember address my.keenetic.net. As an alternative, the standard address 192.168.1.1 is used. The login will be the word “admin”, and the password will be standard settings – 1234.
It seems like you can get confused, but in reality everything is simple. In 90% of cases the address will be 192.168.0.1. or 192.168.1.1, and the pair for authorization is admin/admin. If these values do not allow you to open the web interface, then read the instructions carefully - the address, login and password are always indicated there.
Possible login errors
If you go into the router settings using automatic settings If it doesn't work, try setting the login parameters manually using the router's IP address.

Knowing the router's IP address, you can manually specify the TCP/IPv4 protocol parameters:

To understand what values need to be specified, let’s take the router’s IP address - for example, 192.168.0.1. Based on this address, fill in the lines as follows:
- IP address – 192.168.0.2 (last digit must be in the range from 2 to 254).
- Subnet mask – 255.255.255.0 (always remains the same).
- The main gateway is 192.168.0.1 (the router address is indicated here).
- The preferred DNS is 192.168.0.1 (the router address is also written down).
With these settings, the problem of launching the router's web interface through a browser should be resolved. Then all you have to do is set up the Internet and create wireless connection so that the Wi-Fi router begins to fulfill its functions of providing constant access to the network from different devices.
Routers allow people to send and receive a wifi signal. They are truly popular, and manufacturers could not ignore this. More and more router models are being released every day. The problem is that not every user can configure this device themselves. In this article we will talk about how to go into the tp link router settings.
Go to the router's web interface
If your Wi-Fi router is connected to a computer, then let's talk about how to enter its settings:
- Turn on your computer. Open the browser available on it.
- We take the router in our hands and turn it over to the reverse side. We are looking for the item that indicates the device id. 192.168.1.1 is the standard id for the tp link transmitter.
- We enter the combination that we learned in the previous paragraph into the address bar of the browser.
- A small window appears. It contains two items - “Username” and “Password”. If no action has been taken on your device, the standard data specified on back side. Most likely it is admin/admin.
 Username
 - If everything is done correctly, the tp link router configuration is enabled.

There are times when a Wi-Fi router, despite following all the instructions, does not enter the web interface. If you cannot enter the router settings, then read the next part of the article.
Checking the connection to the computer
Before setting up the router, you need to check its connection. It comes with a white network cable. Using it, the router connects to the computer. If you did it correctly, but the problem does not go away, then reboot the devices. It also doesn’t hurt to check all the cables again; they may not be plugged into the ports enough. This completes the installation of the device.
If the Wi-Fi transmitter is connected to the PC correctly, the LAN lights on it will light up.
We are looking for a problem in IP and DNS
This is one of the most popular reasons why you cannot access the web interface on TP link routers. You need to check whether IP and DNS are automatically obtained. This is especially true for those who have previously used connections with static addresses.
Step-by-step instruction:
- Right-click on the Wi-Fi and connections icon located in the lower right corner of the screen. We select the item that will take us to network management.
- We open the window. Follow the steps shown in the screenshots.
 Item: change adapter parameters
 - Now you need to open the properties of protocol version 4. Be sure to set the settings exactly like this.
 Properties of TCP/IPv4
 After these steps the problem should go away. As you can see, setting up the transmitter is not difficult.
Incorrect username or password
If you provide standard login information, but it gives you an error, then most likely you have already used the router. Or the settings are simply lost. This means that you do not know the new account to log in to. Fortunately, the problem can be solved by the following in a simple way. Instructions on how to reset your tp link router:
- We find a needle or other thin device.
- We are looking for a small black hole on the router. There should be an inscription “reset” next to it.
- Carefully insert the needle into the hole. We wait more than 10 seconds.
After this, the Wi-Fi router returns to factory settings. All the information on the back side works for him.
Now you know what to do if your router settings are lost.
Specifying the router address
If somehow you cannot find out the link to the settings, then this can be done without the help of a Wi-Fi transmitter. For this:
- Turn on the interpreter command line. Enter the key combination “win” + “r”. A small window appears, enter “cmd” into it.
- Have you come in? Great. Enter "ipcongif".
- The command line produced a lot of text. We are looking for what is indicated on the screenshot.

- The address used by your device may vary.
If you enter the numbers indicated in the CMD into the address bar of the browser, you will be taken to the wifi transmitter settings. This is how you enter the tp link router settings.
The process of setting up a Wi-Fi router is not entirely complicated, as many people think. In this article we will discuss the main points of this process.
How to set up a Wi-Fi router?
Setting up a Wi-Fi router can be divided into three stages. The first stage is physical setup, the second is setting up a connection to the router interface to control it, the third is setting up the router’s operating parameters. We will look at all three stages of installing and configuring the router in more detail below.
Physical installation and configuration of the router
This stage is a preparatory one, in which we will install the router in its proper place. You need to connect the router to the mains and turn it on. You also need to connect a network cable to the router. Your provider should provide you with this wire. This wire must be connected to the WAN connector on the router. We also need some device that has a working network adapter. It would be better if it was a computer. This computer must be connected to the router using a patch cord (short network cable with RJ-45 interfaces at the ends). This wire must be connected to any of LAN connectors. On top of that, you must already have an agreement with your Internet access provider. And this leads to the fact that you must have a username and password to access the Internet. You can also read articles about improving signal quality.
Connecting to the router web interface
In order to install and configure a Wi-Fi router, we need to get to the web interface of this router. A web interface is essentially a website hosted by the router’s memory. You can connect to it if you enter 192.168.0.1 into your browser's address bar and press Enter. On some routers this address needs to be replaced with 192.168.1.1 (Sometimes there are routers whose web interface is located, for example, at 192.168.10.1). All these IP addresses are
So, all we need to do in the second stage is go to the router’s web interface. If you have connected your computer and router to each other, then feel free to open any browser and try to open the web interface. Let me remind you that to do this you need to enter the router address in the address bar.
Also, sometimes it is possible to immediately connect to Wi-Fi networks router. You can try connecting wirelessly if you don't want to deal with wires. To do this, find in the list of available networks the one that your router creates and connect using the password from the router’s network. After that, try going to the above addresses. If everything is fine and you don’t see any error in front of you, then this means that you have a window asking for a password to access the web interface (sometimes this password is not requested, which puts the security of the router at risk). If yes, proceed to the third stage of setting up the router. If not, then double-check the connection - have you really established a connection with wireless network. If everything is fine, but the web interface does not open, try connecting to the router via a LAN wire.
All current self-respecting routers immediately set up a network between the computer and the router. But if suddenly your computer does not receive an IP address from the router, then you need to do it yourself. Connecting a computer to a router via a local network is similar to the process. There we configured both computers so that they were on the same subnet. Here you need to configure an IP address only for the computer, since the router already has its own address. The router usually has an address 192.168.0.1 or 192.168.1.1 . We will have to check both options if the first one on the list does not work. You can check with the help or at random. In any case, you need to set the following parameters for IP protocol version 4 in the connection properties:
- IP address - 192.168.0.2
- Subnet mask: 255.255.255.0
- Default Gateway: 192.168.0.1
- Preferred DNS server: 192.168.0.1
These parameters assume that the router's IP address is 192.168.0.1 . If this configuration doesn't work, try the following settings:
- IP address - 192.168.1.2
- Subnet mask: 255.255.255.0
- Default Gateway: 192.168.1.1
- Preferred DNS server: 192.168.1.1
After you set all the settings and save them, try opening the page with the address in your browser 192.168.0.1 or 192.168.1.1 . If you see a window asking for a username and password, then proceed to the next step. Otherwise, you need to double-check what you did and find the error.
Setting up a router in the web interface
So, here is a window for logging into the router’s web interface. If you or someone else has used the router, then ask them for the password and username. And if the router is new, then the login information can be found in the instructions for the router. Usually this is a simple username (user, admin) and an equally simple password. These are factory settings. After the first login, I recommend changing at least the password for this account, since anyone can find out the factory settings for any router and gain access to it.
The web interface of each Wi-Fi router is different from others. There are those where you get access to a huge number of settings, and those where you can barely customize anything. But all of them have a mandatory minimum - setting up a username and password, through which you can identify the user of the provider’s services. This is the setting we need to find. And then find and fill in the appropriate fields with the name and password that your provider provided you with. In addition, you can read the article about - the meaning is the same. The main thing when setting up a router is to choose type PPPoE connections , which is used by most providers.
After all the above steps, you have successfully installed and configured the Wi-Fi router, which will now provide Internet access to all those who connect to it. Don't forget to provide good