Creating forms in Access for data entry. Development of forms of submission
Microsoft Access is a database development tool. This application is included in the complete office suite Microsoft. In this case, data is stored on the computer in the form of tables. This program allows you to enter new data, edit existing table rows, and also view entered information both directly through the table and through the form.
Purpose of the form
A form is a structured window that contains fields corresponding to the fields of the table (all or some fields of the table can be presented on the form). At the same time, the form can contain either one database record (elements of one row of the source table) or more. The table can be created and filled out either before creating the form in Access, or after creating the form. The location of the form fields is specified by the user. Thus, it is possible to create a form that replicates a certain form and use it for convenient viewing and printing the information entered into the table.
Creating a Form
Now let's talk about how to create a form in Access. This can be done either through the “Form Wizard”, or through the “Form Builder”, or quickly select one of ready-made solutions. In Microsoft Access 2007 and higher, all these options are located in the “Create” tab. The wizard will prompt you to specify the table fields that will be included in the form, and will provide a choice of options for the appearance of the form.
Instantly creating a form includes all fields, selecting only appearance. The most powerful tool is the Constructor. It allows the user to independently shape the appearance of the form by filling it with elements (text fields, drop-down lists, tabs, etc.) and linking these elements to database table records. You can also create a form, for example, using the Wizard, and then, entering design mode, make changes in order to adapt the form to the task at hand.
 In Access 2007, there are several ways to create forms: AutoForm - automatic creation forms using one of the standard templates. This is the easiest and fastest way to create a form. Form Wizard – create a form using the wizard; Depending on the purpose of the form, the wizard offers a choice of standard templates and design styles. Designer – creating a form from a blank form using the form designer tools.

 Form design After creating a form project, you need to make changes to it that will make the form more attractive (add pictures, change the location of individual fields, etc.). The form is designed in Design mode, in which the form has three sections: the form title; data area; form note.
 Changing the size of fields Each line of the main form in the data area contains two elements: on the left is the name of the field (element type - Signature), and on the right - the contents of the database field (element type - Field). The length of the form elements corresponds to the size of the fields in the table. Selection handles are used to change the size
 Moving fields Moving fields is done by dragging them in the selected state. It is possible to move components of composite fields (for example, label and content) individually. To do this, turn off the Delete mode and drag the resizing handle (top left)

 Adding controls To add controls, you must use the Controls area on the Design tab
 Icon Name mma Selecting objects Wizards Caption Function Selecting objects (allows you to mark and move fields, as well as change their default sizes) Wizards for creating controls Inserting the name of a new field into the form
 Field Displays the contents of some field in a database record or calculated field Group Creates and places switches in a group into which you can enter control switches and selector buttons Switch Switch Checkbox Create a switch, latching button Create a selector switch Create a control switch
 Combo Box Create a Combo List List Create a Combo Box Button Create a Button Figure Embed Statistical Illustrations ( graphic files in uniform) team
 Free object frame Creates an object frame that cannot be linked Attached Creates an object frame that will be linked to the source file Break Sets a page to force the end of a form page Set of tabs Creates a form or dialog box with multiple tabs
 Subform/report Embedding a subform in the main form and establishing relationships between forms Line Drawing a dividing line in the form Creating a rectangular frame for a group of fields Rectangle Additional Embedding elements of elements not present in the toolbar in the form
 Inserting a calculated field Any formula is a combination of operators and field names. A formula must always begin with an equal sign, and field names in the formula must be enclosed in square brackets. Example: =[Salary]* 20%
 Report areas in design mode Any report contains several areas, which allows you to automate the process of its design. The functions of each area are most evident in multi-page reports. Below is a brief overview of the Access report areas.
 Report Header The report header is located on the first page of the report before the header. By default, the title of the report is taken as its title.
 Header A header is placed on every report page by default. You can block its display on pages containing a header or summary. Typically, the header contains column headings, namely the names of the fields.
 Group Header The group header consists of the group name and the words Group Header. Data Region Elements of this region are repeated for each record selected from the table. Group Note A group note appears at the end of a group of entries. It is used primarily to indicate the number of records or the sum of values in group fields. The title of this area includes the group name and the word Note.
 Footer A footer is present on every page of the report. Most often used to display page numbers. By default, the Report Wizard enters the =Page function in the footer. If a report contains many records and spans several pages, they are automatically numbered. In addition, the Report Wizard enters the expression =Now() in the footer, which is replaced with the current date when the report is generated.
 Report Note A report note is inserted at the end of a report and can provide a summary of the entire document. This is the last area of the report project, but when printed it precedes footer last page.
 Macro A macro is a set of one or more macro commands that perform specific operations, such as opening forms or printing reports. Macro is the main component of a macro; a closed instruction that, alone or in combination with other macro instructions, determines the actions performed in the macro. In other macro languages, macros are sometimes simply called commands.
 When you create a macro, the macro commands you want to execute are entered in the Macro column. If the specified command requires arguments, then an area for entering them appears at the bottom of the window. The macro arguments specify additional information, which is required by some macro commands, for example, indicating the object on which the macro command operates, or the special condition under which the macro command is executed.
Purpose of the work: acquire the skills and abilities to create forms for editing tables with MS Access data.
Using the Form Builder in Microsoft Access
Of course, Access allows you to create a data entry form “from scratch,” almost element by element, as the user wants. However, in most cases, this is irrational, since the program allows you to significantly simplify and automate this process, saving the user’s time and effort. Therefore, in order to create the form we will use master of forms. It is located in the “Creation” tab

The Form Wizard will do all the work for us to create a data entry form by asking a few simple questions. To run it Click on the “Form Wizard” button and get this result

The first thing we need to do is select the table with the data that we are going to edit. The table is selected in the drop-down list at the top. As soon as we specify the table, the list of fields available for editing will be immediately populated. Here we can select the fields we need for the form. We can select only the necessary items from each table and query. If some fields do not require direct editing by the user, then there is no need to move them to the right side of the list. By moving from left to right using the appropriate buttons, we select the fields we need, which will be displayed in the form for editing the contents of the data table.
As an example, let's create a form for editing contract data. To do this, in the window we move all the fields of the contract table to the right side.

Accordingly, after clicking the “Finish” button, the form creation wizard will create a form for editing from the fields that were in the right list, and if any table fields remained in the list on the left, then they would not be in the final form for editing.
As a result, we get the form we need in this form:

If the table with the list of contracts were “independent”, then at this stage it would be possible to finish. However, if we remember that our database has been normalized in its structure, we will find out that the contract table does not contain direct data about the person with whom this contract was concluded, but only a link to it. That is, the table logically connected with another table and we cannot break this connection.
Therefore, instead of directly entering data, we need to convert the last three input fields into a drop-down list, which should already contain data about the clients with whom we need to logically link the contract data. To do this, we need to move the mouse pointer over the item we need, and after right-clicking, select the command we need in the list that appears.

IN in this case, we select the Combo Box menu item, telling Microsoft Access that we want to change the way the table field is edited. We want the user to select the required field value from the list offered to him.
We will perform this operation for the last three fields ("Agreement with a legal entity", "Agreement with an individual" and "Deposit conditions"). We get the following result:

However, to ensure that your data is linked to other Access tables, you need to tell the program what values to populate each list with. For these fields with drop-down lists to “work”, you need to set them in the properties data source. To do this, you need to hover your mouse over the desired combo box and select “Properties” from the menu that appears.

A window opens that contains the properties of the field with a drop-down list, which allows us to tell the program (Microsoft Access) what kind of data we want this list fill in and in what mode to edit, what error handling looks like, etc.
We need to specify a row source that will be automatically used to populate the dropdown list with data.

Our task is to link the table of contracts and legal entities by OKPO code. But it is inconvenient for the user to select the OKPO code. From the point of view of ease of use, it would be more correct to provide a list of legal entities, and after the user selects a legal entity, instead of its name, write the OKPO code in the DB (Database) field. That is, to replace the data representation unnoticed by the user.
To solve this problem, select the "Legal Entities" table and click on the button with three dots "...", which is located next to the button for opening the drop-down list.
The Query Builder opens:

We need a name in the drop-down list Legal entity and its OKPO code. To do this, in the field line, first select the name of the legal entity and then in the next column select the OKPO code. We save the result.

Access desktop databases can help you store and track just about any kind of information, such as inventory, contacts, or business processes. Let’s take a walk through the paths you can take to create an Access desktop database, add data to it, and then learn about next steps towards customizing and using your new database.
In this article
Choose a template
Access templates have built-in tables, queries, forms, and reports that are ready to use. A choice of templates is the first thing you’ll notice when you start Access, and you can search online for more templates.
In Access click File > New.
Select a desktop database template and enter a name for your database under File Name. (If you don't seea template that would work for you, usetheSearch online templatesbox.)
File Name
Click Create.

Depending on the template, you might need to do any of the following to get started:
Click New User.
Fill in the User Details form.
Click Save & Close.
Select the user name you just entered, and then click Login.
If Access displays a Login dialog box with an empty list of users:
If Access displays a Security Warning message in the message bar, and you trust the source of the template, click Enable Content. If the database requires a login, log in again.
For more, see.
Create a database from scratch
If none of the templates fit your needs, you might start with a blank desktop database.
From Access, click New > Blank desktop database.
Type a name for your database in the File Name box.
You can either use the default location that Access shows below the File Name box or click the folder icon to pick one.
Click Create.
Add a table
In a database, your information is stored in multiple related tables. To create a table:
When you open your database for the first time, you’ll see a blank table in Datasheet view where you can add data. To add another table, click the Create tab > Table. You can either start entering data in the empty field (cell) or paste data from another source like an Excel workbook.
To rename a column (field), double-click the column heading, and then type the new name.
Tip: Meaningful names help you know what each field contains without seeing its contents.
Click File > Save.
To add more fields, type in the Click to Add column.
To move a column, select it by clicking its column heading, and then drag it to where you want it. You can also select contiguous columns and drag them all to a new location.
Copy and paste data
You can copy and paste data from another program like Excel or Word into an Access table. This works best if the data is separated into columns. If the data is in a word processing program, such as Word, either use tags to separate the columns or convert into a table format before copying.
If the data needs editing, such as separating full names into first and last names, do that first in the source program.
Open the source and copy (Ctrl + C) the data.
Open the Access table where you want to add the data in Datasheet view and paste it (Ctrl + V).
Double-click each column heading and type a meaningful name.
Click File > Save and give your new table a name.
Note: Access sets the data type of each field based on the information you paste into the first row of each column, so make sure that the information in the following rows match the first row.
Import or link to data
You can either import data from other sources , or you can link to the data from Access without moving the information from where it is stored. Linking can be a good option if you have multiple users updating the data and you want to make sure that you are seeing the latest version or if you want to save storage space. You can choose whether you want to link to or import data for most formats. See Import or link to data in another Access database for more information.

The process differs slightly depending on the data source, but these instructions will get you started:
On the External Data tab, click the data format you’ll be importing from or linking to. If you don"t see the right format, click More.
Note: If you still can't find the right format, you might need to export the data first to a file format that Access supports (such as a delimited text file).
Follow the instructions in the Get External Data dialog box.
When you link, some formats are available as read-only. Here are the external sources that you can import data or link from:
|
Yes |
||
|
Microsoft Access |
||
|
ODBC Databases, such as SQL Server |
||
|
Text or comma-separated value (CSV) files |
Yes |
Hi all! In this article I will tell you how to create a button in the Microsoft Access database.
Creating buttons on a form does not depend on what version of Access you have installed (2003, 2007, 2010, 2013 or 2016). In this article I will show 2 ways to create buttons on a form in the Acceess database: using a wizard and using a macro.
How to do this?
Step 1: Create a form
If you don't have a form, you need to create one. You can see more details on how forms are created. Go to the “Creation” tab, “Form Wizard” item. Next, select the table or query on the basis of which the form will be created. Next, select the required fields and click “Next”.
Selecting the appearance of the form.

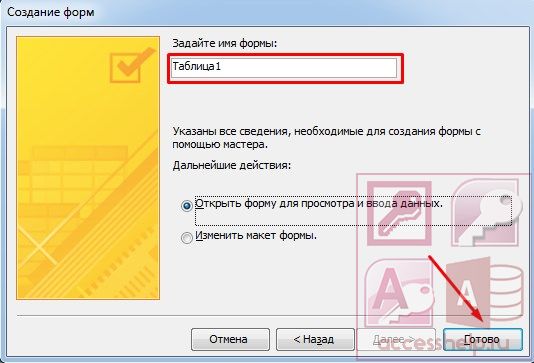
Set a name for the form and click “Finish”.
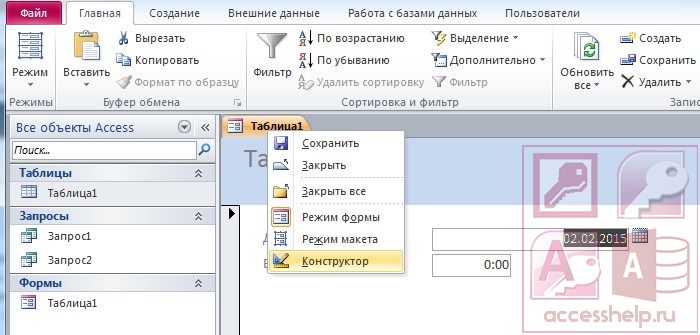
Open the form in design mode. How to create a button in the Microsoft Access database will be described in the second step.
Step 2: Create a button using the wizard
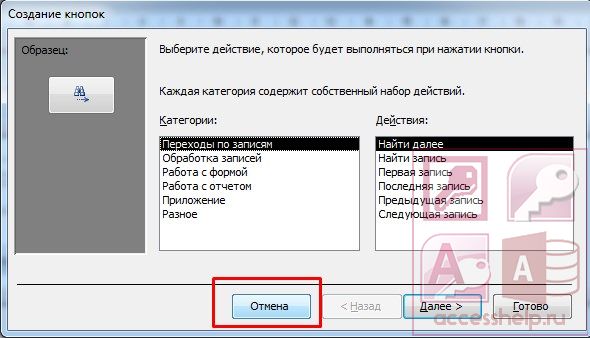
On the toolbar, select the “Button” item and place it on the form. The Button Wizard window appears. Here you need to select the required category and set a specific action. Select “Previous Entry” and click “Next”.

Choose what to display on the button: text or image. Leave the default image and click “Next”.

Set a name for the button and click “Finish”.


Now let's create a button with text. Let’s go to the button wizard again and select “Next entry”.


Step 3: Create a button using a macro
On the toolbar, select the “Button” item and place it on the form. The Button Wizard window appears. Click “Cancel”.

Double-click on the created button to open the properties window. Go to the “Events” tab, “Button Press” item. Click the button with three dots.

Select “Macros” and click OK.


