Connecting a computer and monitor: everything about connectors and interfaces. Connecting a laptop to a TV via VGA Connection diagram for vga to hdmi
Probably everyone has ever wanted to watch a downloaded movie or play some games on the big screen. It’s easier to watch a movie in comfort on the sofa, rather than sitting on a chair near the monitor.
After turning on the computer, the TV should display your desktop as it was on the computer. And you can run any movies, games and other applications.
It should be noted right away that when connecting a TV using VGA, the sound will still be played by the computer. The VGA connector is designed to transmit only images, not sound. Therefore, we will not be able to use the TV’s capabilities to reproduce sound with this connection.
How to connect a computer to a TV with an HDMI cable

Rice. 3. What does the HDMI connector look like?
To connect your computer to your TV using this method, you will need an HDMI cable. It has the shape of a rectangle with 2 beveled edges. If you don’t have a cord, you can purchase one at any store. computer equipment And computer accessories.

Rice. 4. HDMI cable
Connection is also not difficult. Simply connect the HDMI cable to your TV and then to your computer. Next, you need to select on the TV itself which stream to use for display. To do this, press SOURCE on the remote control and select HDMI. After this, your desktop will be displayed on the TV.
It is worth noting that this connection method gives a clearer image, unlike VGA. Since the signal is analog via the VGA cable, and digital via HDMI.
HDMI also carries audio, so this connection makes it possible to listen to the sound of movies, games and other applications using the acoustic capabilities of the TV, which provides additional convenience and benefits of such a connection.
Thus, connecting your computer to the TV will not be difficult and will not require any significant cash outlay, since you already have these cables, and if you don’t have them, they are inexpensive. As a result, you have the opportunity to watch any movie on a large diagonal screen with high-quality sound.
Receive the latest articles on computer literacy directly to your mailbox
.
Already more 3,000 subscribers
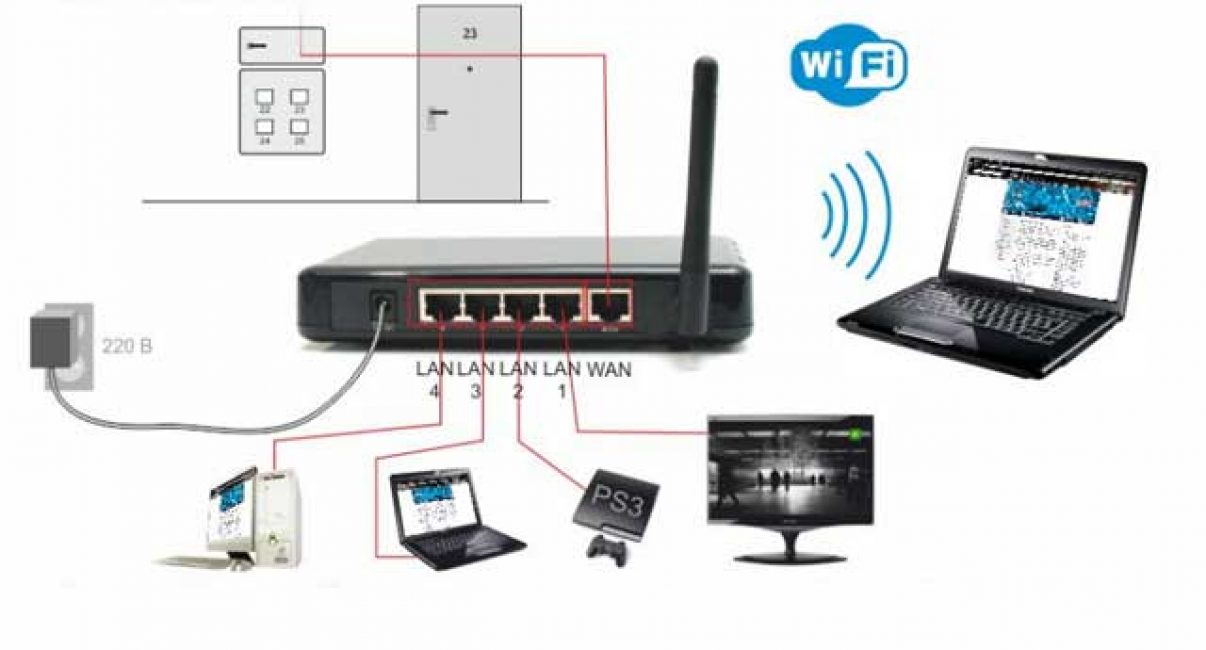
In relatively new televisions you can find USB ports, HDMI, VGA, as well as support for wireless networks, such as Wi-Fi. Thanks to this, the TV can be connected to other devices - laptops, computers, etc. Let's look in more detail at how to do this in all available ways.
Connect via Wi-Fi
Wi-Fi support is mainly found in Smart TVs, so this option is not suitable for all TVs. However, it has its certain advantages, for example, there are no restrictions imposed by the length of the cable. Let's look at the main methods that can be used to connect a laptop to a TV using Wi-Fi.
Method 1: Over local network
This optimal solution, which will allow you to view data on your laptop from your TV remotely. The instructions presented below may not be ideal for all Smart TV models, so in your case there may be some discrepancies with these instructions.
First, set up your TV:
- Take the remote control and press the button "Settings", which will open the TV settings.
- You need to select a tab from the menu "Net". Control is carried out using the remote control remote control. Some TV manufacturers may also include special headsets for interacting with the interface.
- Go to section « Network connection» or a section with a similar name.
- Click on the button "Set up connection".
- A list will appear wireless points, where you need to select the one you want to connect to.
- Enter all connection details. Typically this is only the password, if one is set.
- If the connection is successful, you will receive a corresponding notification.


After connecting to Wi-Fi on your computer, you need to configure the access point. To play multimedia files, you will need to apply special settings in Windows Media Player. Instructions for working with them are as follows:
- Open Windows player Media Player and expand the list "Flow", which is located in top panel tools. Check the boxes next to the items "Allow remote control player" And "Automatically allow devices to play my media".
- Expand the item "Arrange". In the context menu you need to select the item "Library Management".
- Select the type of data you want to import.
- In the window that opens, click on the button "Add".
- Will start "Conductor", where you need to select the directory in which the videos will be located. After selecting, click on the button "Add folder".
- Click "OK" to save settings.
- The library will display data that you can access through your TV.


Now all that remains is to view the added data and also check the quality of communication with the computer. This is done like this:

Connecting via a local network can be convenient, but there are certain inconveniences. For example, if a laptop is idle for a long time, it goes into hibernation mode. In this mode, the exchange of information between devices stops.
Method 2: Miracast
With Miracast technology, you can display images from your laptop monitor to big screen using Wi-Fi connection. You can not only display images from your laptop screen on your TV, but also expand the working space of the screen itself. Initially, you need to make some settings on the TV itself:
The initial setup of the TV is complete, now you need to configure operating system on a laptop. The Miracast connection process will be discussed using the example of a laptop with installed system Windows 10:

You can select the option of projecting an image from a laptop screen onto a TV display by using the Win+P key combination. In the menu that opens, select the option that suits you.
USB connection
Modern TVs (not necessarily Smart TVs) have USB outputs. However, due to technical features It is not possible to connect a laptop and a TV to each other via USB to display an image. This limitation can be circumvented by using a special adapter.

Preparatory stage
Since you cannot directly connect the TV to a laptop via a USB cable, you will have to use special adapters and signal converters. There are special external USB video cards that convert the signal from the computer to HDMI and/or VGA (depending on the availability of the appropriate connectors). There are also devices on the market that transmit signals wirelessly.

Buy one of these devices. It is recommended to choose a wireless one if possible, so you will not be limited by the length of the cable. Wireless converters (even the cheapest ones) have a range of at least 10 meters. If you do not have the necessary wires and they are not included in the kit, then you will have to purchase them separately.
It is worth considering one more feature - with HDMI the audio signal is transmitted without the help of third-party adapters and additional connections. At the same time, signal transmission via VGA will require an additional adapter.

Connection
The connection process looks like this:

Connection setup
Now you need to perform certain manipulations on the laptop and TV so that the entire system works correctly. Let's start setting up the TV:

It remains to perform some manipulations on the laptop:

Connection via VGA
This connection option is quite simple, since it does not require much “bothering” with technical aspects, as happened in previous methods. In most cases modern televisions and computers are equipped with VGA connectors, therefore, if you have the appropriate cable, there should be no connection problems.
Preparatory stage
If you do not have a double-sided VGA cable with you, you can purchase one at any store that sells computer components. The length can be adjusted depending on your needs.
If one of the devices does not have a VGA connector, then you can purchase a special adapter such as HDMI-VGA or USB-VGA. Working with the latter type was described in detail in the instructions above.

It is also worth considering the peculiarities of VGA operation, that is, the fact that they are designed exclusively for image transmission, so it is not possible to transmit files, sound and other information through them. To get around these limitations, you will have to separately connect speakers to the laptop, use special audio adapters, or be content with the sound from the laptop speakers.
Connection
The process of connecting a laptop to a TV via a VGA cable is not anything complicated or unusual. Connection instructions are as follows:

Setting up a VGA connection
When you are done connecting your laptop and TV using a cable, go to settings. Immediately after connecting the cable, the signal will most likely not be transmitted. To fix this, you need to make some preliminary settings, both on the TV and on the computer.
The setup process is as follows for the TV:
Now you need to configure the connection for your computer. Instructions:
- "Desktop".
- "Screen resolution" or "Display Options".
- In the column "Display" select your TV.
- Now click on the item . You can also use the keyboard shortcut Win+P, which will call the desired window.


At this point, the process of connecting the laptop to the TV can be considered complete.
Connecting a laptop to a TV via HDMI
This connection option is in many ways very similar to the previous one. You will also need an HDMI cable, as well as the presence of appropriate connectors on both the TV and the laptop case. The HDMI connection outputs not only the image, but also the sound, which allows you not to bother with this issue.
If one of the devices does not have the required connector, then you can use various adapters. However, in this case, the setup process may become much more complicated, and the quality of the output signal will most likely be lower than with a direct connection.
Connection
There is nothing complicated here. Just take one end of the HDMI cable and plug it into the port on your TV. By analogy, install it in the corresponding interface on your laptop. Usually the fastening occurs as tightly as possible, so additional fasteners are not provided either by the design of the connectors themselves or by the design of the cables.
Setting up an HDMI connection
Here everything is almost the same as with a connection via a VGA cable. The TV is configured like this:
Now set up your computer:
- Typically, after you set up your TV, the image from the laptop display will be duplicated on the TV screen. However, if it does not appear or does not appear in the form you would like, then you will have to resort to the laptop settings. Right-click on empty space on "Desktop".
- From the context menu, select the option "Screen resolution".
- In the column "Display" select your TV.
- If you are not satisfied with the resolution displayed on the TV screen, then indicate it in a special column bearing the appropriate name.
- Now click on the item "Displaying an image on a second screen"
- Here, select the image transfer option.
Also, do not forget that HDMI supports the ability to transmit audio without any additional cables. This often happens when outdated drivers or if cables from 2010 and earlier are used for connection. The process of setting up sound with this type of connection goes like this:

Another common problem is when the TV icon appears, but it is grayed out. This may indicate two problems:
- The laptop simply did not recognize the TV correctly. In this case, you need to reboot without disconnecting the HDMI cable. After a reboot, everything should return to normal;
- If this does not happen, then most likely your sound card drivers are outdated. Update them. In the context of this article, this process will not be considered, since this is the topic of a separate article.
Connection via twisted pair RCA
This option of connecting a laptop to a TV is the most difficult, as it requires a long preparatory stage from the user, the presence of special cables and adapters. However, if for some reason other connection methods are not possible, then you will have to use this method.
Preparatory stage
Many computers, and even more so laptops, do not have the necessary connectors for an RCA connection, so you will have to mandatory buy a converter. Since most modern laptops are equipped with HDMI or VGA outputs, you will have to buy a converter that has such connectors. The main thing is that the same interfaces are on the laptop.

You also need to select the appropriate cables for the connectors, that is, HDMI/VGA and a branch of RCA cables. Sometimes all the necessary peripherals are included. Additionally, you need to familiarize yourself with the characteristics of RCA cables:

Most often you can get by with just the yellow cable, since there will still be serious problems with the sound if you can get it out at all. The sound will most likely have to be connected through the laptop to the speakers or through the speakers of the laptop itself.
Most converters may not receive the necessary power from the connector on the computer, so you will have to separately purchase a device to power the converter if it is not included with it.
Connection
This process may vary depending on what type of converter you purchased. First, let's look at the instructions for connecting an HDMI-RCA channel:
- Connect the HDMI cable to the appropriate connector on the laptop body. There is no need to secure it with anything else.
- Plug the other end of the HDMI cable into the appropriate interface on the converter itself. Required connector can also be signed as "Input".
- Now connect the RCA wires to your TV. The colors of the plugs must match the colors that indicate the connector on the TV, otherwise the connection will not be made correctly. The necessary connectors are usually located in a block marked "AVIN".
- Similarly, connect the RCA wires to the converter.
- Using a special switch on the side panel, you can adjust the image standard.
- Signal transmission may not occur in cases where there is insufficient power from the computer's HDMI connector. In these cases, the transmitter can be connected to a computer using a double USB cable, providing it with the necessary energy, or connected to the network.


We will also consider the connection process using a VGA-RCA adapter:

Settings
When you are done with the connection, you will need to configure the TV and computer. Let's start with the TV:
Now set up your computer:
- Typically, after you set up your TV, the image from the laptop display will be duplicated on the TV screen. However, if it does not appear or does not appear in the form you would like, then you will have to resort to the laptop settings. Right-click on empty space on "Desktop".
- From the context menu, select the option "Screen resolution".
- In the column "Display" select your TV.
- If you are not satisfied with the resolution displayed on the TV screen, then indicate it in a special column bearing the appropriate name.
- Now click on the item "Displaying an image on a second screen". You can also use the Win+P key combination, which will open the desired window.
- Here, select the image transfer option.
If you use an RCA-to-HDMI adapter, you can also output audio, not just video. True, sometimes sound may not be output by default, although it should be. This often happens with outdated drivers or if cables from 2010 or earlier are used for connection. The process of setting up sound with this type of connection goes like this:
Within the framework of this article, all available methods connecting a laptop to a TV. Unfortunately, not all of them are universal, so you will have to look depending on your situation.
Modern TVs can easily replace a computer display. But how does a computer connect to a TV?
We have collected various ways solutions to this common problem.
Connection selection

First, attention will be paid to the optimal options regarding image quality, with which you can easily make the connection. After this, several additional methods will be given.
There is a possibility that the user will need to buy a cable from the store. Usually it is not very expensive, but it can be purchased various devices You can go to a specialized radio store or a retail chain that sells consumer electronics.
Please note that the presence of gold plating on expensive cables does not in any way affect the quality of the displayed image.
So, here are a few options for how to connect your computer to your TV:
- HDMI- an ideal option, because to work with it you just need to connect the connectors. As a result, not only sound, but also image will be transmitted well. The only possible problem is that sometimes it may not work from a laptop.
- VGA- one of the easiest ways to connect television. To do this, you only need a cable, which is sold complete with monitors. There is a possibility that the user has an unused device at home. If necessary, you can buy it at a specialty store.
- With cable from DVI the situation is the same - to work with it you only need to buy an adapter and cable.
- Alternatively, you can use a composite cable S-Video. You can work with it either through a cable or through an adapter. It’s just that he’s not considered the best way connections because the image may not be very clear. So such a connection is not used if modern technology is available. The connection occurs in the same way as when working with household players.
Connecting using HDMI

Surely many users have heard about this connector. It is on all modern TVs.
The HDMI cable has the same connectors on both ends.
You can buy a cheap cable. But if the user plans to work in 3D mode, it is better to use latest version HDMI cable.
Look carefully, a similar socket is located on the video card near the monitor connection.
If missing discrete video card, the nest will be located on motherboard, that is, near the USB port. However, it will look similar.
With a laptop everything is much simpler - it has the same HDMI socket. But it’s located on different sides depending on the model the user is working with.
Sometimes the TV is hanging on the wall and it can be very difficult to insert the cables from behind. It is for this situation that a cable with plugs at right angles is sold.
Alternatively, buy a special HDMI corner.
VIDEO: How to connect a computer to a TV via HDMI
How to connect a computer to a TV via HDMI
Connecting a TV to a computer via a VGA connector
Video Graphics Array is an interface designed to receive and transmit analog video signals. There is no sound transmission in this option for connecting the TV to the computer.
Before connecting, make sure that both devices - the computer and the TV - are equipped with VGA connectors and have a special cable.

To make this connection, your computer must be equipped with an operating system of at least .
Connect the PC and TV with a VGA cable when turned off, then press the SOURCE button on the TV remote control (in some models this may be INPUT) and in the menu that appears on the screen, specify as an external signal VGA(in some models - PC or RGB).
After this, confirm the selected changes by clicking OK.

Right click on free space on the desktop and in the drop-down list, go to menu.
IN this menu you are given the choice of using both a TV and a computer monitor, as well as setting the required resolution.
Additionally, you can choose to use multiple screens, which gives you the following options:
- Duplicate screens- a function that allows you to get the same image on both the monitor and the TV screen;
- Expand screens- will allow you to simultaneously watch a video on the TV screen and, for example, type text on a computer;
- Show desktop 1 or 2- this function operates only one of the available screens - either a monitor or a TV.
In general, the process of such connection is not difficult, however, it creates some inconveniences associated with the transmission of sound in this embodiment.
It will have to be connected with a separate cable or use an external cable for these purposes. sound system.
S-Video
Another option for connecting a TV to a computer is to connect using S-Video connectors.
This option is convenient because all televisions and computers (except very old ones) are equipped with an S-Video connector.
All you need to do is connect these devices with an “S-Video to S-Video” cable.

Before connecting, both the TV and the computer must be de-energized, after which you insert one end of the cable into the connector on the computer’s video card, which is a round black socket, and the other into the S-Video socket on the TV.
As the operating system loads on the computer, the TV screen will blink, thereby indicating that it has been detected external source signal.
The next step is to configure the video card. To do this, click on an empty space on the desktop and in the menu “ Properties» go to the tab « Options» .
Then select the item « Additionally» and in the window that opens, opposite the name of the video card, activate the item « Clone» .
After applying this parameter, click on the item « Display" and select the name of the TV from the available list.
Then, on the TV, search for the signal source and adjust the image.
Miracast

Miracast technology differs from DLNA in that a similar output option multimedia information from TV to PC simplifies the task of viewing not only recorded files stored on the gadget’s hard drive, but also played online on one of the built-in ones.
But Miracast technology has the only drawback - it is very demanding on computer resources.
So it is only supported individual computers, as well as tablets and laptops that have powerful hardware.
It is important to implement such modern technologies on the TV itself.
If the TV only optionally supports Miracast, then you will have to spend extra money on an adapter that easily connects to the HDMI port.
The technology of a wireless monitor is very simple - the displayed image is compressed using a special algorithm.
After this, it is mirrored via Wi-Fi to a large TV display.
In this case, there is no need to connect the TV to one of the local networks using a router.
Thanks to the receivers, a separate mini-network is organized, simplifying communication with a PC.
To successfully transfer images, install the Wireless Display add-on on your computer and start broadcasting.
Make sure that the Miracast function is activated in the TV menu. This can be done in the settings if you go to the tab "Networks" and go to sub-item Intel WiDi.
VIDEO: Connecting your smartphone to your TV via Miracast
Connecting your smartphone to your TV via Miracast
Connecting PC and Smart TV
As many probably know, home network can be created without using a router. IN in this case will perform the role of an access point.
This is done in several ways:
- You can create a connection in one of the special management consoles;
- Alternatively, use ;
- Take advantage third party programs, for example, Virtual Router Plus.
Please note that a distinctive feature of most built-in Windows tools– greater reliability and stability of operation.
In addition, users will no longer have to waste time searching for programs and installing them on personal computer. So the registry won't be too clogged.
This method is considered one of the simplest.
Once logged in as an administrator, proceed to launch the command line. To cope with this Windows 8 task, use the key combination Win+X.
When the menu appears, you must select " Command line" In the seventh version operating system you need to press the combination Windows keys+ R in the window that opens, and also write CMD and press Enter.
Be sure to write the following command netsh wlan set
and after that press Enter.
Creation new network After this it will be completed and you can start launching it. For this purpose, write on the command line
Hostednetwork
It is important to say what to create virtual network you can only do it once.
However, after the module is rebooted, the user must enter a command to successfully launch the Internet.
As a result, the user will only have to connect to the computer by performing the necessary steps that have already been done when working with the router.
Control TV from PC wireless network Wi-Fi is possible using the same programs.
There are various add-ons that make it much easier to control your TV using a smartphone.
In this case, the telephone is used as control.
So, this article provides the basic ways to connect a computer to a TV.
It is very easy to cope with this task if you choose the appropriate option and follow the instructions given. Then the user will not have any difficulties connecting.
VIDEO: Connecting a Smart TV to a computer (Wi.Fi - Lan) - using WINDOWS
We connect the TV with Smart TV to the computer (Wi.Fi - Lan) - using WINDOWS
Image Settings
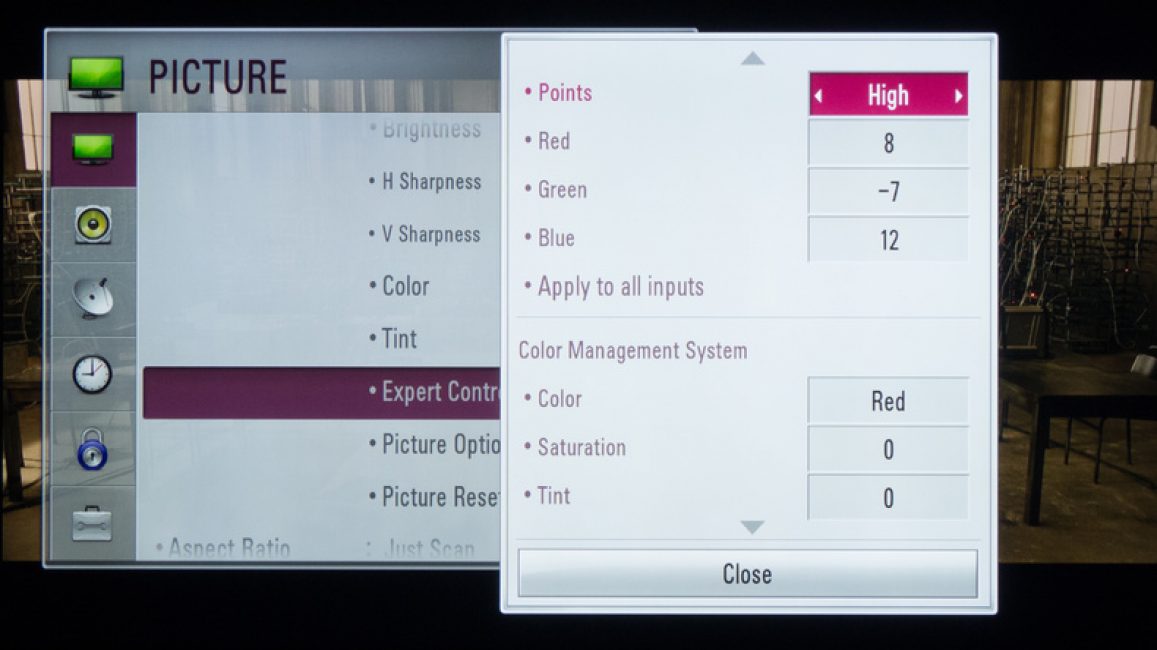
If the image is blurry, you should open system settings and find the section that is responsible for .
Here the user can set the required resolution to match the TV. If necessary, you can change the mode in which the video is displayed.
Most modern smart TVs can be connected to a PC wirelessly using local network wifi
This helps broadcast a variety of content - music, videos, and so on.
If necessary, you can easily duplicate images downloaded from your computer to your TV.
As a result, the latter will turn into a high-quality analogue of a wireless monitor. In addition, when working with wi-fi, you won’t need it.
As for the LG device, to activate this function you can use the service Smart Share
AllShare program
There are big differences in wireless connection settings between TV models from different manufacturers.
Most devices are capable of establishing a connection in automatic mode. To work with others, you need to install an additional software to connected .
So it may be difficult to formulate universal instructions, suitable for all users.
If you need to connect your TV to your PC via, you can find necessary information by reading the instructions, or going to the manufacturer’s official website.
There you can also find the answer to the question of what software is needed for this.
Combination of different outputs

Sometimes it happens that the equipment does not have the necessary connectors. It often happens that there is one port on the TV and another on the computer.
What to do in this case? It’s very simple – you just need to decide which connectors will be used and purchase the right cable.
Alternatively, use special converters that simplify the connection of different ports.
You can use a VGA converter that receives signals from the VGA output of the gadget.
After this, the signals are converted to the most common S-Video for TVs.
When turning off, follow this order:
- The TV and computer should be unplugged;
- Remember to disconnect the antenna and peripheral devices;
- You should connect the cables if you plan to use adapters;
- It is important to connect your computer as well as your TV to the network.
- Next, you need to turn off the computer and wait for the system to fully boot;
- Only after this can you start turning on the TV.
By clicking the right mouse button, the user will see context menu, in which you should find the item "Screen resolution" . For the system to connect the TV, you must press "Find" .
By selecting the item "Multiple Screens" , the user must configure the output of images:
- Screen duplication - in this case, the same information will appear on the TV as on the computer screen;
- When screens expand, the computer display and TV will form a common work area;
- Half desktop display means that the image will be displayed on either the TV or the computer.
| Connection method | How to do |
|---|---|
| Connecting a TV using a VGA connector | This connection option will require a separate audio signal output. |
| Connecting using the S-Video connector | Quite a simple and inexpensive way to connect. Due to the fact that most devices have an S-Video connector, it can be used as the main connection option. |
| Connecting a PC using HDMI | You can buy a cheap cable. But if the user plans to work in 3D mode, it is better to use the latest version of the HDMI cable. Next, you should find the HDMI socket, which is located behind the computer or TV. |
| Miracast technology | Miracast technology differs from DLNA in that this option for outputting multimedia information from a TV to a PC simplifies the task of viewing not only recorded files stored on the gadget’s hard drive, but also played online on one of the built-in web browsers. |
| Connecting a PC and Smart TV without a special router | Please note that a distinctive feature of most built-in Windows tools is greater reliability and stability. In addition, users will no longer have to waste time searching for programs and installing them on their personal computer. So the registry won't be too clogged. This method is considered one of the simplest. Further, this issue will be considered in more detail. |
Modern computers have many options for displaying images on a TV, one of which is connecting via VGA. Feature this method is that the VGA interface was a de facto standard in the past and even old PCs of venerable age are equipped with it. Therefore, if you are the owner of such equipment, then connecting your computer to your TV via VGA may be the only way to output images from one device to another.
Unlike most modern interfaces, VGA is analog and does not support audio output. However, almost all modern TVs have VGA connectivity. Carefully inspect the connectors of your device and you will probably find one like the one in the picture below. This is a 15-pin D-Sub (VGA).
It is into this that we will connect the cable, connected at its other end to a similar connector on your computer.
Make the connection in the switched off state and with the power cords unplugged from the socket!
When connecting, please note that it is not enough to insert the connector tightly and all the way; you will also need to tighten the “ears” - two screws on the sides. This will eliminate the possibility of accidentally pulling out the cable and guarantees a reliable connection. So, if you managed to connect your PC to your TV via a VGA cable, let's start setting up.
Configuring connection settings
Right-click on an empty space on the desktop and select “Screen Resolution”. If you did everything correctly, the display settings should show two devices, and your monitor should be defined as the primary one.

Next, in the “Screen” line, select the second monitor. In our case it is ACER V243HQ. Check whether the resolution of your television device is determined correctly. Please note that it should not be greater than the physical resolution of the matrix specified in the operating instructions.

If the image on the TV is without distortion or change in proportions, then congratulations - you managed to connect everything correctly. If there are black bars on the sides of the screen, then you have set the resolution or aspect ratio incorrectly. Carefully read the characteristics of your TV and, in accordance with them, select the correct value in the “Screen Resolution” menu.
So, we have dealt with image output and are moving on to setting up audio transmission to the TV.
Sound output
As we already mentioned, the VGA interface only supports image transmission. In order to output sound, the easiest way is to use a mini-jack cable, connecting it to the computer output, marked in green, and a similar TV input. The cable has the same connector that is widely used for connecting almost all types of audio devices: mp3 players, music centers, headphones, etc. When outputting multi-channel audio, a connecting cable with color-coded connectors is used, so the connection should not cause you any difficulties.
Possible connection problems
Sometimes it happens that, despite a correctly made connection, the computer does not see the TV via VGA. In this case, there are several ways to solve the problem.
Latest generation video cards from NVIDIA and AMD are not equipped with VGA outputs. Moreover, such video cards comply with the DVI-D standard, which means that only digital signals are transmitted via DVI. All this leads to the fact that it is not possible to connect an old VGA monitor to such video cards, even using an adapter from DVI to VGA.
But, not everything is so sad. Such modern video cards can still be connected to old VGA monitors. In this article we will talk about how to connect a VGA monitor to HDMI or DVI-D output on the video card.
Connecting VGA monitors to DVI-D or HDMI outputs of a video card
So, if you have a monitor with a VGA input and a video card with DVI-D or, then to connect them you will need active adapter. This active adapter converts the digital signal from the video card into analog signal for the monitor.
These adapters usually have a small HDMI cable, which you need to connect to the video card, and on the other side there is a VGA output into which you need to plug the VGA cable from the monitor. The pictures below show what such an adapter looks like on its own and already connected.

If there is no HDMI output on the video card, then you can try connecting such an adapter to the DVI-D output. In this case, you will also need an adapter from DVI-D to HDMI.

As for the purchase, active adapters from HDMI to VGA can be found in Chinese internet stores, for example, on AliExpress.


