Lan cable pinout. We crimp the network wires with RJ45 connectors. Pinout of wires to create a local network. Types of cables for Internet connection
Recently I had the need to compress network cable LAN, but I didn’t have a special tool at hand. It’s about how to pressurize twisted pair without a special tool we will talk. Of course, you can buy a ready-made cable, but we’re not looking for easy ways, are we? Well, but seriously, there are very different situations when it is necessary to crimp a twisted pair cable.
For example, due to frequent removal of the RJ-45 plug from the Ethernet port during crimping, a failure could occur. high quality signal or there is not enough standard cable length (patch cord) to connect several workstations. Or maybe you just need it at home (for example Samsung TV) or to a local network. You never know what you might need to connect via a network cable.
Here are the factory standard lengths for patch cords with RJ-45 plugs: 0.5m, 1m, 1.5m, 2m, 3m, 5m, 7m. The manufacturer produces cables of shorter or longer length to order.
At home I had a twisted pair cable (described in detail here) and several RJ-45 connectors, but I did not have special crimping pliers (crimper). As you probably already guessed, a way out was found - I decided to replace the crimper with a screwdriver. Of course, without a special tool, the installation process becomes routine and takes more time, but with the right approach, the quality of crimping will not suffer.
Schemes for crimping twisted pair cables.
I think you understand that by quality we mean the head and hands because the quality of twisted pair crimping will depend on them. I say this because I have met people who manage to crimp twisted pair cables with a crimper much worse than an amateur can do with a screwdriver using the right approach. The image below shows one of the many types of crimpers.
I'll start by presenting several circuits for crimping twisted pair cables. Below is an image in which I drew two twisted pair crimping diagrams: a straight cable and a Cross-Over cable.
- The first scheme is used to connect PC - Switch (computer - switch), Smart TV - Router (TV - router), Switch - Router (switch - router) and Router - PC (router - computer).
- The second scheme for connecting PC - PC (computer - computer), Switch - Switch (switch - switch), Router - Router (router - router). Typically used to connect devices of the same type.
It is worth saying that many modern digital devices automatically detect the cable type (straight or crossover) and work perfectly together on any of them. Most modern devices already have such an interface (Auto MDI-X), and therefore the cross type of crimping is gradually becoming a thing of the past.
Straight-through cable.
Crossover cable (Cross-Over - zero hub).
I think that you have chosen the necessary scheme with which you will connect your devices to the network, now let's proceed directly to creating the LAN cable itself.
Detailed instructions for crimping an RJ-45 connector.
First of all, you need to remove the outer sheath of the cable. By the way, almost all types of twisted pair cables contain an internal thread, which makes it easy to remove the cable from the outer sheath when connecting to RJ 45 connectors (for computer networks).

Now you need to straighten all the wires laid together and measure the distance along the plug, attaching the cable to it so that all the wires sit in their seats until they stop. The outer sheath of the cable must be placed under the retaining clip.

After making sure that the measurement was made correctly, we cut the cable to the required length.

Now you need to insert the cable into the end of the plug so that all the wires fit into their guide channels all the way. This must be done so that the outer insulation of the cable falls under the connector clamp bar. After this, clamp the connector fixing bar with a screwdriver, while making sure that the wires do not come out of the landing channels. For convenience, you can fix the cable with the hand in which you hold the screwdriver.

At this stage of crimping, the connector should look like the photo below. Please note that the contacts are not yet recessed into the cable cores.

All that remains is to recess the connector contacts into the cable cores. You need to be extremely careful and press with feeling with a screwdriver on the contacts so that they sit in their places, while cutting through the braid of the wires.

When you recess the connector contacts into the cable cores, make sure that they sit in the same place in one line. Upon completion of crimping, it is advisable to verify the quality of the work performed and check the connection using a conventional tester. To do this, you need to set the switch on the tester to the resistance measurement mode or to the sound signal position and test all the working cores of the LAN cable you crimped.

If there is no resistance or sound signal, press the connector contacts to their seat. Of course, doing this with a crimper is much more convenient and faster, but if you do everything correctly, the output will be no worse than a crimped twisted pair cable with a screwdriver.

It would be nice to use an insulating cap as it would protect the cable from bending and the connector from dust and moisture, but I didn’t have one at home. In addition, the cap gives the cable some finality and beauty.

In the photo below, I decided to post a comparison of a crimped twisted pair cable by specialists from a well-known provider in Ukraine, who crimped the connector with a crimper about a year ago at my home. Their work in the photo is circled in red, and the connector crimped with a screwdriver is circled in green.

P.S. It is important to remember that the quality of the connection of your network depends on the quality of the network cable crimping. A poorly crimped or secured connector may work intermittently, which in the future will lead to its complete failure. If you are in home network If you find a broken LAN cable, then find out how to connect it. By the way, I recommend expanding your horizons and reading a short publication about between continents.
I decided to drop the cable from the router to the computer. I bought cable channels three years ago, but I just got around to them :). I don’t remember the last time I crimped an RJ-45, I remembered it and thought a lot. I'm sharing.
What do we need?
Select a cable and lay it
Measure from point A to B how much cable you need. Immediately figure out how it will go in the cable channel or be attached to the walls. Perhaps you are going to hide it under the baseboard. Before laying it is advisable to ring the cable :).
Before the “crimping” operation, the cable must already be laid, leaving an adequate margin at the ends. For example, it would be desirable that a computer with a cable connected could be pulled out of a niche, unfolded, and some kind of maintenance performed system unit without the need to disconnect wires.
Cables for laying the network are used with 2 and 4 twisted pairs of wires. Any of them will suit you, but 4-wire (with only 2 pairs) will allow you to connect only at speeds of up to 100 Mbit. Such a cable is cheaper, easier to crimp, and often higher speed is not required.
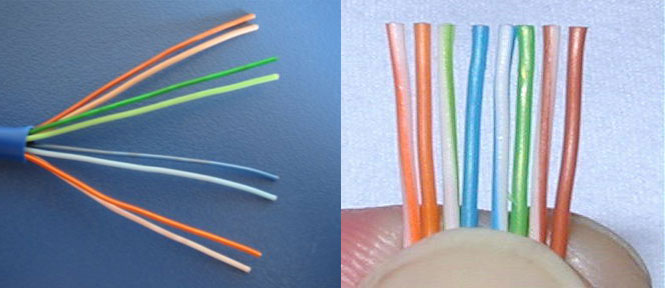
Please note that each pair of cores is marked with its own color. For example, an orange wire is intertwined with a white-orange one. Each pair is absolutely no different from the other, except for the color of the insulation. Wire connection and crimping diagrams always specify the colors of the wires, but in fact, if you swap two pairs, everything will work exactly the same.
RJ-45 connectors
Through the transparent body of the connector, 8 gold-plated contacts are visible. The numbering of contacts from 1 to 8 is shown in the picture.

For crimping, we only need a pair of these connector connectors. But it never hurts to take a few in reserve. :)
Crimping pliers

The figure shows three typical operations that crimping pliers can perform.
Stripping the overall cable insulation. The knives (1) do not close completely, and the wire can be rested against a special strip. The bar will allow you to measure the optimal cable length (about 1.5 cm). When removing the insulation, the end of the cable can be turned, then the knives will cut off the protective layer in a circle.
Crimping RJ-45 connector. Pincers (2) are used at the very end, when the conductors are passed into the desired tubules. The serrated edge presses the contact blades into the conductors, and a special protrusion snaps the RJ-45 wire retainer into place.
Knife. The 3rd type crimping element is usually used for straightening conductors and cutting cables. This knife completely touches the opposite edge, working like a wire cutter.
What are we connecting?
There are two types of connections, so we need to figure out what we will connect. The most common case is when we connect a computer to some kind of switching device - a router, a switch, a switch... A direct connection diagram is suitable here ( workstation- concentrator).
Direct connection diagram
You need to make exactly the same cable crimp on both ends according to this diagram. Choose a picture for your case - 8 or 4 wires in the cable.

The color order of the pairs is shown as an example. Instead of the orange pair, you can connect, for example, a green pair to pins 1 and 2. But both connectors must be routed equally at the ends of the wire.
Cross cable layout
The second case is the connection of two hubs or two workstations. In this circuit, you need the orange and green pairs at the ends of the wire to swap places.


It doesn't really matter whether you decide to connect your home computer to the router or decided to combine all PCs into apartment building: you will build a computer network, and you will not be able to do without knowledge of how and how to connect devices. This publication will talk about what a “twisted pair” is, how the correct crimping and pinout of a twisted pair should occur for various types devices.
In addition, the topic of the necessary tools will be touched upon, and how this can be done “on your knees” without the use of specialized tools.
A little theory
A twisted pair cable is a cable of a certain standard used to create a particular type of computer network. It can be shielded (STP type) or unshielded (UTP type). Depending on the equipment connected to the network and the expected data transfer speed, a cable of various standards with 2 or 4 pairs of wires is used.
The throughput of the “twisted pair” depends on the number and cross-section of the cores, as well as the material from which they are made. Four pair conductor is mainly used to create more modern networks, with data transfer rates up to 1 Gbit/s.
Correct "pinout"
To combine two devices into one network, you will need a piece of cable (patch cord), on both sides of which RJ 45 connectors (Jacks) are attached. To build a working computer network, it is important to make the correct wiring or, as experts say, pinout. The use of RJ 45 connectors allows you to make a patch cord with a high-quality connection of wires, without resorting to the soldering process.
The standard RL45 connector has 8 contacts, each of which has its own wiring. The connection of wires with connectors is done based on existing standards: TIA-568A and TIA-568B.
Most often, to create a 100 Mbit network, the user uses an 8-core cable, although 4 cores are quite sufficient. Below we will consider crimping a twisted pair of 8 cores.
To connect a computer with a switch (router), a direct twisted pair crimping circuit is used, i.e. patch cords are used, with the same pinout on both ends.
The figure shows the color arrangement of wires according to the TIA-568A standard
 Color arrangement of cores in the connector, according to the TIA-568B standard
To connect two computers to a network, pairs of wires must be crossed, so in one patch cord they make: one end according to standard A, the other must correspond to standard B.
The crimping circuit for a twisted pair crossover looks like this: 
Correct connection of 2 pair cables
As mentioned above, a cable consisting of 2 pairs of wires is in the vast majority of cases used to connect between the provider’s access switch and the subscriber’s equipment, so most often, a direct pinout scheme is used for this, where both connectors are connected according to one of the above standards. The figure shows a direct crimping diagram of a twisted pair cable into 4 cores.
 If you need to make a patch cord with a crossover connector connection scheme, then you should simply swap the pairs when connecting the second connector. If you need to prepare several workplaces, then the specialists of the System Technologies company can produce it according to the layout of your office.
Tool for the job
You will need:
- Cable of the required standard.
- RJ45 connectors 2 pcs. (if you are doing this for the first time, you should take extra connectors).
- Special pliers.
- Insulation stripping device.
- Twisted pair tester.
 This is what the required tool might look like
 One of the tester options for checking the correct connection of the cores.
If you don’t have a special tool, and you decide to make your own patch cord from a twisted pair cable, the pinout and crimping of which will meet all standards, then you can prepare the tools shown in the figure below. IN last section This article will tell you how to use them, as people say, “on your knees.” 
Step-by-step instructions for crimping a network cable

Crimping the connector using a screwdriver and other available tools
If you don’t have special tools and you have a one-time job to do, then you shouldn’t buy a special tool. You can try connecting and fastening the connectors using regular side cutters, a knife and a screwdriver.

It may not turn out very beautifully, but the main thing is that everything works. Better yet, call us and we will do the job quickly and efficiently. We work both in Chelyabinsk and in the region.
Twisted pair is a network cable connecting equipment. Such a cable consists of a sheath - this is insulation, and one or several pairs of twisted conductors - cores. Twisting protects the wire from interference and helps strengthen the signal. The cable category, which determines the frequency range, depends on the number of pairs.
Why and how to crimp twisted pair
To create networks, you can use a patch cord - a wire whose ends are already crimped, but sometimes you need to pull the wire through holes in the wall and remove the connector - or you need a wire of a different length.
For crimping you will need:
- twisted pair cable category 5;
- wire cutters;
- connector (aka jack, connector, standard RJ 45, or 8P8C – 8 positions 8 contacts);
- screwdriver (preferably special crimping pliers for RJ 45).
Stripping
Before crimping, clean the cable from both ends (3 cm), being careful not to damage the core insulation.
Alignment
Unravel the pairs of wires so that each core is separate, arrange them according to the diagrams shown below, and cut them to the size of the connector.
Crimping diagram
Straight twisted pair crimping
Allows you to connect the end device with an intermediate device: computer / card - switch or modem / hub. We look at the connector with the contacts facing up.

The colors at both ends are arranged in the same order:
- White-orange
- Orange
- White-green
- Blue
- White-blue
- Green
- White-brown
- Brown
Cross crimp twisted pair
Allows you to connect two end devices: computer - computer, for example.
Color arrangement:
- White-green
- Green
- White-orange
- Blue
- White-blue
- Orange
- White-brown
- Brown
On the other end:
- White-orange
- Orange
- White-green
- Blue
- White-blue
- Green
- White-brown
- Brown

Lifehack
Different crimping schemes were relevant on old equipment. Modern device is able to “see” other equipment using any of the listed crimping schemes!
Fixing and crimping a twisted pair with a screwdriver
Insert the wires into the grooves of the connector until they stop. Before crimping, check the order of colors and the position of the wires through the connector. Crimping pliers are the most suitable tool, but they are rarely kept at home. Therefore, take a screwdriver and, pressing the contacts all the way, bring them to the bottom position so that they do not protrude beyond the edge of the connector and are slightly recessed. Use a plastic clamp to press the base of the wire
Almost no local network can do without wired segments, where computers are connected to the network using cables. In this material you will learn what types and types of cables are used to create local networks, and you will also learn how to make them yourself.
Almost no local network, be it home or office, can do without wired segments where computers are connected to the network using cables. This is not surprising, because this solution for transferring data between computers is still one of the fastest and most reliable.
Types of network cable
In wired local networks, a special cable called “twisted pair” is used to transmit signals. It is called that because it consists of four pairs of copper strands twisted together, which reduces interference from various sources.
.jpg)
In addition, the twisted pair has a common external dense insulation made of polyvinyl chloride, which is also very little susceptible to electromagnetic interference. Moreover, on sale you can find both an unshielded version of the UTP cable (Unshielded Twisted Pair), and shielded varieties that have an additional foil shield - either common for all pairs (FTP - Foiled Twisted Pair), or for each pair separately (STP - Shielded Twisted Pair).
Using a modified twisted pair cable with a screen (FTP or STP) at home only makes sense when there is high interference or to achieve maximum speeds with a very long cable length, which should preferably not exceed 100 m. In other cases, a cheaper unshielded UTP cable, which can be found, will do at any computer store.
Twisted pair cable is divided into several categories, which are marked from CAT1 to CAT7. But you shouldn’t be immediately afraid of such diversity, since for building home and office computer networks, mostly unscreened cables of the CAT5 category or its slightly improved version CAT5e are used. In some cases, for example, when the network is laid in rooms with large electromagnetic interference, you can use a sixth category cable (CAT6), which has a common foil screen. All of the categories described above are capable of providing data transmission at speeds of 100 Mbit/s when using two pairs of cores, and 1000 Mbit/s when using all four pairs.
Crimping schemes and types of network cable (twisted pair)
Twisted pair crimping is the process of attaching special connectors to the ends of a cable, which use 8-pin 8P8C connectors, which are usually called RJ-45 (although this is somewhat misleading). In this case, the connectors can be either unshielded for UTP cables or shielded for FTP or STP cables.

Avoid purchasing so-called plug-in connectors. They are designed for use with soft stranded cables and require some skill to install.
To lay the wires, 8 small grooves are cut inside the connector (one for each core), above which metal contacts are located at the end. If you hold the connector with the contacts up, the latch facing you, and the cable input is facing you, then the first contact will be located on the right, and the eighth on the left. Pin numbering is important in the crimping procedure, so remember this.
There are two main schemes for distributing wires inside connectors: EIA/TIA-568A and EIA/TIA-568B.

When using the EIA/TIA-568A circuit, wires from pins one to eight are laid out in the following order: White-Green, Green, White-Orange, Blue, White-Blue, Orange, White-Brown, and Brown. In the EIA/TIA-568B circuit, the wires go like this: White-Orange, Orange, White-Green, Blue, White-Blue, Green, White-Brown and Brown.
For the manufacture of network cables used for interconnection computer devices and network equipment in various combinations, two main cable crimping options are used: straight and crossover (crossover). Using the first, most common option, cables are made that are used to connect the network interface of a computer and other client devices to switches or routers, as well as connect modern network equipment to each other. The second, less common option is used to make a crossover cable, allowing network cards connect two computers directly to each other, without using switching equipment. You may also need a crossover cable to connect old switches into a network via up-link ports.
What to make straight network cable, it is necessary to crimp both ends the same scheme. In this case, you can use either option 568A or 568B (used much more often).

It is worth noting that to make a straight network cable it is not at all necessary to use all four pairs - two will be enough. In this case, using one twisted pair cable, you can connect two computers to the network at once. Thus, if high local traffic is not planned, the wire consumption for building a network can be halved. However, keep in mind that at the same time, maximum speed Data exchange on such a cable will drop 10 times - from 1 Gbit/s to 100 Mbit/s.

As can be seen from the figure, in in this example Orange and Green pairs are used. To crimp the second connector, the place of the Orange pair is taken by Brown, and the place of Green by Blue. In this case, the connection diagram to the contacts is preserved.
For making crossover cable necessary one crimp its end according to circuit 568A, and second- according to the 568V scheme.

Unlike a straight cable, all 8 cores are always required to make a crossover. At the same time, a crossover cable for data exchange between computers at speeds of up to 1000 Mbit/s is manufactured in a special way.

One end of it is crimped according to the EIA/TIA-568B scheme, and the other has the following sequence: White-green, Green, White-orange, White-brown, Brown, Orange, Blue, White-blue. Thus, we see that in circuit 568A the Blue and Brown pairs have swapped places while maintaining the sequence.
Finishing the conversation about circuits, we summarize: by crimping both ends of the cable according to the 568V circuit (2 or 4 pairs), we get straight cable to connect a computer to a switch or router. By crimping one end according to circuit 568A and the other according to circuit 568B, we get crossover cable for connecting two computers without switching equipment. A special issue is the manufacture of gigabit crossover cables, where a special circuit is required.
Crimping a network cable (twisted pair)
For the cable crimping procedure itself, we will need a special crimping tool called a crimper. Crimper is a pliers with several working areas.

In most cases, knives for cutting twisted pair wires are placed closer to the tool handles. Here, in some modifications, you can find a special recess for stripping the outer insulation of the cable. Next, in the center workspace, there are one or two sockets for crimping network (marking 8P) and telephone (marking 6P) cables.
Before crimping the connectors, cut a piece of cable to the required length at a right angle. Then, on each side, remove the overall outer insulating sheath by 25-30 mm. At the same time, do not damage the own insulation of the conductors located inside the twisted pair.
Next, we begin the process of sorting the cores by color, according to the selected crimping pattern. To do this, unravel and align the wires, then arrange them in a row in the desired order, pressing them tightly together, and then cut the ends with a crimper knife, leaving approximately 12-13 mm from the edge of the insulation.
Now we carefully place the connector on the cable, making sure that the wires do not get mixed up and that each of them fits into its own channel. Push the wires all the way until they rest against the front wall of the connector. With the correct length of the ends of the conductors, all of them must go into the connector all the way, and the insulating sheath must be inside the housing. If this is not the case, then remove the wires and shorten them somewhat.

After you have placed the connector on the cable, all that remains is to fix it there. To do this, insert the connector into the corresponding socket located on the crimping tool and smoothly squeeze the handles until they stop.
Of course, it’s good when you have a crimper at home, but what if you don’t have one, but you really need to crimp the cable? It is clear that you can remove the outer insulation with a knife, and use ordinary wire cutters to trim the cores, but what about the crimping itself? In exceptional cases, you can use a narrow screwdriver or the same knife for this.

Place a screwdriver on top of the contact and press it so that the teeth of the contact cut into the conductor. It is clear that this procedure must be done with all eight contacts. Finally, push the central cross section to secure it in the cable insulation connector.
And finally, I’ll give you a little advice: Before crimping the cable and connectors for the first time, buy with a reserve, since not everyone can perform this procedure well the first time.


