|
|
If the element is followed by , , , , , , , , , , ,..., , , , , , , ,
,
,
,
,
.
|
|
If an element is followed by or . |
|
|
If an element is followed by or . |
|
|
If the element is followed by or is the last element of the parent. |
|
|
If the element is followed by , or it is the last one of the parent. |
|
|
If the . comes first inside and does not come before another element. |
|
|
|
|
|
If an element is followed by or . |
|
|
If the first one inside is | and does not come before , or which have an omitted closing tag.
|
|
If the element is followed by or or it is the last element of the parent. |
|
|
If the element is followed by or is the last element of the parent. |
|
If an element is followed by | or he is the last one with the parent.
|
If an element is followed by | or or he is the last one with the parent. |
|
|
If an element is followed by | or or he is the last one with the parent. |
If the opening tag contains one or more attributes, then the tag must be specified.
Due to the fact that many tags may not be specified, because... they are implied by default, any document is reduced to the following parts.
An optional byte order mark (BOM).
.
.
You can insert any number of spaces or comments before and after the doctype. Thus, the doctype does not have to be on the first line of code.
Example 1 shows the minimal HTML code to display a traditional greeting.
Example 1: Minimal HTML
HTML5 IE Cr Op Sa Fx Hello World! A byte order mark consists of a U+FEFF character code at the beginning of the document, where it is used to determine the encoding. It is recommended to remove this symbol, since its presence leads to errors in displaying the document in some browsers. To do this, you can use the Notepad++ editor, in the “Encodings” menu, select “Encode in UTF-8 (without BOM)” (Fig. 3).
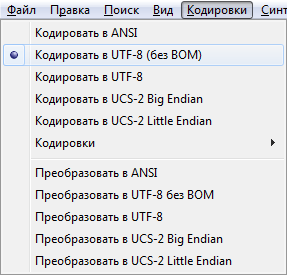
Rice. 3. Select encoding Useful links - More about byte order mark
http://unicode.org/faq/utf_bom.html#bom1
- Notepad++ editor
In the first chapter, you learned that website design is created with using CSS. For a better understanding of what needs to be used and for what, let's look at one illustrative example. Think of HTML as a black and white structured frame of a house without decoration, and CSS is what we use to create a unique look.
As you can see, the house on the right now has colors, materials and additional decorations. The same thing happens on a web page: using CSS rules colors and indents appear on it, font style and element sizes change, creating a whole, complete style. Simple style sheet Let's take a look at what the most basic style sheet looks like and what elements it consists of. This is an example of CSS styling for all tags Which are on the web page: What will the text look like now? In the browser and what does each line mean? It's very simple: the font will have a bold style and color #1E824C (hexadecimal color code) and will be displayed at 1em (a relative unit equal to the default font size in the browser).
 The style described above, like any other, includes a set of elements that have their own names. Remember them so that when you read the following chapters you will understand what is going on. Selector By specifying it, we tell the browser what exactly we want to apply the style to. In our case, the selector is p. Declaration block This is the name of all the content located between the curly braces () after the selector. Style property This is a command that specifies the desired formatting option (for example, you want to change the font style font-weight , color color , font size font-size , etc.). A colon must be placed after the property name. Later you will get acquainted with a large number CSS properties. Property value After the colon, the property value itself is written, which you define yourself, thus creating your own style. Depending on the property, you must specify the appropriate value. For example, the font style is set keywords bold , bolder etc., color – hexadecimal value, RGB(A), HSL(A) or keywords red , orange , white etc., font size – CSS units (percent%, pixelpx, pointspt , font height em ) or constants small , medium , large , etc. After specifying the property value, a semicolon is placed.

Because CSS is insensitive to line breaks, spaces, tabs, and case, you can format your code in a way that makes it easy to read and edit later. For example, we could write the above code in one line: P (font-weight:bold;color:#1E824C;font-size:1em;) It works too, but is it easy to understand? Especially when the CSS code is quite long. Of course, it wouldn't hurt to separate it at least with spaces. There are several rules of good manners, and if you learn them right away, you will say “thank you” to yourself in the future.
Very often, when describing a style, a compact form of notation is used, in which all the properties for one selector are indicated in one block: P ( font-weight: bold; color: #1E824C; font-size: 1em; ) And this form of notation is very cumbersome, although it works: P (font-weight: bold;) p (color: #1E824C;) p (font-size: 1em;) To make it easier to navigate the code, it is recommended to write each property as new line and use tabs or spaces when listing properties. Sometimes there is a space between the colon and the property value, but here you can decide whichever is more convenient for you.
For added convenience, you can add comments directly in CSS. In them you can write explanations and notes to help you navigate the style sheets.
Comments in CSS are written between the /* and */ characters. They are not displayed on the web page in the browser and are only visible in the code. Developers also often use comments to hide temporarily unnecessary sections of CSS code. The comments look like this: /* Style for body text */ p ( font-weight: bold; color: #1E824C; font-size: 1em; ) Internal and external style sheets Once you've created a style sheet, you can choose how to attach it to your web page. There are two options for tables - internal, which are added directly to the page, and external, which are located in separate file with the .css extension and are connected to the page using a link.
Internal style sheets are written in an HTML document between . You need to add a style sheet to every web page. If the site has a large number of pages that require the same design, then adding and editing styles becomes a thankless job - the process will take a very long time. Therefore, internal style sheets are considered inconvenient.
External style sheets are much more common. You only need to connect the table to all the necessary web pages using a tag with a rel attribute (defines the relationship between the page and the included file) and a stylesheet value, which means that the included file contains a style sheet. The href attribute is the path (URL) to your .css file:
By editing just one file, you can change the style for the entire site at once, regardless of how many pages there are. This is very convenient, especially for large resources. Lesson: creating a style sheet Since external style sheets are the most convenient and widely used in design development, we will learn how to create them. You can download the archive with files for this lesson on this page.
In the folder you will find an HTML document with an example of a simple page and an image (to be used in the tutorial). Open the HTML document in your browser. You will see that the page looks completely normal. To give it a more attractive look, let's style it.
For now, you don't need to delve too deeply into what any given piece of code means. Now you need to understand the principle of operation. Let's get started. Connecting CSS to HTML To begin, open any text editor on your computer (notepad will do) and create an empty file called style , saving it with the .css extension (you should end up with a style.css file). Save the file in the folder where the downloaded HTML document is located.
Open the HTML document in a text editor, as well as in a browser (to easily view changes in appearance pages). Add the following code between the tags:
Briefly summarize what you just did. By pasting this code into your HTML document, you:
- provided a link to a font called Roboto Condensed, which will be taken from Google servers(more about Google fonts we'll tell you later);
- connected our external style sheet style.css (empty for now).
Writing CSS style Save your changes to the HTML document and go to the empty .css file you created. Let's add some styling to the page: Html ( padding-top: 5px; background-image: url(background.jpg); ) Save your changes. Congratulations, you have written your first rule - it concerns the tag. The first property - padding-top - will add a top padding of 5 pixels between the browser window and the web page content. With the second property, background-image , you have included an image for the background of the entire page, specifying the path to graphic file(located in the same folder as the HTML document).
Refresh the open web page in your browser. If everything is done correctly, you will see that a background has appeared on the page, and the space between the top of the window and the text has increased slightly.
Body ( width: 75%; padding: 40px; margin: 15px auto; background-color: #EBEBEB; border-radius: 30px; ) Save the changes to the file. Now you:
- set the area for the content of the tag, which is equal to 75% of the width of the browser window;
- provided a margin of 40 pixels from all sides of the content area;
- positioned the area in the center of the page, and also indented the top and bottom by 15 pixels;
- set the background color #EBEBEB for the content area;
- rounded the corners of the rectangular area, specifying a rounding radius of 30 pixels.
Update the HTML document again. At the same time, make sure that the cache is disabled or reload the page with the update of all files associated with it, using a special key combination (for example, for Chrome it is Ctrl+F5).
You will see that a rectangular area with rounded corners has been added to the center of the page. This is the result of your actions in the CSS file. You can also try making your browser window smaller and admire how the width of the rectangular area adjusts to its size. This is due to the fact that width is specified as a percentage. Changing the font using CSS It's time to decorate our text. Add this code to your stylesheet and save your changes: H1 ( color: #E87E04; font-size: 2em; margin-left: 20px; font-family: "Roboto Condensed", sans-serif; ) h2 ( color: #E87E04; font-size: 1.7em; margin-left : 20px; font-family: "Roboto Condensed", sans-serif; ) p ( color: #22313F; line-height: 150%; margin-top: 20px; margin-left: 20px; font-family: "Roboto Condensed ", sans-serif; ) Having written this, you set the font colors for the h1 , h2 , p tags, indicated their sizes, added a margin from the left edge of 20 pixels and additionally for We indented the top by 20 pixels and set the leading to line-height ( line spacing text) 50% more than standard. In addition, you connected the Roboto Condensed font to all three tags (that’s why you had to provide a link to it in the HTML file at the very beginning).
Refresh the page in your browser and admire the result. In this tutorial we will try one more thing. Add this code to CSS: Emphasis ( font-weight: bold; ) Save and refresh the page in your browser. You will see that in the last paragraph the font has become bold in some parts of the text. To understand what happened, go to the window text editor, where at the very beginning you opened the HTML file. Look at the last paragraph: part of the sentence is wrapped in a tag with an emphasis class. This way you have written a style for a single line of text in a paragraph. We'll talk more about classes in the next chapter.
You should end up with a page like this:

As a practice, try changing the text size for (let's say 1.1em), and also increase the space between And the left edge of the content area by another 10 pixels. Conclusions This chapter looked at CSS syntax and how to create a basic style sheet. You've learned how to incorporate CSS into an HTML page and how to create simple styles. Let's highlight the main things you need to remember from this chapter:
Any CSS style consists of several elements: a selector, a style property, and the value of this property.
All properties and their values are written in a declaration block between two curly braces () after specifying the selector.
You need to pay close attention to the signs: two braces(opening at the beginning of the ad block and closing at the end). Without these brackets, CSS will not work correctly.
It is required to place a colon after the property and a semicolon after the value.
For convenience and better readability of your CSS code, write each property on a new line, and don't skimp on spaces and tabs.
HTML tags are the basis HTML language. Tags are used to delimit the beginning and end of elements in markup.
Each HTML document consists of a tree of HTML elements and text. Each HTML element is identified by a start (opening) and ending (closing) tag. The opening and closing tags contain the name of the tag.
All HTML elements are divided into five types:
- empty elements - , ,
, , , , ![]() , , , , , , , , ; , , , , , , , , ;
- elements with unformatted text - , ;
- elements that display unformatted text - , ;
- elements from another namespace - MathML and SVG;
- ordinary elements - all other elements.
The table shows full list elements supported by HTML4 and HTML5. Experimental and legacy tags are excluded. Elements added to the HTML5 specification are highlighted in teal. Complete list of HTML elements Table 1. HTML elements Tag Description |
|
Used to add comments. |
|
|
Declares the document type and provides basic information to the browser - its language and version. |
|
|
Creates hypertext links. |
|
|
Identifies text as an abbreviation or acronym. Explanatory text is specified using the title attribute. |
|
|
Specifies the contact information of the author/owner of the document or article. Displayed in italics in the browser. |
|
|
It is a hyperlink with text corresponding to a specific area on an image map or an active area within an image map. Always nested inside a tag. |
|
|
A section of content that forms an independent part of a document or website, such as a magazine article, blog post, comment. |
|
|
Represents page content that is indirectly related to the main content of the page/site. |
|
|
Loads audio content into a web page. |
|
|
Sets a passage of text to be bold without adding emphasis or importance to the highlighted text. |
|
|
Specifies the base address (URL) from which all relative addresses are calculated. This will help avoid problems when moving the page to another location, since all links will work as before. |
|
|
Isolates a passage of text written in a language in which the text is read from right to left from the rest of the text. |
|
|
Displays text in the direction specified by the dir attribute, overriding the current text direction. |
|
|
Highlights text as a quote, used to describe large quotes. |
|
|
Represents the body of the document (content that is not part of the document's metadata). |
|
Wrap text to a new line. |
|
|
Creates an interactive button. You can place content inside the tag - text or image. |
|
|
Canvas container for dynamically displaying images such as simple images, charts, graphs, etc. The JavaScript scripting language is used for drawing. |
|
|
Adds a caption to the table. Inserted immediately after the tag .
|
|
Used to indicate the source of the citation. Displayed in italics. |
|
|
Represents a piece of program code, displayed in a monospace font family. |
|
|
Selects one or more table columns for formatting that do not contain the same type of information. |
|
|
Creates a structural group of columns that identifies many logically homogeneous cells. |
|
|
The element is used to associate the value of the value attribute, which is in a machine-readable format and can be processed by a computer, with the content of the tag. |
|
|
Container element for the drop-down list element. Variant values are placed in elements. |
|
|
Used to describe a term from a tag. |
|
|
Marks text as deleted by striking it out. |
|
|
Creates an interactive widget that the user can open or close. Represents a container for content, the visible title of the widget is placed in the tag. |
|
|
Identifies a word as a term by putting it in italics. The text that follows should contain a definition of this term. |
|
|
An interactive element with which the user interacts to complete a task, such as a dialog box, inspector, or window. Without the open attribute, it is not visible to the user. |
|
|
A container tag for sections of an HTML document. Used to group block elements for formatting with styles. |
|
|
A container tag containing a term and its description. |
|
|
Used to specify a term. |
|
|
Highlights important passages of text by displaying them in italics. |
|
|
A container tag for embedding external interactive content or a plugin. |
|
|
Groups related elements in a form by drawing a box around them. |
|
|
Title/caption for the element. |
|
|
A self-contained container tag for content such as illustrations, diagrams, photographs, code examples, usually with a caption. |
|
|
Defines the ending area (footer) of a document or section. |
|
|
A form for collecting and sending information from users to the server. Doesn't work without the action attribute. |
|
|
Create six levels of headings for related sections. |
|
|
A container element for HTML document metadata, such as , , , , . |
|
|
Section for introductory information of a site or a group of navigation links. May contain one or more headings, logo, information about the author. |
|
|
A horizontal line for thematic division of paragraphs. |
|
|
The root element of an HTML document. Tells the browser that this is an HTML document. It is a container for all other html elements. |
|
|
Italics a passage of text without giving it additional emphasis. |
|
|
Creates an inline frame by loading another document into the current HTML document. |
![]()
|
Embeds images in an HTML document using the src attribute, whose value is the address of the embedded image. |
|
|
Creates rich form fields in which the user can enter data. |
|
|
Highlights text with underlining. Used to highlight changes made to a document. |
|
|
Selects text to be entered by the user using the keyboard in a monospace font. |
|
|
Used to store additional information about the page. This information is used by browsers to process the page, and by search engines to index it. There can be several tags in a block, since depending on the attributes used they carry different information. |
|
|
Indicator of measurement in a given range. |
|
|
A section of a document containing navigation links for the site. |
|
|
Defines a section that does not support scripting. |
|
|
Container for embedding multimedia (e.g. audio, video, Java applets, ActiveX, PDF and Flash). You can also insert another web page into the current HTML document. The tag is used to pass the parameters of the plugin. |
|
|
Ordered numbered list. Numbering can be numeric or alphabetical. |
|
|
A container with a title for a group of elements. |
|
|
Specifies an option/option to select from the , or , drop-down list. |
|
|
Field for displaying the result of a calculation calculated using the script. |
|
|
Paragraphs in the text. |
|
|
Defines parameters for plugins built using the element. |
|
|
A container element containing one element ![]() and zero or more elements. By itself it does not display anything. Allows the browser to select the most appropriate image. and zero or more elements. By itself it does not display anything. Allows the browser to select the most appropriate image. |
|
|
Outputs text without formatting, preserving spaces and text breaks. Can be used to display computer code, email messages, etc. |
|
|
An indicator of the completion of a task of any kind. |
|
|
Defines a short quotation. |
|
|
Container for East Asian symbols and their decoding. |
|
|
Defines its nested text as the base component of the annotation. |
|
|
Adds a brief description above or below the characters contained in the element, displayed in a smaller font. |
|
|
Marks embedded text as additional annotation. |
|
|
Displays alternative text if the browser does not support the element. |
|
|
Displays text that is not current with a strikethrough. |
|
|
Used to display text representing the result of executing program code or script, as well as system messages. Displayed in monospace font. |
|
|
Used to define a client-side script (usually JavaScript). Contains either script text or points to an external script file using the src attribute. |
|
|
Defines a logical area (section) of a page, usually with a header. |
|
|
A control element that allows you to select values from a proposed set. Variant values are placed in . |
|
|
Displays text in a smaller font size. |
|
|
Specifies the location and type of alternative media resources for the , , . |
|
|
Container for inline elements. Can be used to format passages of text, such as highlighting individual words. |
|
|
Places emphasis in the text, highlighting it in bold. |
|
|
Includes embeddable style sheets. |
|
|
Specifies subscript writing of symbols, for example, element index in chemical formulas. |
|
|
Creates a visible title for the tag. Displayed with a filled triangle, clicking on it allows you to view the title details. |
|
|
Specifies the superscript spelling of characters. |
| Tag for creating a table. |
|
|
Defines the body of the table. |
| |
|
Creates a table cell. |
|
|
Used to declare HTML code fragments that can be cloned and inserted into a document by a script. The content of a tag is not a child of it. |
|
|
Creates large text input fields. |
|
|
Defines the table footer. |
|
|
Creates a table cell title. |
|
|
Defines the table title. |
|
|
Defines date/time. |
|
|
The title of an HTML document that appears at the top of the browser's title bar. May also appear in search results, so this should be taken into account when providing the title. |
| |
| Creates a table row. |
|
|
Adds subtitles for elements and . |
|
|
Highlights a passage of text by underlining, without additional emphasis. |
| |
Creates a bulleted list. |
|
|
Highlights variables from programs by displaying them in italics. |
|
|
Adds video files to the page. Supports 3 video formats: MP4, WebM, Ogg. |
|
|
Indicates to the browser where a long line might break. |
Cheat sheet with tags For ease of use, I grouped the tags into thematic sections, adding display property values for each tag. To go to the table, click on the picture.
The stream of Unicode code points, including input into the mnemonization step, will initially be visible to the user agent as a stream of bytes (usually coming over the network or from the local file system). Bytes encode real characters according to a specific character encoding, which the user agent uses to decode bytes into characters.
For XML documents, user agents must use this algorithm to determine the character encoding specified by the XML specification. This section does not apply to XML documents. 8.2.2.1 Parsing with a known character encoding When an HTML parser operates on a byte stream of input that has a certain known encoding, then the character encoding is that encoding, and - certain. 8.2.2.2 Character encoding definition In some cases, it may not be practical to unambiguously determine the encoding before parsing the document. For this reason, this specification provides a two-step mechanism with optional prescan. Implementations are permitted, as described below, to apply a simplified parsing algorithm to any available bytes before parsing the document. The actual parser then starts, using the pre-encoding taken from this pre-parsing and other out-of-band metadata. If, while the document is loading, the user agent encounters a character encoding declaration that conflicts with this information, then the parser can be called again to parse the document with the actual encoding.
User agents must use the following algorithm, called the encoding sniffing algorithm, to determine the character encoding to use when decoding the document in the first step. This algorithm takes as input any out-of-band metadata available to the user agent (for example, the document's Content-Type metadata), and all bytes so far available, and returns the character encoding and , which tentative or certain.
If the user explicitly instructs the user agent to override the document's character encoding with a specific encoding, it is optional to return that encoding with certain
Typically, user agents remember such a user request between sessions and sometimes apply this to documents in iframes as well.
The user agent may increase the available resource bytes either at this step or at a later step in this algorithm. For example, a user agent might expect 500ms or 1024 bytes, whichever comes first. In general, pre-parsing a resource to determine the encoding improves performance because it reduces the need to discard data structures used in parsing after searching for encoding information. However, if the user agent takes too long to obtain the data to determine the encoding, the time spent waiting may exceed any benefit from preparsing.
The conformance requirements for a character encoding declaration limit its appearance to only the first 1024 bytes. User agents are therefore encouraged to use the prescan algorithm (below) as invoked by these steps on the first 1024 bytes, but not stop there.
For each row of the following table, starting from the first and downwards, if there are more bytes available than in the first column and the first bytes of the file match the bytes of the first column, then return the encoding from the second column cell of the same row, with - certain, and abort these steps:
Hex bytes Encoding | FE FF |
Big-endian UTF-16 |
| FF FE |
Little-endian UTF-16 |
| EF BB BF |
UTF-8 |
This step looks for Unicode Byte Order Marks (BOMs).
The fact that this step comes before the next one, which respects the Content-Type HTTP header, is a deliberate violation of the HTTP specification, due to the desire to be as compatible as possible with older content.
If the transport layer specifies a character encoding and it is supported, will return that encoding with - certain and abort these steps.
UTF-8 encoding has a precisely defined bit pattern. Documents containing bytes greater than 0x7F that match a UTF-8 pattern are very likely to be UTF-8, but documents with byte sequences that do not match it are very likely not. User agents are therefore encouraged to look for this common encoding.
Otherwise - return the implementation- or user-defined default character encoding, with - tentative.
In managed environments, or in environments where document encoding may be mandated (for example, for user agents intended specifically for use on new networks), a comprehensive UTF-8 encoding is recommended.
In other environments, the default encoding usually depends on the user's locale (the approximation of the languages and thus often the encodings of the pages the user is very likely to visit). The following table recommends defaults based on the user's locale, for compatibility with legacy content. Locales are identified by BCP 47 language tags.
Local language Recommended default encoding | ar |
Arabic |
windows-1256 |
| ba |
Bashkir |
windows-1251 |
| be |
Belarusian |
windows-1251 |
| bg |
Bulgarian |
windows-1251 |
| cs |
Czech |
windows-1250 |
| el |
Greek |
ISO-8859-7 |
| et |
Estonian |
windows-1257 |
| fa |
Persian |
windows-1256 |
| he |
Hebrew |
windows-1255 |
| hr |
Croatian |
windows-1250 |
| hu |
Hungarian |
ISO-8859-2 |
| ja |
Japanese |
Shift_JIS |
| kk |
Kazakh |
windows-1251 |
| ko |
Korean |
euc-kr |
| ku |
Kurdish |
windows-1254 |
| ky |
Kyrgyz |
windows-1251 |
| lt |
Lithuanian |
windows-1257 |
| lv |
Latvian |
windows-1257 |
| mk |
Macedonian |
windows-1251 |
| pl |
Polish |
ISO-8859-2 |
| ru |
Russian |
windows-1251 |
| sah |
Yakut |
windows-1251 |
| sk |
Slovak |
windows-1250 |
| sl |
Slovenian |
ISO-8859-2 |
| sr |
Serbian |
windows-1251 |
| tg |
Tajik |
windows-1251 |
| th |
Thai |
windows-874 |
| tr |
Turkish |
windows-1254 |
| tt |
Tatar |
windows-1251 |
| uk |
Ukrainian |
windows-1251 |
| vi |
Vietnamese |
windows-1258 |
| zh-CN |
Chinese (People's Republic of China) |
GB18030 |
| zh-TW |
Chinese (Taiwan) |
Big5 |
| All other locales |
windows-1252 |
The contents of this table are derived from Windows defaults, Chrome and Firefox.
sequence of bytes starting with byte 0x3C (ASCII) Advance the position pointer so that it points to the first byte 0x3E (ASCII >) that comes after the byte 0x3C found.Any other byte Do nothing with this byte.
Next byte: Move position to point to the next byte in the input byte stream, and go back up a step loop.
Support for EBCDIC-based encodings is particularly discouraged. This encoding is rarely used for public web content. Supporting UTF-32 is also strongly discouraged. This encoding is rarely used and is often incorrectly implemented.
This specification does not attempt to support EBCDIC and UTF-32 based encodings in its algorithms; support and use of these encodings may therefore result in unpredictable behavior in implementations of this specification. 8.2.2.4 Determining the encoding during parsing When the parser requires the user agent to change the encoding, the user agent must perform the following steps. This can happen if the , discussed above, fails when looking up a character encoding, or if it finds a character encoding that was not the actual file encoding.
8.2.2.5 Preprocessing the input stream The input stream consists of characters pushed into it as decoded or from various APIs that directly manipulate the input stream.
One leading U+FEFF BYTE ORDER MARK character must be ignored if present in .
The requirement to strip the U+FEFF BYTE ORDER MARK character, regardless of whether the character was used to determine byte order, is a deliberate violation of Unicode, which is explained by the desire to improve the robustness of user agents in terms of their own transcoders.
Any occurrence of any characters from the ranges U+0001 to U+0008, U+000E to U+001F, U+007F to U+009F, U+FDD0 to U+FDEF and the characters U+000B, U+FFFE , U+FFFF, U+1FFFE, U+1FFFF, U+2FFFE, U+2FFFF, U+3FFFE, U+3FFFF, U+4FFFE, U+4FFFF, U+5FFFE, U+5FFFF, U+6FFFE, U +6FFFF, U+7FFFE, U+7FFFF, U+8FFFE, U+8FFFF, U+9FFFE, U+9FFFF, U+AFFFE, U+AFFFF, U+BFFFE, U+BFFFF, U+CFFFE, U+CFFFF , U+DFFFE, U+DFFFF, U+EFFFE, U+EFFFF, U+FFFFE, U+FFFFF, U+10FFFE and U+10FFFF are . All of them are control characters or permanently undefined Unicode characters (noncharacters).
The characters "CR" (U+000D) and "LF" (U+000A) are given special consideration. All CR characters must be converted to LF characters, and any LF characters that come after the CR character must be ignored. Thus, newlines in the HTML DOM are represented by LF characters and never by CR characters in the input to the .
The next input character is the first character in , which has not yet been used/consumed or is explicitly ignored by the requirements of this section. Initially
this is the first character in the input stream. The current input character is the last character that was
.
The insertion point/insertion point is the position (just before a character or just before the end of the input stream) where content inserted using document.write() is actually inserted. The insertion point is relative to the position of the character immediately after it, it is not an absolute offset in the input stream. The initial insertion point is undefined.
The "EOF" symbol in the following tables is a conceptual symbol representing the end of . If the parser is a parser generated by a script, then the end is reached when an explicit "EOF" character is used (inserted by the document.close() method). Otherwise, the "EOF" character is not an actual character in the stream, but rather an indication of the absence of any subsequent characters.
The handling of U+0000 NULL characters varies depending on where the characters are located. In general, they are ignored, except in cases where it can really expose you to a blow. Such processing, if necessary, extends to the mnemonization and tree construction stages.
Last update: 11/18/2019
When creating an HTML5 document, we can use two different styles: HTML and XML.
The HTML style assumes the following points:
Elements may not have starting opening tags
Elements may not have end closing tags
Only void elements (e.g. br , img , link) can be closed with a slash />
The case of tag and attribute names does not matter
You don't have to enclose attribute values in quotes
Some attributes may not have values (checked and disabled)
Special characters are not escaped
The document must have a DOCTYPE element
This is the so-called “permissive” style, based on relaxations when creating a document.
An HTML5 document can also be described using XML syntax. This style is also called "XHTML". It is used if the content-type header is application/xml+xhtml . The following rules are typical for this style:
Every element must have a starting opening tag
Non-void elements with a start opening tag must also have an end closing tag
Any element can be closed with a slash />
Tag and attribute names are case-sensitive and are typically lowercase
Attribute values must be enclosed in quotes
Attributes without values are not allowed (checked="checked" instead of just checked)
Special characters must be escaped
Let's compare two approaches. HTML5 approach: Heading HTML5 Document Contents
And a similar example using the XHTML approach: Heading HTML5 Document Contents
When using XHTML syntax, we also need to specify the namespace for the given document:
The choice of a specific style when writing HTML documents depends on the preferences of the programmer or web designer. A mixed style is often used, which borrows rules from the first and second styles.
At the same time, it should be taken into account that the presence of closing and opening tags on an element reduces the likelihood that the element will be incorrectly interpreted by the browser.
Also, enclosing attribute values in quotes will help avoid potential errors. Thus, the class attribute can take several values in a row. For example: . But if we omit the quotes, "navmenu" will be used as the value, and the browser will try to interpret "bigdesctop" as a separate attribute.
If there are any difficulties as to how correct the generated html markup is, then you can check it using the validator at https://validator.w3.org:
We can paste the web page code into the text field, and after clicking on the “Check” button at the bottom, the validator will either display errors in red or notify us in green that there are no errors and the code has been validated.
Related publications
| | |


