Connecting the router to the network. Wi-Fi router for dummies: purpose, operating principle, device connection. Location of the WiFi router in the apartment
Through a router, but don't know where to start? We will help you with this. Only a small part of everyone who connected themselves Wi-Fi router at home, do this installation without errors - they carry out the setup, organize a wireless network and connect it to this network various devices. Ignorance of the basics of planning local networks can lead to problems in their use in the future.
What is important to know at the beginning of the process
It is important to understand the nuances: in order to create a functional local network, you must purchase a Wi-Fi router. Don't confuse it with wired router without Wi-Fi, which uses wires to distribute the signal - it usually does not have an antenna. Or with a similar device - an access point that performs other tasks.
To connect to the Internet through a router and organize home network Wi-Fi, you can use different routers, because the main differences are in the settings and Wi-Fi connection routers to the Internet consist only of the graphic design of the admin panel. Thus, if you understand the connection principle using one router as an example, you can easily connect and configure any other. For example, today we will configure the ASUS WL-520GC, the whole process with screenshots.
How to connect the Internet on a computer via a router
Before purchasing a Wi-Fi router, your PC itself received an IP address from the Internet provider, and now, using your new purchase, you can connect other computers and devices. Now it is the router that will “communicate” with the provider and in your local network it itself will assign an internal IP address to any of the connected gadgets.
So, let's go.
- We connect the router to the power supply and configure it to communicate with the PC. To achieve this goal, we insert the Internet wire into the WAN connector on the router, and connect the other wire, which has two plugs (RJ45), to the PC’s network card (where the Internet cable was previously connected) and to any of the router’s LAN1-LAN4 connectors.
- We recommend that you always use the source uninterruptible power supply to protect your system from possible power surges and resulting hardware problems.
- Let's start setting up your PC for work. Remember that not all networks are set up the same way. Some people need static IPs, others need dynamic ones. Still others use PPPoE connection(regular input of login and password). The fourth ones do not require any settings at all: just connect the router to the provider’s cable, open any website and a menu will appear asking you to enter your login and password.
By the way, many people are interested in how to connect the Internet to XP via a router. Nothing complicated – let’s do it next steps according to the scheme.
For Windows 7, the path looks like this: “Start> Control Panel> Network and Internet> Network and Sharing Center shared access> Change adapter settings. Then in the list of existing connections we must find and double-click the “Local Area Connection” tab, then select “Properties”, highlight the “Internet Protocol version TCP/IP v4” item and click the “Properties” button (in the diagram I’m in the wireless settings connection, but since you don’t have one yet, but have connected the PC and the router via an Internet cable, you select the “Local Area Connection” menu item).
If you have any data here, be sure to write it down for yourself. This is important for those users who cannot find an agreement with an Internet provider for the provision of services and, accordingly, do not remember important data from the agreement for setting up a network. This data may come in handy when you move on to the task of setting up the Internet via a Wi-Fi router (WAN), which will be discussed later.
Then in the same window we go to “Network connection settings on a PC”, set the IP, gateway and DNS values as automatic - we will enter them separately in our router ourselves.
We enter the address 192.168.1.1 or 192.168.0.1 into the browser search engine (if the first one did not work), here in most cases the settings of almost any router are located. If this address does not work, look in the router manual to see which address we can use to enter the settings menu of our device. You can also turn your router over. The sticker on the bottom contains the information you need.
Even if you did not find this path using the above methods, go to the “Control Panel”, right-click on “Local Area Connection”, in the new window click on “Details”, then find IPv4 Default Gateway - this is the IP address our router.
- In the settings menu of our router, we must find DHCP Server (usually in the LAN or “Local Network” submenu), then we set a number of values for the IP addresses of various gadgets that will connect to our home network.
I used the following Start IP values – 192.168.10.101 and End IP 192.168.10.200, you can vary them depending on the number of connected devices.
Enable DHCP Server and set it to “Enabled”. “Domain Name” (possibly also “Host Name”) – the name of the local network being created.
Keep in mind that I took screenshots from my routers that have an English interface and it is problematic for a beginner to understand what and how without screenshots - so these screenshots should help. And taking into account the fact that almost all new routers come with Russian-language software, it will be even easier for you. For the device in question it will look like this.
- Global connection of the router occurs in the WAN menu. In Online, for example, the IP is set automatically, there is no need to configure it, you just need to insert the cable, set the network settings - and you are on the Internet.
In “WAN connection type” we set Automatic IP.
In Starnet and similar networks – PPPoE type. When setting up PPPoE, we must enter: username, server name (or Service Name), password, primary and secondary DNS. You will find all of the above in your agreement with your Internet service provider.
Setting up a router is not an easy procedure, but we are ready to help you understand all its intricacies. Just read the instructions below carefully, and in just a few minutes you can easily set the parameters you need and get started!
#1. Connection
Before you configure the router yourself via a computer, you need to connect it:
- Insert the Internet cable into the WAN/Internet port;
- Set the end network wire to the LAN port of the device;
- Place the other end into the connector on the PC;
- Connect the model to a power outlet and press power on.
- Ready!
We hope that this brief instructions helped you figure out the first steps, and you can read more about the connection process on the website. Now you can safely move on to the instructions, which tell you how to configure it yourself correctly. WiFi router.
#2. Login to the web interface
We would like to warn you that WiFi setup The router can be accessed online through a browser only after the device is turned on. When you activate the work, distribution of the wireless network with factory settings (login, password) will begin. You can change the router settings in a special web interface that each device is equipped with.
Important! To open the setup interface, you need to connect your computer to the device. Internet access is not required.
To open the site for setting up your router, do the following:
- Open your browser;
- Enter the IP address in the address bar;
- In the window that opens, log in - enter your username and password.
- The address, network name and login pin code are indicated on the sticker located with reverse side router.
- Some devices do not have login data - they need to be installed after logging into the interface.
Please note that some manufacturers set the parameters themselves - then you don’t need to do anything when you turn it on for the first time.
#3. Setup instructions
Most routers have a special wizard option that will help you quickly set the necessary parameters. For example, here, the item is called “ Quick setup»:
The most important thing you need to configure is:
- Internet connection;
- Wi-Fi network.
Let's deal with the first parameter first. Our main goal is, of course, the operation of the Internet on devices:
- Open a tab with general parameters. Most often they are located in the WAN or Internet section;
- Specify the provider connection type, username and password - you can see the information in the contract;
- If the provider requires MAC address binding, provide the required data (from the contract).
Important! If the provider uses (DHCP), then the connection to the network will occur in automatic mode. Skip this section of the instructions; there is no need to reconfigure the router.
- Open the section called Wi-Fi. It may be called differently - Wireless network/ Wireless mode;
- In the “Network name” or “SSID” field, enter a new name (in Latin only);
- In the “Wireless network key” field, enter the identification code you created;
- Security type – WPA2 – Personal;
- Change the region to the location in the appropriate line;
- Save your changes.
All of the above instructions apply if you need to set up a new router instead of an old one or install completely new equipment. By the way, we suggest you watch a general video on how to set up a router. It is perfect for those who are not confident in their abilities, because it shows the whole process step by step and in detail!
Now you know everything about how to set up the Internet on a Wi-Fi router via a computer - use our article to achieve results. Just follow the instructions and in a few minutes you will be able to successfully surf the Internet.
Plug the Internet cable into the WAN (or Internet) port of your router (aka router).
Connect the router to the computer: insert one end of the network cable into any of the router’s LAN ports, and the other into the connector network card PC. You can use a wireless connection instead of a cable, but it is better not to do this at the setup stage.
Connect the router to a power outlet. If your device has a power button, press it. Then wait a minute or two to allow the router to boot up.
2. Check the Internet
If your router was pre-configured by your provider or received settings automatically, then the Internet can start working a few seconds after connecting the router to the PC.
To check, launch your browser and try opening several sites. If there are no problems with accessing web resources, you can skip the fourth paragraph of the article.
In your browser's address bar, enter 192.168.1.1 or 192.168.0.1 and press Enter. One of these IP addresses should lead to the router's settings menu. If both options do not work, find the required IP address in the documentation for your router model and try entering it.
When the settings login page appears in the browser window, the system may request a login and password. Most often, when connecting for the first time, one word is suitable for both fields - admin. Less often as standard password router manufacturers use a combination 1234 .
If necessary, you can find the login information in the instructions for the router or on the provider's website. Well, or try an alternative.
4. Set up an Internet connection
If the Internet still does not work, the router needs special settings. Exactly what parameters you need depends on specific model device and internet service provider. There is no universal configuration. To get the necessary instructions, check the provider's website or request it from support.
Once you have obtained the manual for setting up your model, follow its prompts. If in the process you set up both an Internet connection and a home Wi-Fi network, you can skip the fifth point of the article.
For Wi-Fi, it is important to select correct parameters security.

In the settings menu, find the section responsible for the wireless network (see the documentation for your router model). Be sure to ask here strong password(you will need it to connect your devices to the router via Wi-Fi) and select WPA2-PSK as a means of protection.
6. Change the password to enter the router settings
Just in case, it is better to limit the access of strangers to the router settings menu. If the router is still protected by the default password, replace it with your own.
Find the settings section that is responsible for the security (see the documentation for your router model) of the device, and enter a new strong password here. Save your changes.

If your computer has a Wi-Fi module, after completing the setup network cable You can remove it from your PC and connect to your router via a wireless connection.
7. Install the router in the optimal location
Ideally, the router is in the center of the area in which you use Wi-Fi. This way the signal will be equally available to all connected devices.
The fewer walls, furniture, and other obstacles between the receiving device and the router, the better the wireless network works.
In this article I will tell you how to set up wi-fi from scratch. First you need to set up a wireless network on your router, and then on your laptop. With the help of simple step-by-step instructions, even a beginner can set up the Internet on TP-Link and D-Link routers, which are the most common in the CIS.
Setting up a wi-fi router
Step 1. We connect the router to the network using a power supply. Turn on the power with the ON button, if the router has such a button.
Step 2. We connect the router to a laptop or computer using an ethernet cable (patch cord), which comes with the router. You need to connect the cable to the port of the computer’s network card and to the LAN1 port of the router. (In no case to the WAN port - you won’t be able to configure it through it)
Step 3. We check that on the computer in the properties of the network card we have selected automatic acquisition of an IP address. To do this, go here: “Start” -> “ Control Panel» -> « Network and Sharing Center» -> «» -> « Local network connection»
Attention! In the section " Changing adapter settings» You may have multiple connections displayed. For example, “Local Area Connection”, “Local Area Connection 2”, “Wireless network connection" , "Network bluetooth connection 2" etc. How to find the right one among these connections?
Firstly, default wired connection in Windows 7 and 8 it is called “Local Area Connection”. If no one managed to rename it manually, then it will be called that way. Unless there may be a number at the end - most often “2”. This is the case if the computer has several network cards installed (relevant for desktop computers, because in 99% of cases a laptop comes from the factory with only one wired network adapter)
Secondly, the connection we need should be active, since you connected the computer and the switched-on router using a cable: the connection icon should glow bright (usually blue if your Windows uses a standard icon pack), i.e. the icon should not be grayed out. See picture:

Here, we have found the required active wired network connection.
Step 3.1. Right-click on the active wired connection we need and select “Properties":
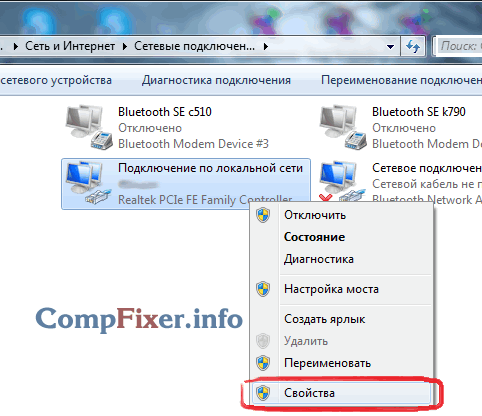
Step 3.2. In the window that opens, click the “Properties” button:

Step 3.3. Select with the left mouse button “ Internet Protocol Version 4 (TCP/IPv4) « and click the next “Properties” button at the bottom:

Step 3.4. We set both switches to the upper positions so that it is “ … … … automatically»:

Step 3.5. Click the “OK” button to save the settings.
Step 4. Open the connection window again:
Step 4.1. Click the “Details” button:

Step 4.2. In the window that opens, we find out the IP address of the default gateway:

In most cases it is 192.168.1.1
Step 5. Open the browser to go to the router’s web interface.
Step 5.1. In the address bar, enter the gateway address and press Enter:
Step 5.2. Enter your login and password:

Attention! You can find out the login details in the instructions for your device. The router may include instructions on paper or in PDF document format on the supplied disk.
If the instructions are lost, you can try to download it from the manufacturer’s website. For example, http://dlink.ru, http://asus.com, http://tplink.com.
Often in a new device the default login = admin and password = admin. It also happens that login = admin and the password is empty.
Step 5.3. After you have logged into the router’s web interface, open the wireless network (wi-fi) settings:
(illustrated using the example of TP-Link TL-WR841ND and D-Link DIR-300 NRU)

Step 6. The actual setup of the wireless connection.
Step 6.1. We disable WI-FI protected setup, because This feature is a serious security hole and could allow an attacker to hack your Wi-Fi network and gain access to your information.
Step 6.2. We check that the Wi-Fi network is enabled: the “Enable wireless” checkbox is checked if it is D-Link.
Step 6.3. Let's set a name for our wireless network.
If the default is dlink or home, then it is recommended to specify some original name to avoid confusion with neighboring networks of the same name.
Step 6.4. Set security parameters. We strongly recommend using the following options:
- security mode WPA2 ;
- encryption type AES;
- key type PSK(aka Personal Key).
After specifying all the parameters, do not forget to click the save settings button!
On a TP-Link router:
 in D-Link:

Setting up Wi-Fi on a computer (laptop)
In this section we will show you how to set up Wi-Fi on a laptop with Windows 7.
Step 1. Find it on the taskbar near the clock icon network connections and click on it with the left mouse button once. A list of available wireless networks will open:

Step 2. Find your wireless network in the list (it will have the name you specified in the previous paragraph) and left-click on this network.
Step 3. Leave the “Connect automatically” checkbox checked and click the “Connect" button:

Step 4. Enter key Wi-Fi security networks. This is the character set that you specified in the “Network Key” field. After entering the key, click "OK":

After clicking “OK”, the connection to your wireless network occurs.

After a few seconds, the previous window will disappear, and the network connections icon near the clock will change its appearance.
Now, when you click on the network connections icon, you will see that the computer is connected to your wi-fi network, but at the top you can see the inscription “ Without Internet access", because We have not yet configured the Internet on the router:

Setting up the Internet on the router
We set up a wi-fi network on the router and connected to it from a computer. All we have to do is help the router see the Internet so that the router can distribute the Internet to any devices that connect to it via wi-fi or cable.
Step 1. In order for the Internet to appear on computers, you need to set up a connection with the provider on the router. We show the example of the same D-Link
Step 1.1. Type the IP address of the router in the address bar
Step 1.2. Enter your login and password and click “Log in”:
Step 2. Go to the Internet settings section. Different router manufacturers may call it differently: WAN Setup, Internet settings, etc. In our D-Link this section is called “Internet Setup”:

Step 3. We get to the WAN port settings section.
Step 3.1. Uncheck “Enable Access Point Mode”.
Attention! For other manufacturers, this option may be called “Disable NAT”. The bottom line is that the “Access Point” mode disables NAT and turns the router into an access point. This option will be useful if this router is connected not to the provider, but to another of your routers.

Step 3.2. Select the type of connection with the provider.
To find out what settings you need to select to connect specifically to your provider, you can:
- in the contract;
- on the provider's website;
- by calling hotline provider
The most commonly used type these days is Dynamic IP.
Step 3.3. If your provider allows connections only from a registered MAC address, you have 2 ways to resolve the issue.
- Go to the provider’s office with your passport and register a new MAC address;
- Specify the MAC address in the MAC address field network card the device from which you successfully accessed the Internet before purchasing the router. Typically, this is the MAC address of the computer's wired network card.
Step 3.4. We specify the DNS server if the instructions from the provider require it.
Step 3.5. Select the MTU value. If the provider does not require you to change this value, we recommend leaving it as it is: 1500.
Step 3.6. Saving the settings
Attention! If you have lost the agreement document with your provider, which contains the details, then, as a last resort, you can always go to the office of your provider with your passport and find out all the comprehensive information: connection type, MAC address, login, password, MTU, etc.


