Reinstalling Windows 7 via USB flash drive. Installing Windows from a flash drive via BIOS. Boot Order Options
Already created a bootable USB flash drive, but don’t know how to boot from a flash drive? There is nothing complicated here. Booting Windows from a flash drive is very simple, and to do this you just need to go into the BIOS and change one setting.
If you have not yet recorded a license digital copy Windows, I recommend reading – ?
How to configure booting from a flash drive?
If you simply connect a USB flash drive to your PC or laptop and reboot it, Windows installation will not start. After all, to do this you need to enable booting from a flash drive in the BIOS.
This is easy to do. But there is one nuance here. The point is that Windows download from a flash drive on PCs and laptops is done differently. Firstly, it depends on the BIOS manufacturers. And, secondly, from the laptop brand (Asus, Acer, Samsung, Lenovo, HP, etc.).
Yes, the BIOS menu will always be different, and this can cause difficulties. But below we will look at several examples so that you understand and can independently navigate the BIOS menu (in case you have another option).
So let's begin. To enter the BIOS, you must immediately press a certain button on the keyboard when you turn on your computer or laptop. Which one exactly? This can be found on the loading screen.
You can find out that you have entered the BIOS by seeing the corresponding menu in front of you. The following options are usually found:


If loading the BIOS failed, then wait until your PC or laptop turns on, reboot it and try again by pressing a different key.

IN in this case“Boot” was selected, and then “ Boot Device Priority" (i.e. device startup priority). As a result, a menu similar to this will open:


As you can see, they are different, but in each case there are the lines we need - First (1st), Second (2nd) and Third (3rd) Boot Device. It indicates which device boots first, which is second and third in turn. As a rule, the first one always goes hard drive(HDD), and then the drive (CR-ROM).
When you connect the flash drive, the USB-HDD option will also appear. You need to select the option USB-HDD in the First Boot Device item. Example:

Next, you must save the changes, otherwise you will have to repeat everything all over again. Which save button? This information is written at the bottom of the screen. For example, in the screenshot above: F10 – “Save”, ESC – “Exit”. Save the changes and exit the BIOS. Congratulations, setting up the BIOS to boot from a flash drive is complete.
The computer (or laptop) will automatically reboot, after which the following line will appear:

Press any button and Windows installation will begin.
If you have a BIOS UEFI then everything is as easy as shelling pears
Go to BIOS and you will see something like this:

To configure booting a flash drive into UEFI, we are interested in the “Boot Priority” item. Drag the USB device icon to the top of the list (so that it is first) and exit (the exit button is in the right top corner). When you exit, the system will ask you whether to save the changes. You agree, after which the PC or laptop will reboot.
By the way: it doesn’t matter at all what kind of image you have on a USB flash drive - Windows 7, 8, 10 or XP. This doesn't affect anything. The OS will start loading from the flash drive in any case (provided, of course, that it is recorded correctly).
And finally one more very important point. When unpacking Windows files will be completed - the computer will reboot.

After this, you need to go into the BIOS again and return the previous device startup priority. That is, put the hard drive (HDD) in first place, and the USB flash drive in last place. There shouldn't be any problems with this.
In principle, you don't have to do this. In this case, when the black screen appears, NOTHING don't press.
Otherwise, the Windows installation will boot again and you will install the operating system again.
But when Windows is installed, you still need to go into the BIOS and return the previous device startup priority. Otherwise, the computer (or laptop) will always load data from the flash drive first (provided it is connected).
You don't need to buy a disk and drive for Windows installations 7, since you can install the operating system from a USB flash drive.
Inexperienced users are perplexed by the question of how to install Windows 7 from a flash drive. Not everyone knows how to install from a disk, and even fewer know how to install from USB. In fact, there is nothing complicated; it is important to strictly follow the installation instructions and not break the sequence of steps. Let's immediately decide what you need USB Flash or external hard disk with a capacity of at least 4 GB. The file system in which the media is formatted does not matter. In addition, you can even burn the image to an SD card or external device, for example, an MP3 player, which is detected on the computer as a flash drive.
Installation sequence
If you install the OS on a blank disk, then you don't need to worry about its contents. If you are reinstalling the OS, remember that the disk on which you are installing the system will be completely formatted, which means that all data on the disk will be deleted. Therefore, the very first step you need to think about is what files you need to save. Next, follow the following instructions:
- Download the OS;
- Create installation media;
- Changing BIOS settings;
- We start the computer from an external device;
- Follow the instructions for installing the OS;
- Install drivers and update the installed OS;
These 6 steps are similar for all versions of the operating system; the scheme also works for other versions of the OS, including Windows Vista or Windows 8.
Where to download OS
You need to download not just system files, you need an ISO image suitable for writing to a flash drive. You can download it here. Already at this stage you need to decide which version of the OS you need. The question is not only whether you will use the “Home” or “Professional” version, but also what bit capacity it will have - 32 or 64 bits. After you decide on the OS version, download it to your hard drive.
How to write an OS to a flash drive
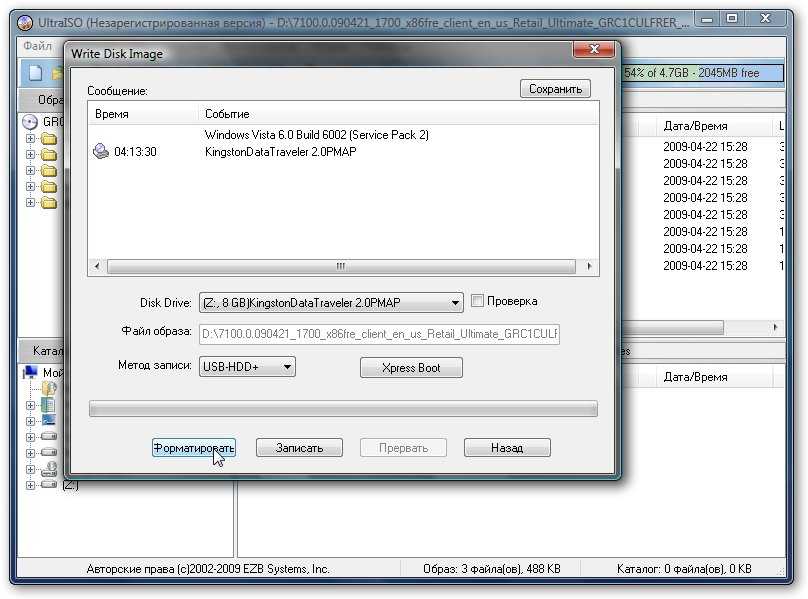
If you simply burn the distribution kit to USB, then you will not be able to run the OS from it, nor can you run the installation from a flash drive. To create bootable media you need to use specialized software. One of best programs to create – . Let's look at creating this utility as an example. First of all, open our ISO image of Windows 7 inside UltraISO:


You need to choose not only the drive, but also the recording method. Select USB-HDD+, you don’t need to touch other settings.
How to start installation via BIOS
After you have created a flash drive with seven, you need to boot your computer from it. To do this, you need to reboot it and during system startup go into the BIOS and specify the startup sequence. Depending on the BIOS version, entry is available using the F2, Del, Esc keys, but there may be other keys. Inside the BIOS you need to find the BOOT tab, where you can specify the startup order. Your media must already be in the device, otherwise you will not be able to specify it to start when you start your PC. The loading sequence should be something like this:

After making changes to the BIOS, they must be saved and exited. Then the system will automatically reboot and start from USB.
Installation
After the start, the installation of the system itself will begin. If you downloaded the Russian version, then the entire installation will be accompanied by Russian instructions and recommendations. Just follow the instructions that appear on the screen, and within 20-30 minutes the operating system will be installed on your computer. If you have any questions, look at the instructions:
Don't forget that the hard drive where you install the OS will be formatted. This means that all data on the disk on which you are installing new system, will be deleted. Therefore, you need to take care of their preservation in advance.
Setup and updates
After installing Windows 7 on your computer, it’s too early to relax. Next you have to configure the system, and then install all the necessary drivers. For settings and drivers you can use the following programs:
- DriverPack Solution;
The first program will optimize the operation of the system. The second program will automatically install all the necessary drivers. During setup, be sure to create backup copy OS, as well as the first restore point, which will be useful to you in the future if you have any problems, for example, you encounter errors.
Content
Almost all modern laptop computers (except Apple) use an operating system from Microsoft. Sometimes a situation arises in which it is necessary to reinstall the OS, so it would be useful to know how to reinstall Windows 7 on a laptop or netbook. You can use several options for launching the program.
How to reinstall Windows 7 on a laptop using built-in tools
A situation arises when there is a need to reinstall Windows 7, but there is neither a licensed DVD nor a flash drive on hand to which you can copy the system files. On all laptops, be it Acer, Asus or Lenovo, you can run a recovery or OS installation using a disk image. It can be created in advance or found on the Internet, but it must be stored on the computer, and the laptop itself must be turned on.
Reinstalling Windows 7 on a laptop requires special programs that are capable of recognizing images, these include:
- Diamond tools;
- UltraISO.
To do this, mount the image into this program and run the file with the .exe extension. If windows is simply archived, then there is no need to unpack it. Open the vault with winrar programs or winzip, find the same again executable file with the ending .exe. After clicking on it, the standard reinstallation process will begin. operating system.
How to reinstall Windows 7 from a flash drive or disk
In cases where the laptop cannot boot the OS on its own, you should use another computer to create the installation media. Before installing Windows on a laptop from a flash drive, you need to find an image and prepare the drive for writing files. If you have a licensed DVD, the process is much simpler, but there is an option that allows you to create it yourself.
Preliminary preparation of software for OS installation
To make bootable media from a DVD or flash drive, it is not enough to simply copy files or an image onto it. To do this, you should prepare the necessary version of Windows itself, using utilities to make an installation CD or flash drive. For the whole process you will need:
- Herself Windows program 7.
- DVD or flash drive minimum 4 GB.
- ImgBurn utility or Windows 7 USB-DVD Download Tool.
Creating a bootable USB flash drive or disk
If you have a DVD-rom, reinstalling Windows 7 on your laptop can be done through it. You will need Windows image and the ImgBurn utility, which can be easily found on the Internet. The creation process is as follows:
- Insert a blank DVD.
- Launch the ImgBurn program.
- In the window, select “Browse” and specify the path to the OS image.
- Don't put maximum speed for recording, it is better to choose the minimum one.
- After recording, a window will appear, you need to click “Ok” and the finished disc will jump out of the device.

In many modern models laptop computers, netbooks no longer use CD-ROM, so it is useful to be able to perform reinstalling windows 7 on a laptop with using usb flash drives. Creation process installation media next:
- Insert the drive.
- Run Windows program 7 USB-DVD Download Tool.
- In the window, select the path to the system image file.
- Next, the program will prompt you to select from the menu what you need to create: DVD or USB Device. Choose the second one.
- Specify the path to the drive.
- The utility will warn you that all data from the media will be lost. Agree and the creation of the installation flash drive will start.
BIOS setup
To restore or reinstall Windows 7 on a laptop, you need to change some settings in the BIOS. To begin, restart your computer to home screen load, press “del” (works for most models, but sometimes F8 works). The mouse does not work in this system, so all actions must be performed using the arrow keys on the keyboard. When going into BIOS, do the following:
- In the "Boot" section, find the "Boot Device Priority" section. This setting will indicate where to start the system from.
- In the menu, make sure that USB DEVICE is first in the list in order if you are using a flash drive or your CD-Rom if it is a disk.
- Press F10 and confirm that you want to save the changes.
Installing Windows 7
After all the steps described above, the installation will begin. The developers tried to make sure that the user does not experience any inconvenience and the whole process occurs as automatically as possible. The person will be offered several parameters that he must determine independently, but there are no difficulties with them. The entire installation, search for drivers for mother card, the processor will be made independently by the system, they will be built into the OS and will be immediately installed with it on the hard drive. When reinstalling, the laptop must be connected to power.
Installing Windows 7 from a disk or removable storage device has one algorithm. The user will need to follow these steps:
- Wait until the program copies all the necessary files. How long this will take depends on your PC configuration.
- Next, a license agreement will appear; you must confirm it.
- In the next window you will be offered the choice of restoring the system or performing a complete reinstallation. It is worth choosing the second option.
- At the next stage, you need to select a partition on which the OS will be installed. As a rule, select section C; all personal data from it will be deleted.
- Confirm your choice, and then the system reinstallation process will begin.
- During the reinstallation, the computer will reboot several times; after the first time, you will need to remove the bootable media and then reinsert it.
- At the end there will be several parameters that need to be set: time zone, if desired, set a password for account, enter the license key.
- The utility will carry out all other actions independently.

Decided to install or reinstall Windows 7, but you don’t have a clean one at hand DVD disc eh, or a disk with a Windows 7 distribution? Don't despair installing windows 7 from a flash drive not such a difficult task! Not one, but two choices at once! You can install Windows 7 using a regular flash drive or a mobile flash drive. It's very simple, just follow the instructions below and everything will go without any problems.
Before installing Windows
You also need to download the appropriate drivers for your computer and save them to a flash drive or DVD. This is because Windows may not initially have drivers for network card your computer or adapter. If you do not do this, then after installing Windows 7 you will not be able to access the Internet.
Windows 7 installation instructions
1. Preparing a flash drive with Windows 7
We need to burn the “.iso” image with the Windows 7 distribution onto a flash drive. An excellent program will help us. After installing the program, if you are not going to buy a license, you can use the “trial period”.
Now you need to open iso image with the distribution. To do this, click on the menu “File -> Open...”:

In the window that opens, indicate where the iso image is located:


It's time to insert the flash drive into the computer.
Attention : The contents of the flash drive will be permanently deleted during the recording process. Therefore, it is premature to copy all important data either to a hard drive or to another computer.
Click the “Format” button:

Assigning a type file system and click the “Start” button:

A notification will appear, click OK.

Formatting completed successfully.

Now click on “Record”:

Waiting for the recording to complete:

That's it, now you have a flash drive with the Windows 7 distribution.
2. Setting in BIOS to boot from a flash drive
Turn off the computer, insert the USB flash drive and only then turn on the computer. This is done because sometimes computers do not recognize flash drives inserted in the BIOS after the computer is turned on. You can also configure booting into the “BIOS” from the phone’s memory card (I’ve heard many people do this), but please note that this is possible in all laptops.
Our computer (I’ll show you using a laptop as an example). To do this, you must press a certain button when your computer starts booting. You can recognize this specific button when loading at the bottom of your screen. As a rule, this is “F2” or “Delete”, but it may be different.
After entering the BIOS, go to the "BOOT" tab to change the boot order. To change the order, as a rule, use the F5 and F6 buttons or using the menu that opens. We change the boot order so that your flash drive comes first. And it looks something like this.
How to reinstall Windows 7 from a flash drive?


Window OS is the most popular among all operating systems for personal computers in the world. Its interface is simple and understandable to all users, while it provides ample opportunities to manage all processes within hardware and in programs. From time to time there is a need to reinstall the operating system. In this article we will tell you how to reinstall Windows 7 from a flash drive.
Typically, OS installation is performed from a disk. However, what about those who do not have a disk drive or whose drive is not working? This is where our instructions will help on how to reinstall Windows 7 via a USB flash drive.
Preliminary preparation
Before you start reinstalling the OS on your computer, make sure that you have copied and saved all files and folders that are important to you.
Find drivers in advance for all devices connected to your computer. They are included with the corresponding devices, but if you lose them, you can find and download them on the Internet.
We suggest you familiarize yourself with 2 options for recording an OS on a flash drive.
Using special utilities
In the first case, you will need to have the flash drive itself, which will be used for Windows entries, operating system distribution and a set of auxiliary utilities.
- Copy Windows image 7 with .iso extension to your computer.
- Run special utility for reading disk images (a program such as Daemon Tools is suitable).
- Open in it the file we need with the operating system image.
- Go to the Boot menu and select Burn hard disk image there.
- Insert the flash drive and format it.
- Once formatting is complete, click the Burn button.
- Confirm the action and wait for the process to complete.
No special utilities
With this method, installation additional programs You don’t need it, just the operating system distribution and a flash drive.
- Call the command Windows string(Start - In the search box, type "Command Prompt").
- Type "diskpart" and press "Enter".
- Type "list disk" and press "Enter".
- A list of connected storage devices will appear in front of you.
- In the list, find the flash drive you plan to record to.
- Enter the command "select *name of flash drive*" and press "Enter".
- Type "clean" - "Enter".
- Then type "create partition primary".
- The system will inform you that the specified partition has been successfully created. Now it needs to be broken. To do this, enter "select partition 1" - "activate".
- Format the partition with the command "format fs=NTFS".
- Finally, enter "assign letter=Z" to assign a specific letter to the flash drive.
- Finally, type "Exit" and press "Enter".
- All you have to do is copy the distribution onto a flash drive.
Boot initialization
Follow this procedure:
- Turn off your device.
- Insert the flash drive into the USB port and turn on the device.
- While the computer is booting, press a special key (the most common are DEL and ESC) to enter BIOS mode.
- Install the flash drive to the first position in the Boot priority order list.
- Save the settings and exit BIOS mode.
Otherwise, the process of installing Windows 7 from a flash drive is completely the same as installing from a disk.

After the Win7 installation is complete, you will need to install all device drivers that you plan to use. In addition, you will need to install the programs that you usually use at work.