The printer does not connect over the network. The process of connecting the printer to a computer via a network cable. What is needed to connect a printing device over a network
How to allow all users to print from the same printer.
Let's begin with modern printers, MFPs and other devices differ in the type of connection to the PC. The most popular and widespread are LPT (although this port is already going out of fashion), USB, and Ethernet ports. Accordingly, setting the printer to personal computer will vary depending on which port you are using. All ports have their pros and cons. Well, for example, if printing via a USB connection is, one might say, “instant”, then printing over the network may take some time, because documents vary in size and until they are transmitted via the network to the printer, printing will not start... In addition, if the printer is connected via USB, if the server PC (the PC on which the printer is installed) breaks down, the printer will not be available to any user.
So let's get started. Let's look at two examples of setting up devices on Windows 7.
USB connection
Let's say a printer is installed on your computer and connected via a USB cable, how can you make it so that other users can print on it?
We need to proceed to " Start" - "Devices and Printers":
The window that appears will display all installed printers, faxes, monitors, scanners, MFPs, and so on:

But we need to select the printer that should be shared. Right-click on the desired printer (in my case it is HP LaserJet 400 MFP M425 PCL 6). In the pop-up window, click on " Printer property":


What we see here is an inactive item " Share this printer". It is necessary to check this box. Such manipulations will now allow us to find the printer by IP address or DNS computer name. But do not rush to click " OK", you should also check the box with the name " Add to Active Directory "(If you have a domain machine, this will simplify the search for a printer, and you can find out how below in the article):

Before clicking the " OK", let's make the final settings. Click on the button " Additional drivers...":

In the window " Additional drivers"You must check all the boxes (provided that drivers for x86, x64, etc. devices are installed). This will allow you to install printer drivers over the network not only for 32-bit PCs, but also for 64-bit ones:

All! Now you can press " OK" in this and the previous window. Settings by provision public access completed. Now let's look at how to connect to our printer from another PC. To do this, on another PC, go to the " Devices and Printers" and click on the link " Installing the Printer":

In the window that appears, we will see two items: " Add local printer " And "":

To connect the printer by IP address, select the first item; to connect the printer via Active Directory, select the second item. Let's first select the first item, click on it and go to " Select printer port":

Select " Create a new port", V " Port type"choose" Standard TCP/IP Port"either" Local Port" and press " Further":

On the menu " Enter the printer name or IP address"you must specify the IP address of the computer on which the printer is installed (in my case it is 10.81.0.50), click " Further", after which the installation of the printer should begin. Once the installation is complete, you can start printing.

So, now let's go back a few steps and look at an example of adding a printer through Active Directory. Select the item " Add a network, wireless or Bluetooth printer":

On the menu " Search for available printers..", without waiting for the search, we immediately click the link " The printer you need is not in the list":

In the menu that appears, we see three installation options, you can select any of them. In the first paragraph you can find the printer through Active Directory, in the second paragraph you can find it by entering the computer name or by finding a computer on the network, in the third paragraph you can specify the IP address. Select the first item and press " Further"and we get a window" Search: Printers":


Here you will see a list of all available printers on the domain network, and you can also filter them by parameters. The screenshot shows that I selected my printer, which I shared earlier, just click on it to begin its installation, after which you can use the printer.
Ethernet connection
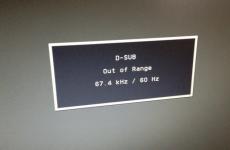
I will show an example of such a connection on a printer, or rather MFP Canon i-Sensys 411 dw. For other manufacturers and on other models, the actions will be identical. Before connecting directly to the printer over the network, you need to configure its IP address on the printer itself! This is important, otherwise we simply will not find the printer on the network.
On the printer touch screen, click on " Menu":

Select " Network configuration":

Select " TCP/IP Settings":

Select " IPv4 settings":

Select " IP address settings":

In this menu you can get settings automatically, but as experience shows, the printer cannot fix DHCP server, in short, IP addresses are not automatically assigned to the printer correctly; it is better to enter them manually. Select " Receive manually":

Enter the IP address and subnet mask. All these parameters depend on your network; the address in the photo is shown as an example. When the address and subnet mask are entered, press " Apply" and we can move to our computer to connect the printer.

After setting up the printer, you need to download the driver from the official website, in my case the driver was downloaded " MF410MFDriverV2160W64RU". Unpack and run:


In the next window we will find the printer if automatic search didn't help, enter the printer's IP address and click " Further":

That's all! The printer will install and you can print documents. I hope this article will help you in setting up your printer! Good luck!
If you have several computers and only one printer, then you probably had to run with a flash drive from one computer to another in order to print a document. This is very inconvenient because it takes a lot of time and forces you to break away from your current work. A network printer can be a solution to this problem. In this article we will talk about how to connect a printer via local network.
In this article we will only describe the process of connecting a printer via a local network. In order for you to use these instructions, you must already have a local network built and the printer must be connected to one of the computers.

Step No. 1. Share the printer.
In order to connect the printer to a computer over a network, it must be shared. To do this, open the Start menu and go to the "Devices and Printers" section.

If you are using Windows 8, then you need to open start screen with tiles and enter “Devices and Printers” into the search.

After this, the operating system will prompt you to open this window. In the "Devices and Printers" window you will see printers, as well as other devices connected to your computer.

Here you need to right-click on the printer that you want to make accessible over the network and select the “Printer Properties” menu item.
After this, the “Printer Properties” window will open in front of you; here you need to go to the “Access” tab. On the "Sharing" tab, you must enable the "Share this printer" feature.

After enabling sharing, close this window by clicking the “OK” button. That's it, your printer is now accessible over the local network.
Step No. 2. Connect the printer via a local network to another computer.
Now we need to connect this printer to another computer via a local network. To do this, open the “Devices and Printers” window on the second computer and click on the “Add a printer” button.

After this, the “Add a printer” window will open in front of you, in it you need to click on the “Add a network, wireless or Bluetooth printer” button.

After searching for printers, the operating system will prompt you to connect the printer to which you previously shared access.

All you need to do is highlight the found printer and click on the “Next” button. This will complete the process of connecting the printer via the local network.
But, if the operating system does not find the printer you need, then click on the “The printer you need is not in the search” button. After clicking this button, the system will prompt you to enter the printer address manually.

The printer address must be entered in the following format: “\\computer-IP-address\printer-name”. For example: \\192.168.1.2\hp.
After searching for the printer by IP address, the operating system will report that the printer has successfully connected over the network.

After this message, the connected network printer will appear in the system and will be available for use.
Many offices install a local network in order to exchange data and use common technical means. For a medium and small office it is easier to install one powerful printer instead of several small ones. It must be connected in such a way that it can be accessed from all computers in the institution. To turn a regular printer into a network, you need to correctly change some device parameters.
There are printing devices that connect directly to the router, bypassing the computer, but they are expensive. The easiest and most inexpensive way is to make a regular printer available to the public. It connects to one of the office computers in a standard way– via LPT or USB port, then it is made publicly available on the Internet. This method of using a printer over a network has limitations in its capabilities. The computer or laptop to which the shared printer is physically connected must be active on the network for the maximum amount of time. Drivers and install it on it from the disk that is always included with the printer, or find and download it on the Internet on the manufacturer’s website. Check system functionality. Make the printer publicly available. To configure, open “Devices and Printers” (or “Printers and Faxes”) in Control Panel. Find the installed printer, open its “Properties” by right-clicking on your printer icon. In the “Properties” window, the required tab is “Access”. Next to the line “Share this printer”, check the box. Leave the network name of the printer suggested by the system or enter your own. For example: "OKI_C510dn". Under this name, the printer will be recognized as a shared resource on the local network. Enter any name, but without spaces. All computers connected by the network have the same operating system installed as the computer with the connected printer - click “Ok”. The procedure is completed. In the case when there are computers on the local network from another operating system , install suitable drivers for them. In the Properties window, in the Drivers section of the Access tab, click the Additional Drivers button. A list of drivers will open, in which check the boxes next to those that you may need for other Windows. Pay attention to the “Installed” column; if the word “No” appears there, then you need to install a disk with drivers from the printer manufacturer, or download the selected drivers from its official website. For example: Canon, Epson, OKI. Now you can use the printer as a shared one

network resource . On remote computer go to the “Devices and Printers” (or “Printers and Faxes”) section, call the “Add Printer Wizard”. A window will open, in which select “Network Printer” as the connection method, then “Next”. All that remains is to correctly specify the path to the installed network printer. Follow the syntax: two forward slash characters, the name of the computer on the network, a forward slash, the network name of the printer. For example: "\\MyComp\OKI_C510dn". Click "Next". The printer installation process will end with the system prompting you to print a test page - do so. The advantages of connecting a network printer this way: there is no need to buy new equipment, it is standard for Windows, easy to implement, without
Here we will talk about setting up a regular printer (or MFP), which is connected to one of the computers on the local network, so that it is possible to print from any PC on this network.
- If you want to connect a regular printer via USB to your router and print from all network computers- look.
- If you need to configure a network printer, see.
- If you need to set up a printer via Wi-Fi via a router, see.
2. Make sure that the printer connected to one of the computers is printing. All you need to do is print a test page.
3. Enable file and printer sharing on all computers on the network.
This can be done at
In Windows 7, it is also advisable to “Disable password protected sharing” in the same window.
Save the changes.
4. Share the printer in settings home group on the computer to which the device is connected.
This is configured by address
In the “Printers and Devices” section, select “Sharing” from the drop-down list and . And “Done.”
5. We share access for the connected printing device.
We go to the address
Right-click on the printing device icon and select “Printer Properties”.
On the “Access” tab, check the “Share this printer” checkbox. Set the name shared resource. Preferably shorter and without spaces. Click "OK".
After these manipulations, the shared printer appears on all network computers.
Manually installing a shared printer
If the printing device does not appear on other computers.
Control Panel\Hardware and Sound\Devices and Printers
- In Windows 8/8.1/10, a window will appear in which you will search for available printers. If the printing device is detected, select it, click “Next” and follow the wizard’s prompts.
- In Windows 7, you need to select “Add a network printer.”
If the printing device is not detected on the network, then click on the link “
If the computers of household members or employees of a small office are connected by a local network, then one printer is enough to organize printing over the network. And this approach is obviously more profitable than installing a personal printer for each computer.
How to make a printer network
There are several options for “transforming” the printer into network device print:
- Through network card printer (if the model requires one);
- Via a print server;
- Through printer sharing.
If the first two methods require special knowledge, then the option of organizing network printing by sharing a printer is the simplest. How can a printer connected to one computer be made an accessible resource for other network users in the operating room? Windows environment 7/8/10 will be discussed below.
Setting up the PC to which the print device is physically connected
In the Control Panel of your computer you need to:
- Download the Network and Sharing Center section.

Set up other computers on your network for a shared printer
On each computer included in the local network, you need to use the “Devices and Printers” section to perform the “Add a Printer” mode.
The network-wide printer should appear in the list of available resources. You must select the appropriate printer and click the “Next” button. You can also search for a device by network name or IP address using Explorer. After initializing the printer installation, you must follow the prompts of the “Setup Wizard”. Upon completion of the installation, you need to set the network printing device to the “default” status.

IN different versions Windows systems 7/8/10 In general, the algorithm for connecting printing over a network is the same, the main modes may only be formulated slightly differently. More detailed information about other ways to organize printing over a network can be highlighted in the video.