Cc and bcc in email. Archiving letters in corporate mail Narrow send me a copy of the message by email
In the “If” section you set the parameters by which letters will be filtered.

The message object that is checked by the filter.
The condition that the filter checks.
Content that is checked by the filter.
Step 1. Set the scan object
First of all, you need to select the letter element that will be checked by the filter. You can select one of the objects:
- From field: sender is verified
- "To" field: All recipients are checked
- Subject field: email subject is checked
- Field "Copies": all recipients of a copy of the letter are checked
- Forwarded From field: the first sender is checked if the letter was forwarded to you
- Forwarded to field: checks who the email was sent to
- Size, KB: checks the message size in kilobytes
To specify a different letter object for scanning, click on the current inscription.

Step 2. Select the verification condition
"Contains": the filter will check that the check object specified in the first step contains the value that you specify in the third step.
"Does not contain": on the contrary, the filter will check that the object from step 1 does not contain the value that you specify in step 3.
To select another verification condition, click on the label with the current one - it will change.
Step 3. Specify the content for verification
In this field, you specify the content that the filter will look for in the object specified in the first step. You can enter any word, number, text passage, and so on. To specify multiple criteria at once, use the | symbol. To recognize not only whole words, but also parts, use * (for example, if you specify in the field check* The filter will also pass through letters containing words accounts).
Step 4. Add another condition
Click the Add Condition button if you want to add other validation criteria.
If you have two or more check conditions, the message “Apply a filter if one of the conditions is met” will appear under the “Add condition” button.

Click on it. The phrase will change to “Apply the filter if all conditions are met.” In this case, only messages that contain all the specified criteria will be filtered.
Select the required condition and proceed to the next step.
Action ("That")
In the “To” section, you specify what will happen to messages that pass the filter.

Step 5. Choose: move to a folder or delete forever
First of all, you need to choose what to do with the filtered emails: move them to a folder or delete them forever. To do this, set the switch opposite one of the inscriptions ( or ).
If you selected “Place the message in a folder,” click “Inbox.” A list of folders in your mailbox will open. Select a folder to move the filtered emails to, or create a new one by clicking “Create Folder”.

You can also specify that filtered emails be marked as read or flagged. To do this, check the box next to the required inscriptions.
Step 6. Select additional actions for the filtered letter
You have already chosen the main action for the letter, now you can select an additional one. To do this, click “All actions”.

The following additional actions are available:
“Forward a copy of the message/notification to the address”
Check the box next to this item to forward to specified address a copy of the message or notice. To select the type of letter, click on the inscription “copy of message”, it will change to “notification”.
In the field, enter the address where a copy of the message or notification will be sent.
"Reply automatically"
Select an automatic response to an email that passes through the filter. Click "Message" to indicate own text. Click “No such recipient” to have the sender receive this response.
Corporate mail has size limits mailbox employee. When certain limits are reached, the functionality of your mailbox will change. The following limits are available:
- When the volume reaches 5.8 GB - a warning that your personal mailbox will soon fill up.
- Once the volume reaches 5.9 GB, sending letters is prohibited. Incoming emails will continue to arrive.
- Once 6 GB is reached, sending and receiving letters is prohibited. Emails sent to you will be lost.
To find out the current size of your mailbox, you can use the Instructions or Instructions below.
Each corporate mailbox has a network archive associated only with it. If you are using to connect to mail server Exchange protocol (MAPI) or web access, then this archive will be displayed in the interface mail client like a separate mailbox. In the same way as in the main mailbox, you can create any folder structure in the archive for storing letters.
Absolutely all letters older than 2 years will be automatically moved from the main mailbox to the online archive. This is true for all folders in your mailbox, such as Inbox, Sent Items, Deleted Items, etc. When automatically moving to a network archive, the structure of folders created manually will be preserved.
If you want to reduce the current size of your personal mailbox, you can independently move any letters to a network archive. If you are using Outlook, then use " Instructions for moving emails to a network archive via MS Outlook". If you are using web access, then use " Instructions for moving letters to a network archive via web access» .
All letters older than 5 years will be deleted from the online archive. These letters cannot be restored. If you need a group of letters to remain even after reaching the age of 5 years, then you need to save them in advance, before reaching the age of 5, using an archive file.
Any email messages can be downloaded to a separate archive file located on the user's computer. See instructions below. After this, these mail messages will no longer be stored in the mailbox (or online archive), so the mailbox size will decrease. The user is responsible for the integrity and safety of this file, so we advise you to sometimes make a copy of the archive file and save this copy on another medium: a flash drive, another hard drive, in a network location, etc. An archived file, like any file, can be transferred to another computer and connected to Outlook for use on another computer. To perform this step, see
IN Lately politics, which many don’t even think about and don’t want to think about, one way or another brings into our lives various changes and sometimes very surprising.
All your life you have had an E-mail address on the popular mail.ru service, and suddenly circumstances develop in such a way that you are no longer allowed to use this service.
This happens to citizens of different countries, someone cannot use their mailbox on mail.ru, someone cannot visit their favorite social network, someone cannot access their favorite torrent distribution site, and someone has lost all their contacts in a business social network.
Everyone has different circumstances and stories, but today we will try to help those who have lost or are about to lose access to their mailbox on mail.ru and yandex.ru and to all their contents.
So let's start step by step.
Step 1. Create a new Email address on Google
Why on Google? Because this is an international, large and serious company that operates all over the world, is reliable and is not blocked by anyone. And it also provides a huge amount of storage for your mailbox.
FinExecutive Russia website 2020-01-14
8 life hacks: how to work effectively with email
We use email to resolve a lot of work issues every day. But at the same time, many people, in the literal sense of the word, become dependent on their mailbox. If you think that it takes up too much of your time and even your productivity suffers as a result, listen to our advice.
It would seem that everyone knows the rules for working with email. But even this does not always help to use your time rationally. A flood of incoming messages, an overabundance of unverified mail, a lack of time to properly process electronic correspondence and the desire to always remain obligatory and reliable in the eyes of your business partners often causes stress.
Common situation? In this case, our life hacks will help you find a way out. difficult situation and thereby increase work productivity.
- Make checking your inbox part of your work schedule. Make it a rule not to monitor incoming messages, but to process them twice a day. After all, mail processing is the same job as any other included in your work schedule. Before using this life hack, analyze your incoming message flow to understand which 2 hours you receive the most emails. Record these two periods of time in your diary and use them to read correspondence and respond to messages received.
- Minimize anything that reminds you of the existence of email. If the specifics of your work allow this, close (not just minimize) the program, disable the function of pop-up notifications about receiving a new letter and remove the icon from the desktop. Do everything to protect yourself from any additional reminders in your inbox.
- Clear your inbox. Once you minimize the number of unread messages, you will realize how much easier it is to process new messages when you don’t have to look for them in a stream of disparate information. You will be able to process incoming correspondence faster if:
- You will leave only unread messages in your inbox;
- Create separate folders for each project or category of emails. This technique will help you quickly find the information you need;
- Start using labels and color coding of incoming messages. This way, for visual perception, the sorting of letters will become more noticeable;
- Study the functionality of your email account in detail to manage its work more effectively;
- Block the delivery of letters from unwanted users;
- Once and for all, unsubscribe from unnecessary email campaigns. At first glance, this seems like a hassle, but if you don’t want to continue receiving piles of useless information, you’ll have to reconsider all your subscriptions;
- You will use filters to sort letters received from the remaining mailings;
- Mark with a star those messages that are very important or require a detailed response.

 Good time! Today we will talk about backup SMS, by sending all messages from your smartphone to email. This may be required simply for the purpose of saving correspondence, or for further processing of messages, for example, searching for the necessary information in messages (contacts, names, prices, etc.) third party applications, which in turn work with E-Mail. Let's look at an option for such copying using a smartphone running Android.
Create a mailbox
To send and save all messages by E-Mail, you first need to register a mailbox; mail from yandex.ru is perfect for this. You can also use your existing mailbox, but I recommend registering a new one. Firstly, over time, a large number of SMS messages will accumulate in it, which can interfere with working with regular letters, and secondly, if you connect your mailbox to a third-party service for analytics, do not indicate the login and password for the main E-Mail in it.
Install the SMS Backup + application on your Android smartphone
To send all SMS messages to your mailbox, you will need to install and configure a special SMS Backup + application, which can be downloaded from play.goole.com or apk-dl.com (an alternative for smartphones that do not use Google Play) or .
The application has been tested on Android: 3.xx, 4.xx, 5.xx, 6.xx; Support for version 2.xx is declared.
Setting up SMS Backup +
- Launch the application;
- After launching the application, in the menu that opens, select the item: Advanced settings;

- Next, go to Backup settings;

- Check the boxes for Backup SMS and Email subject prefix, uncheck the boxes for Backup MMS, Backup Call log (we don’t need MMS and call history, although you can reserve them too);

- Return to the previous menu and go to the IMAP Server settings section;

- Select the Authentication menu item,
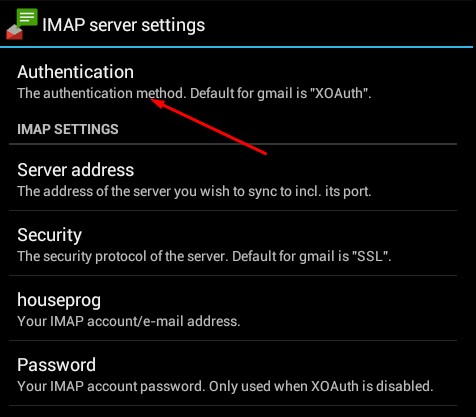 set the parameter value to Plain text;
- Select the Server address menu item, enter the value: imap.yandex.ru:993

- Select the Security menu item and enter the value: SSL

- Select the Login (You IMAP account) menu item, specify your login, then select the Password (You IMAP account password) menu item, specify the password for yandex.ru mail;
- In the main menu, check the box for Auto backup;

- Next, go to Auto backup settings, select the Regular schedule menu item and set the time interval with which SMS will be sent to the mailbox account we specified (for example, every 2 hours).

The SMS Backup + application allows you not only to do backups to E-Mail, but also to recover messages from it. The corresponding recovery settings can be found in the Advanced settings -> Restore settings section.
After sending messages by E-Mail, they will all be placed in a folder called: SMS.

Analyzing SMS sent to Email
After receiving the list of SMS messages to your email address, you can use a special software analyze the data they contain. For example, you can track SMS from the bank with messages about cash receipts and debits, based on which you can keep financial records automatically. Similar solution implemented by me for the “site” joint purchases“When all SMS messages from the Bank received by the JV Organizers are collected in one place, analyzed and based on them, the system displays data in the control panel about which user who placed the order made the payment.