How to enable general synchronization on Android. Enable synchronization on your computer. Why do you need to configure synchronization in multiplayer games and applications?
Thanks to this, they can be accessed from different devices(smartphone or computer). This is convenient if you use several phones or are simply concerned about safety important files. Next, we will tell you how to enable and configure account synchronization Google on Android.
How to enable Google account synchronization on Android
By using Google account, you can synchronize contacts, messages, photos, passwords and other user data. For example, to have access to them from another smartphone or computer. How to enable backup:
Step 1. If there is an item in the phone settings "Synchronization", then select it. In the page that opens, move the slider "Auto-sync data" in a state "Enabled".
Step 2. Confirm the action. If necessary, synchronize objects immediately, limit data synchronization (for example, only by WiFi). Here you can set up individual accounts.

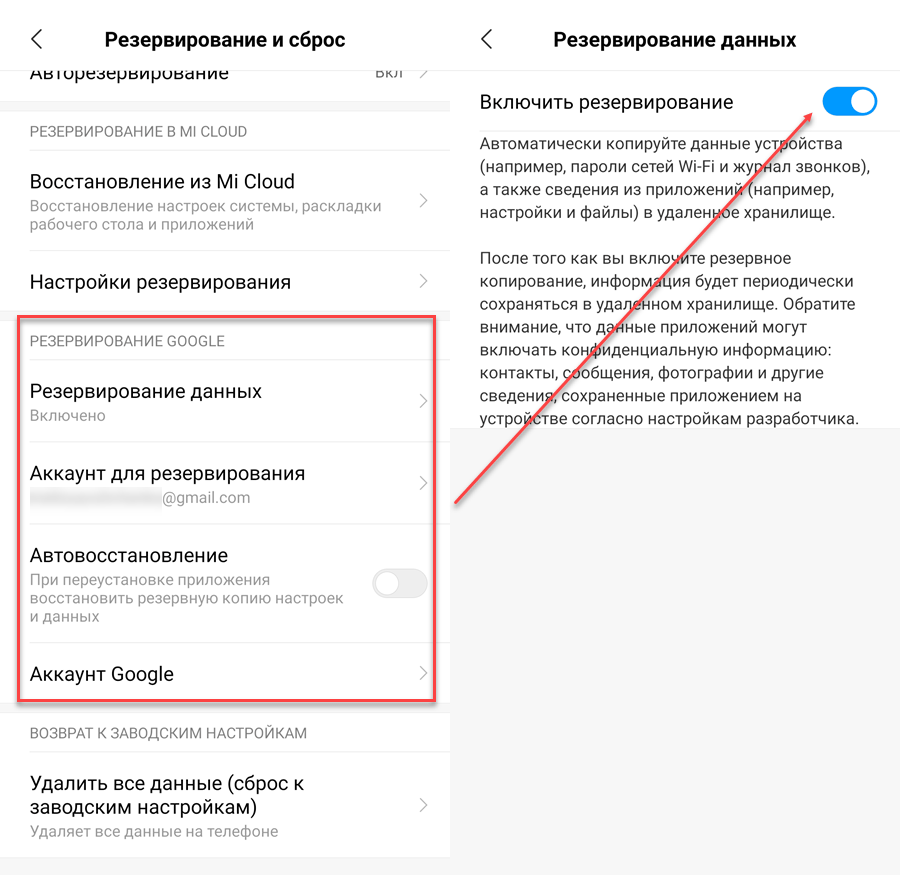
Step 3. In settings, find and select "Google". Click on the line here "Backup".

Step 4. Move the slider "Upload to Google Drive» in a state "Enabled". After this, the information on the screen will be updated, a button will appear "Start copying" with which you can immediately create a backup copy of your data.

Step 5. Go to the menu through settings "Advanced settings". Here, find and select "Backup and Reset".

Step 6. In settings "Local reservation" you can manually create a backup system settings or delete the existing one.

Step 7. In the section "Google Backup" you can select an account, auto-recovery, and configure other settings. Depending on the device model, there may be other sections here.
After this, you will be able to synchronize Android with Android. To do this, it is enough to use one Google account on two devices. This is convenient if you want to transfer all user data from one smartphone to another.
How to disable contact synchronization on Android
By default when created backup copy Android copies all settings and user data to the cloud. If you do not want to sync contacts between devices, you can disable this. Instructions:
Step 1. From the setup menu select "Advanced settings". Find the item here "Backup and Reset".

Step 3. If you do not want to sync Android contacts, then select "System Settings". Here, uncheck the line "Contacts" and click on the button "OK" to confirm the action.

Step 4. If you want to disable synchronization of other applications, then click on "Select applications" and mark those objects whose data you do not plan to save.

The names of some menus and buttons may differ depending on your device model. The same applies to the location of some sections. Therefore, if you cannot disable contact synchronization, then you can transfer them to SIM-card and delete from Google account.
Sync data with Google account – useful feature, which almost every smartphone running Android OS is equipped with (not counting devices aimed at the Chinese market). Thanks to this feature, you don’t have to worry about the safety of the contents of your address book, email, notes, calendar entries and other branded applications. Moreover, if the data is synchronized, then you can access it from any device, you just need to log in to your Google account on it.
On most mobile devices running Android OS, data synchronization is enabled by default. However, various failures and/or errors in the system may well lead to this function being deactivated. We will tell you how to enable it further.

Note: On some smartphones, you can force data synchronization for more than in a simple way– using a special icon in the curtain. To do this, you need to lower it and find the button there "Synchronization", made in the form of two circular arrows, and set it to the active position.

As you can see, there is nothing difficult in enabling data synchronization with a Google account on an Android smartphone.
Enable the backup function
Some users by synchronization mean data backup, that is, copying information from proprietary Google applications to cloud storage. If your task is to create a backup copy of application data, address book, messages, photos, videos and settings, then follow these steps:

After completing these simple steps, your data will not only be synchronized with your Google account, but also saved to cloud storage, from where it can always be restored.
Common problems and solutions
In some cases, syncing data with your Google account stops working. There are several reasons for this problem, fortunately, they are quite easy to identify and eliminate.
Network connection problems
Check the quality and stability of your Internet connection. Obviously, if the mobile device does not have access to the network, the function we are considering will not work. Check your connection and, if necessary, connect to stable Wi-Fi or find an area with better cellular coverage.

Auto-sync disabled
Make sure that the automatic synchronization function is turned on on your smartphone (5th point from the part “Turn on data synchronization ...”).
Failed to login to Google account

The latest OS updates are not installed
Perhaps yours mobile device needs updating. If available to you new version operating system, you must download and install it.

To check for an update, open "Settings" and go through the steps one by one "System" — "System update". If you have installed Android version below 8, you will first need to open the section "About the phone".
As is known, the owner of the operating room Android systems is a Google company. Accordingly, you can link the system to your Google account via Gmail. This will allow you to use your account both in Google services and on several devices running Android OS. In any case, you will need this account to install applications from Play Market and synchronize your data. We will talk about the latter in more detail in this article.
In the broad sense of the word, synchronization is the exchange of data between a device and your account. This is very convenient because it allows you to access a lot of data on multiple devices, or recover deleted information with just one Gmail account. When synchronizing, the user exchanges his data (contacts, applications, etc.) with the Google cloud in order to access it from another device.
This process can be easily explained with an example Chrome browser. For example, you use a browser on a PC, add bookmarks, save passwords. By using Gmail account you can easily access the same bookmarks, browsing history, etc. on your smartphone. The same goes for everyone Google services, of which there are a large number.
Synchronization also performs two very important functions. First, it allows you to access your data if you lose your device. Secondly, automatic synchronization will save you a lot of time when transferring files from one device to another than you would have to do it manually. But in order to synchronize Android device worked correctly, you need to configure it correctly.
How to set up synchronization? Enable, disable
In fact, the synchronization procedure is extremely simple, but still, many users have difficulties with it. This is primarily due to the fact that there are several versions of Andriod, as well as a large number of proprietary graphical interfaces, for example, in Xiami, Meizu, LeEco, etc. smartphones. However, they are all generally similar, and general instructions can be outlined.
Sync contacts in Android
Synchronizing contacts in Android is the most important function. When purchasing a new smartphone, log into your Google account and after the synchronization process is completed, all contacts are again in the phone book. The main thing when creating a new contact on your device is to specify “ Save to Google"and that's all
These simple steps will help you in the future, if you lose your smartphone or buy a new one, to restore your data through your Google account.
Conclusion
I hope in this short article you have become familiar with what synchronization is, what this process is like on your phone, and where your data is stored. This is a simple way to synchronize contacts in Android, transfer calendar data, restore data and applications, as well as all programs that are used every day on a smartphone. If you have any questions, write to us in the comments to this page and we will definitely help you.
For those who are experiencing a “There are currently synchronization problems” error or error, we recommend that you watch the following video.
Today, almost all of us have several devices with Internet access. We use phones, tablets, laptops, and other equipment at home, at work, and in public places. Agree, it would be convenient if the usual settings for displaying tabs, saved bookmarks, scoreboards, history or other parameters did not have to be entered and changed again each time on a new device. But what if it’s someone else’s computer, and you urgently need to find a saved bookmark?
Yandex Browser developers have solved this problem and now in this program you can configure automatic data synchronization on all devices.
The process is simple and does not require any special knowledge. Besides this, this property The program will allow you to restore data if for some reason it was lost (error, failure, virus attack).
What is synchronization in Yandex Browser, how to enable, configure or disable it - you will learn all this from this article.
Account creation
The main condition for setting up synchronization and saving your data is an active user account. If there is one, you can skip this settings item. Otherwise, if you have not set up your own account up to this point, you will need to register with Yandex services:
Method 1 (via browser menu):
- Open the browser and go to the program menu;
- In the pop-up window, find the “Settings” section and go to it;
- Click the “Set up synchronization” button.

Method 2 (via direct link):
In both the first and second cases, a standard user registration window will open. Here you need to enter your data, then click “Register”:

Congratulations, you now have a single account for all services from Yandex. Now you can proceed to setting up data synchronization. Write down or remember your password. We'll still need it.
Enabling synchronization with a cloud account
Method 1 (via the “Synchronization” menu items):
- IN open window Yandex browser go to the menu by clicking on the icon at the top right.
- Select the “Synchronization” menu item.
- In the window that opens, fill in the login and password fields in the authorization form.
- Click the “Enable synchronization” button.

Method 2 (via the Settings menu)
Longer chain of transitions:
- Launch the browser window
- Open the menu.
- Go to the “Settings” section.
- In the window that opens, find the “Set up synchronization” subsection.
- Next, following the instructions described above, enter your account information and click the “Enable synchronization” button.
When you first log into the service, Yandex may offer to install additional components. If you wish, you can install or refuse:

In the same window we can make changes to some synchronization settings. In particular, we can select the elements that we want to synchronize with other devices:

If desired, some of them can be disabled. This is easy to do, just uncheck the box next to the required section, and the data will not be saved in cloud services. This option does not affect the storage of data on your device.
Important! To ensure proper security of your personal data, it is recommended to disable the “passwords” and “history” sections. If an attacker suddenly manages to gain access to one of the devices, he will not be able to use your personal data.
Don't be alarmed if you accidentally disable/enable something and close this window. This is not the only way to get into the settings.
Settings
In order to go to the above section from the browser, we will use standard menu programs -> Settings -> Synchronization. The information on the page will indicate that your program is synchronized with your account:

When you click on the “Show parameters” button, a list of available items for editing will open. Select and save.
The developer has provided the ability to delete outdated or irrelevant synchronization data. To do this, in the “Show parameters” section you need to click on the small “Delete” button:

As a warning, the user will see a pop-up window with information. If you clicked this button by accident, you can always refuse.
Shutdown
Naturally, for a number of reasons it may be necessary for Yandex Browser synchronization to be disabled.
Disabling a service is as simple as all other operations. According to the standard scheme, open the settings:
Open the Yandex browser page -> Go to the menu -> Section “Settings” -> “Synchronization”. Just click the “Disconnect” button and the device will be disabled from the ability to synchronize with others:

Using data on another device
All of the above steps describe setting up synchronization on one of the user's devices. To connect the second and all subsequent ones, all these steps will no longer be needed. It will be enough to authorize your account on any of the devices with installed by Yandex Browser, and all your data will be automatically pulled from the cloud, the two devices will synchronize automatically. This process may take some time, depending on the speed of the Internet connection and the operating parameters of the device.
Synchronization with other browsers
What to do if you previously worked with another browser (Chrome, Mazila, Opera), but have now switched to products Yandex company?
Unfortunately, as such, automatic synchronization between products different developers doesn't work, it simply doesn't exist. However, it is possible to import user personal data from one program to another. Let's look at how to do this using the example of transferring from Google Chrome. To do this:
- go to the browser settings through the main menu;
- find the “Profile” section
- Click the “Import bookmarks and settings” button;
- in the pop-up window, select the browser from which you want to transfer data;
- leave ticks on the necessary items;
- click “Transfer”.

Thus, using this simple functionality provided by the developers, you can greatly facilitate your work with the Internet anywhere, wherever you are. Synchronization will not only provide a single, familiar browser working environment, but can also become a means of monitoring, for example, a child. Since the program saves all data, you can easily track the history of visits to certain resources from other devices from one device. However, this can also become a headache if a device ends up in the hands of the wrong people. Remember this!
Sync your smartphone to Android based With Google account- This is an extremely useful feature. Why? Some data is stored on the server of the Internet giant Google, so if necessary, it can be special problems restore - this also applies to contacts linked to the account. Therefore, we strongly recommend that you enable data synchronization.
First of all, you need to turn on the Internet - Wi-Fi or mobile, it's up to you. The main thing is that the connection is stable.

Open settings.

Find the “Accounts” section and open it.

Among available accounts choose an account Google entry. If you don't have it yet, .

What's next? If you see that the switches are in the "On" position, you can do nothing, synchronization is enabled. If the switches are in the Off position, synchronization is disabled and must be enabled. Move the switches opposite the desired items to the “On” position. These do not have to be all the items: you can choose what exactly to synchronize.

When connected to the network, the data is synchronized automatically.

If, for example, you changed some data and want it to be synchronized with the server right now, click on the button in the form of three dots.

A menu will appear, it has a line “Synchronize” - tap on it.

The data is synchronized, as indicated by the corresponding icons.

Agree, it’s not that difficult?


