How to make a save point. Create a system restore point manually. The principle of the recovery procedure in seven
Windows provides several ways to protect itself. That is, the operating system by default contains mechanisms that allow you to quickly restore the computer to its functionality after a failure.
One such mechanism is points Windows recovery.
What is a Windows Restore Point
Restore point is a set of parameters and important system files that determine the state operating system at a specific point in time. That is, when creating a restore point, Windows “preserves” the most important things responsible for its performance. All conserved information is stored in a secure area hard drive. In the event of a failure or failure of the operating system, you can use a restore point and restore the operating system to the state in which it was at the time the restore point was created.
At the same time, it is IMPORTANT to understand that we are talking ONLY about the state of the operating system, that is, about the state of its most significant files, and not about the user files or the image of everything system disk.
For example, a virus can damage system files due to which the computer will stop booting or will appear blue screen death. This can also be caused by incorrect driver installation, operating system updates, or even the installation of some program.

In such a situation, a restore point will allow you to very quickly solve the problem by returning the system files to the state they were in before they were damaged or changed.
Restore points allow you to undo latest changes in the operating system, but their use will only be truly effective if they are created in a timely manner. This means that restore points should be created regularly, and also before each potentially unsafe action, such as installing a driver or new application on the computer.
Usually the operating room itself handles this task. Windows system, but here it is worth understanding that you will have to pay for such insurance, and in this case we are not talking about money, but about hard drive space. Restore points can take up a significant amount of space, especially if they are created regularly.
Many users do not know about the existence of restore points, but have encountered . Quite often there is a direct connection here and deleting old restore points can free up extra gigabytes, and sometimes tens of gigabytes on the system disk.
I also want to note that restore points are not always useful and I personally disabled their creation in Windows. But this does not mean that they are completely useless. Each user has his own algorithm for restoring the functionality of the operating system, and this algorithm depends on how the person uses the computer, that is, on how his work on the computer is organized. For example, I have had a certain virtually unchanged set of programs on my computer for a long time, and my personal files have always been located on a non-system drive. For this reason, in the event of a failure, it was easier for me to use a pre-created image of the system disk and restore the system partition with all the applications I needed in half an hour, rather than trying magic with recovery points without a guarantee. But still, sometimes their use is completely justified.
If you experiment with programs, periodically install something new, or are going to change something in , then restore points will help you avoid possible problems.
So let's look at the recovery settings.
Configure system recovery options
Recovery settings can be found in the window System properties. This window can be accessed in different ways, for example through Windows search 10.
Or by calling the context menu on the element This computer in Explorer, select Properties.
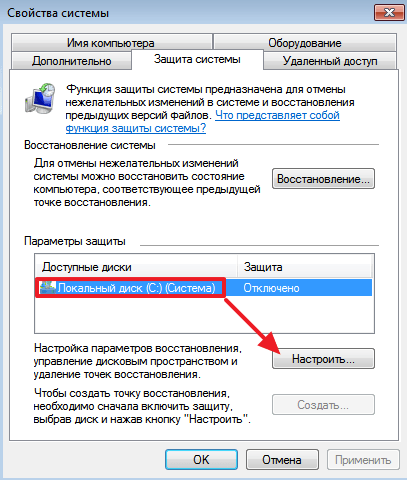
In the window that opens, go to .

The creation of restore points can be enabled for all disks, but it is logical to use this tool only for the system partition. In the area Security settings we see for which disks protection is enabled or disabled.

If you want to use recovery points for the system disk, but its protection is disabled, then select the disk and click on the button Tune. Then we enable system protection and can immediately determine the volume disk space, which we are willing to sacrifice to create recovery points.

And here again a compromise is needed. The fact is that the more disk space you allocate for recovery points, the more of them will be saved. As soon as the allotted space is filled, the oldest points will be gradually deleted, replaced by newly created ones.
If you allocate too small a volume, this may lead to the fact that recovery points simply will not be created even when disk protection is turned on.
Also, quite often users have a completely logical desire to move recovery points to another drive or even removable media information, for example, on a flash drive. Unfortunately, this cannot be done, since recovery points must be stored on the disk that is being protected.
How to create a Windows restore point
So, if protection is enabled, restore points are created automatically when you install new applications, drivers, or Windows updates, but sometimes it becomes necessary to create them manually. For example, you are going to make some changes in Windows registry. In this case, it’s worth being on the safe side and creating a recovery point in case of unforeseen complications.
To create a Windows restore point, click on the button Create(in the window System properties, tab). Next, you can specify a custom name for the recovery point. The date and time will be added automatically.
 
It will take some time to create the restore point, after which you will see success messages.
Where are Windows restore points located?
As I already mentioned, recovery points are stored in a certain area of the protected disk - this is the folder .

It is hidden and located in the root of the protected disk. You can see it by turning on display mode hidden folders and files in Conductor. But entering the folder and deleting something in it will not work, since it is protected by the system.

For the same reason, programs do not have access to this folder. Therefore, if you are using the program Conductor If you try to estimate the amount of free disk space, then this folder will not appear in the displayed volume, which makes many users puzzled by the question of the loss free space on the system disk.
But there is no need to work directly with the folder. I mention it only because some novice users have questions about its purpose.
How to roll back Windows to a restore point
So, if Windows suddenly starts acting up, then one of the options to solve the problem is to roll back its state to the last successful restore point.
There are several ways to do this and the easiest is through the section System Restore.

Click on the button Restore and the recovery wizard starts. Here we are immediately informed that the recovery does not affect the user's personal files, however, applications, drivers and updates installed after creating a restore point may be deleted.


If the system created restore points automatically, the wizard can recommend one of the latest points. You can also select a restore point manually by specifying it in the list.

After selecting a point, click on the button Ready and Windows will be restored to the specified state. After the computer restarts, a message indicating the successful completion of this operation will appear.
How to delete restore points
If you do not use and do not plan to use recovery points, but find that protection is enabled for one of the disks, then in the disk protection settings you can delete the already created recovery points and then disable the protection.
Also, many optimization programs allow you to delete system restore points, and some of them clear them by default. Therefore, if you use some cleaners and clear everything that the utility offers by default, then most likely delete all restore points.
I have said it many times and will repeat it again: any program is just a tool and cannot be relied on unconditionally. That is why I do not recommend that novice users clean their computer using such utilities, since in inept hands these programs do more harm than good.
But in any case, it’s worth knowing that all “cleaners” can delete restore points. For example, the program copes with this perfectly - in the section Service subsection System Restore You can select and delete unnecessary restore points.

Recovering a deleted restore point
Enough frequently asked question- how to restore a restore point if it was deleted accidentally or mistakenly.
Unfortunately, NO way.
Once I was present while trying to restore erroneously deleted restore points. For this hard drive computer was connected to another computer, on which, using a recovery program deleted files the person tried to restore a deleted restore point. But this did not lead to anything, only a lot of time was wasted.
I see no point in such dubious transactions. If the restore point has already been deleted, then it is much easier and faster to reinstall Windows if problems arise. Well, it’s even better to have an image of the system with all the necessary programs. And I will talk about creating such images in the next post.
How to create a restore point in Windows 7.10 or 8 often arises after the bitter experience of data loss, but we will tell you how to make a restore point!
This happens automatically. Windows also does this when it detects major changes in its operation - for example, when you install updates for the OS, drivers or some other software.
These dots represent the saved state of all files and registry settings - with their help you can launch . If at some point you need to undo some changes, you can quickly return the OS to the time period when these changes had not yet been made.
System Restore uses Windows feature called "System Protection". This feature regularly creates and stores information about your computer's system files, registry settings, and previous versions of files. Reverting the OS to an earlier state affects system Windows files, installed programs, registry settings, changes to scripts, batch files and other types of executable files - but does not affect the user's personal files.
Creating a Wimdows System Restore Point
To create it manually, right-click on the "Computer" icon on your desktop, in context menu select “Properties”, and in the “System” window click on the “System Protection” link.

In the Properties window, click New. The “Protection” window will open.

Enter any title (name) and click on the “Create” button.

The process you start will take less than a minute.

When the process completes, you will see a message indicating that the process completed successfully.

Click Close. Now at any time you can return the computer to this or any other time point.
Restoring Windows to a previous state
If problems arise with the operation of your computer, you can return your PC to the “normal” period of its state, and this is done as follows. In the Properties window, click the "Restore" button.

Alternatively, you can open the recovery window using the Run dialog. Press Win + R on your keyboard, enter the command rstrui.exe and press Enter.

The "Recovery" window will open. Click Next.

Select the point to which you want to return your computer and select “Next”.

Now you need to click on the “Finish” button and then confirm the start of the process by clicking on the “Yes” button.

The process also includes restarting the computer. After rebooting, you will see a message confirming that your computer has been successfully restored.
More details in critical situations.
Have a great day!
First, let's figure out what a system restore point is and why it is needed.
System restore points are one way to undo recent changes to operating system settings. If something goes wrong with your computer’s settings after certain actions, a third-party user or your child messes with the computer’s settings, this function will help you.

Important! Please note that this is not another way backup, but only a function for some settings. It will not be possible to completely restore the operating system.
For different versions Windows OS absolutely exists different ways creating restore points, so below we will look at each in turn. We have specially selected the optimal way to find the necessary menu items without going into details and without wandering through unnecessary directories.
In this version of the OS, a system restore point is created through a special tool in the system properties, which is similar in its simplicity to the standard boot wizard.

Windows 7 provides especially many ways to find this menu through various directories, but here we will describe the simplest and most convenient for the average user.
The algorithm of actions is as follows:


Video - How to create a restore point on Windows 7
Windows 8
Create a restore point on this Windows versions very similar to the previous one, but there are some features that appeared only in this system.

Windows 10
For this Windows versions a simpler algorithm should be performed to get to the control window. This became possible thanks to a more convenient location of the search button in this version of the Microsoft operating system.
- In the search bar, which is located right on the toolbar, right next to the multifunctional “Start” button, enter the request “Create a restore point”, and click on the first option with the control panel icon, which will give a selection. Thus, we immediately find ourselves in the already familiar traditional “System Protection” menu.


- Select a point name that is convenient and understandable for you and click “Create”.

- We are waiting for the process of creating a restore point to complete.


So, now you can create on all modern versions of Windows.
Pleasant and convenient use!
Video - How to create a Windows 10 restore point
Restore points allow you to restore your operating system settings to their previous settings. file versions in case of software failure. IN this material we will talk about how to create a restore point in Windows 7 and how to then use this point to restore the system.
In order to create a restore point in Windows 7, you must first open the system properties window. This can be done in several ways. For example, if you have a “Computer” icon on your desktop, then you can simply right-click on it and select the “Properties” menu item.
You can also open System Properties through the Control Panel. To do this, go to “Start – Control Panel – System and Security – System”.

Well, or you can use the most in a simple way, namely press the key combination Windows + Pause/Break.

After you have opened the System Properties window, you need to go to the “System Protection” section. To do this, click on the appropriate link on the left side of the window.

As a result, a small window with system protection settings will appear in front of you. There will be a list of disks, next to which it will be indicated which disks have protection enabled and which do not. If protection is enabled for your system drive (usually drive C:), then you need to select it and click on the “Create” button

After this, you just need to enter a name for the recovery point to be created and click on the “Create” button again. After which the Windows 7 operating system will begin the process of creating a restore point.

If system disk protection is disabled, you must first enable it. To do this, select the disk and click on the “Configure” button.
After that, activate the “Restore system parameters and previous versions files" and indicate what percentage of the disk you want to allocate for creating Windows 7 restore points. After making these settings, close the window by clicking on the "Ok" button and you can start creating a restore point.

Please note that in the same window you can delete previously created restore points. There is a separate “Delete” button for this.

Restoring a Windows 7 system from a previously created point
In order to restore the Windows 7 system using a previously created restore point, you need to open the Control Panel and use the search to find the “Recovery” section.

In the “Recovery” section, click on the “Run System Restore” button.


If Windows 7 does not boot, then you can start recovery using installation disk. To do this, boot from the installation Windows disk 7, Select your language and go to System Restore.

After that, select the Windows 7 operating system and click on the “Next” button.


And follow the instructions that will appear on the screen.

This way, you can restore your Windows 7 system from a previously created restore point, even if Windows 7 refuses to start.
There are cases when, after installing some program or other actions: the Windows operating system does not work correctly; programs that worked do not work; Previously running games do not launch. In this case, a very wonderful function from Microsoft, Howsystem recovery (rollback to restore point). This function can also help us if your computer is infected with banner ransomware. In this article we will tell you: how this is done, what is needed for it to work.
1. If the system is operational.
On the desktop, right-click on the “computer” or “my computer” icon and select properties,

h Then on the right side select system protection.

Attention! Here we can see: is this component enabled and

how it is configured.

If next to the specified system drive there is no message included, we will not be able to restore the system, but we can enable this function by clicking on any disk and pressing the button configure, h then check the box next to restore system settings and previous versions of files, select a specific space with the slider that will be used for recovery files. The more space is allocated, the more restore points the system will create. So if your component is enabled, click the button recovery

E if you are satisfied recommended recovery(the computer state date corresponds to the time when everything worked for you), click further, if not, then you need a tab select another restore point and so on.

In this window you need to check the box show other restore points and select the most desired point. Selected click further.

Click ready and wait for the process to complete (If you have a laptop or netbook, make sure the battery is well charged; if the charge is low, connect to a power source)
2. If the system does not turn on or a “ransomware banner” appears when turned on
When loading the operating system, press the key F8, further

computer troubleshooting and Enter.

select the desired language


