How to reduce screen resolution in Windows 7. Changing screen resolution on Windows. Changing resolution with other programs
On Windows 7. Honestly, this is a very broad question that covers almost every element computer graphics. Here and computer games, and pictures with photographs, and displaying web pages, and system settings. In general, there are a lot of objects subject to scaling. And that is why we will discuss each moment with you separately.
Pictures
So, the first thing we can discuss with you regarding how to adjust the screen resolution on Windows 7 is changing the scale of the picture displayed on the monitor. Everything here is extremely clear and simple.
The first thing you need to do is open graphic file. Now just roll the mouse wheel. In the direction “towards you” - the scale will decrease, “from yourself” - it will increase. In this case, the resolution in the system settings will not change.
In addition, you can increase the size of the picture. To do this you will need to resort to some kind of help third party program. For example, " Picture Manager". Open the picture for her, select "edit" - "resize". Set the necessary numbers and save the changes. That's all the problems. However, changing the screen resolution applies to Windows 7 in a slightly different sense. And now we will look at what else can we talk about?

For games
For example, we can talk about displaying graphics in a game. After all, this is where many users wonder how to adjust the screen resolution on Windows 7, without affecting the system settings. It's very inconvenient. Especially when you have a lot of different shortcuts on your desktop.
Special people come to the rescue game settings. They allow you to figure out how to create your own screen resolution in Windows 7 and set it only for the period of playing a particular application. Launch the program and then select "options" or "settings" there. Next you will have to visit the graphics settings. There you will find the item we need. That's what it's called - screen resolution. Set the appropriate values in it, and then save all changes. That's it.
However, there is one more trick regarding games. He will help answer how to adjust the screen resolution on Windows 7, and one that is not in the toy’s settings. Run windowed mode, and then simply stretch our game “around the corners” of the window. When you achieve the desired result, simply go to game mode. Nothing difficult or special. But you can set the resolution that is convenient for you. But there are at least two more meanings that apply to the question: “How can I change the screen resolution in Windows 7?” And now we will get to know them.

Browser
Sometimes this question may sound from users. After all, they want to change the scale of display of pages on the Internet. Sometimes this is very useful. So let's try to figure out how this is done.
There are several options for the development of events. To begin with, you can try to open it, find the “scale” there, and then set the desired display numbers. They will be indicated as percentages. 100% is the norm, values lower - reduce the scale, and higher - increase. Save the changes - and all problems are solved.
You can also press Ctrl and then “+” or “-” located on the right numeric pad of the keyboard. This combination serves to enlarge the image and reduce it, respectively. In addition, you can cope with the question posed using the mouse. To do this, hold down Ctrl and then roll the mouse wheel. “Toward” - reduces the resolution, “toward” - increases. Nothing difficult, right? Only now we have reached the most important point for a computer. Namely, we’ll try to figure out how to adjust the screen resolution on Windows 7 relative to system settings.

For system
True, this question will not take up much of your time. After all, in operating system simplified to the maximum. If you suddenly need to change the screen resolution of your monitor, then just click on the free space on your desktop. Do this using the right button.
You will see a long list of functions performed. Find “screen resolution” in it and select this item. In the window that appears, you should find the parameter of the same name, and then simply move the slider up or down, depending on the desired result. Want to reduce the size of your icons? Then you will have to move the slider up. Increase? A downward movement will do. Save the changes, confirm them - and all problems are solved. Now you know how the scale changes on Windows 7 in every sense.
All sections of the site site
How to adjust laptop resolution
After installing drivers on a laptop or home computer It is advisable to check and adjust the screen resolution.
Basically, liquid crystal matrices are designed to work with one resolution - the one indicated in technical specifications laptop.
You can set higher or lower values, but the image quality will be many times worse than with the “passport” value.
In principle, setting monitor screen resolution on laptop- it's a matter of taste. But for taste and color... as you know, there are no comrades.
Although there are generally accepted and proven proportions that have been tested many times and satisfy many.
Change monitor screen resolution
To adjust the screen resolution, follow these steps:
1. Right-click anywhere on your laptop's desktop.
2. In the context menu that appears, select the Personalization command. The Change Picture and Sound on Your Computer window opens.
Settings appearance And sound effects
Choose one that is convenient for you font size, setting the switch to the desired position.
Selecting the size of text and image elements on the screen:

Click on the arrow next to Resolution to open this list, and by moving the slider, select the resolution that corresponds to the nameplate value of your laptop screen.

This is what it looks like Setting up a laptop monitor screen
- Selection of themes
5. Click the OK button. A request to save the settings will appear - click Yes.
All. The windows will close and screen resolution will change.
If you subsequently don’t like something or are not satisfied with the size, you can always change the monitor screen resolution again to another parameter.
Resolution is the number of pixels present on the screen. Pixels are tiny components attached to screens that can display multiple colors. Screens are made of millions of pixels that work in tandem to recreate any signal.
The screen resolution on your monitor will determine the size of text, images, and icons on the screen. Setting the correct screen resolution is important because high resolution screen size results in reduced graphics size, which can cause unnecessary eye strain. On the other hand, using a resolution that is too low results in sacrificing valuable screen real estate.
To calculate the number of pixels in a resolution, you need to multiply the width and height values (to get your calculators ready). For example, 4K has a width value of 3840 and a height value of 2160, 3840 * 2160 = 8,294,400 pixels.
Some people believe that big screen will always have a higher resolution, but this is not necessarily the case. A 42" TV and a 19" monitor can have the same number of pixels if the screen resolution is the same. This pixel density is instead measured as PPI or Pixels In Inch.
Pixels Per Inch is a very important factor to consider. Pixels have no set size, and thus the same number of pixels for any set resolution must be stretched by different sizes. A lower PPI is about stretching a small image onto a larger canvas. Higher PPIs usually result in a much sharper and clearer image.
![]()
Screen resolution settings in Control Panel
Changing the extension is quite simple; you can access the settings in two ways:
- from your computer desktop;
- through the screen section in the toolbar.
Step 1. Right-click on an empty area of your computer's desktop.
Step 2. Select Screen Resolution from the menu that appears.

Step 3. The Screen Resolution window appears. This setting is part of the Control Panel in Windows 7 and can also be accessed from the Control Panel.
Step 4. In the appropriate section, install the extension you need.

Note! If you are using more than one monitor, you will need to set the resolution and other settings for each monitor separately by clicking on the monitor you want to adjust.
Click the Resolution drop-down menu to select the screen resolution that best suits you from the list. Windows 7 will automatically determine the best resolution based on your monitor and provide a recommendation.
Advice! When choosing a display resolution, remember that the higher the resolution, the smaller the size of all elements displayed on the screen will be, and the opposite will happen with lower resolutions.

Who cares what Windows recommends? If you think a recommendation is not important, you can reconsider it. Some monitors, particularly LCDs, have native resolutions that look best on display. If you use a resolution other than the native resolution, images may appear blurry and text will not display correctly, so next time you buy a monitor, make sure you choose one with a native resolution that your eyes can handle.
Step 5. Save your screen resolution changes.

When you're done changing the screen resolution, click OK to save the changes. You may have to confirm the changes. If so, click Yes to continue.
Note! If you're not sure which resolution to choose, click Apply instead of OK to view your changes. You will have 15 seconds to save your changes before the screen resolution returns to its original state.
If you are not satisfied with the selected resolution, simply repeat the previous steps to set the desired resolution.
Read detailed instructions on changing the screen resolution in the new article -
Video - How to quickly adjust screen resolution
When conventional methods don't help
If this method does not work, update your monitor driver and graphics drivers. A buggy monitor driver can cause this kind of screen resolution issue. So make sure your drivers are up to date.
You can go to your PC manufacturer's website to check latest driver for monitor and video card. Before you begin, make sure you know the PC model and the specific operating system you are using (Windows 7 32-bit or Windows 7 64-bit).
If you are having trouble downloading drivers manually, you can use Driver Easy to automatic update drivers. This program will scan your computer and detect everything problematic drivers in 20 seconds and then provide you with a list of new drivers.

Driver Easy has both a free and professional version. Both versions can be used to automatically download drivers. But with the professional version, you can even update all drivers with just 1 click. More importantly, you will receive free guarantee technical support and money back. You can request additional help to resolve your screen resolution issue or request a full refund for any reason.
Note! If the problem still cannot be resolved, replace the old monitor cable with a new one.
The problem may arise if the old cable identifies the monitor as a generic one that does not support PnP. Changing the cable to one that correctly identifies it may solve the problem.
Modern systems, starting with Windows 7, can independently select the optimal value for the screen, so basically there is no need to worry about this. It turns out that there are people, most likely beginners, asking the question of how to change the screen resolution, no matter what operating system or computer. The instructions will be individual for everyone and, I hope, will help you.
There are a couple more points that I will touch on here. Let's say you have a monitor with a resolution of 1920 by 1080 or higher. It is known that setting the value 800×600 for it will not work. Why? This is because you will see screen distortion as the values do not match the physical values for the screen.
Let's start from the depths, namely seven. Using this particular operating system, you do not have to worry that the value will not be selected accurately. Although sometimes the value is set lower than necessary, so the knowledge that can be gleaned from this manual comes to the rescue.
The article touched on points on the topic, and the article itself is quite useful. If interested, you can read it.
For manual settings screen resolution, you need to right-click on an empty space on the desktop. A menu will appear where we select the option "Screen resolution".
One of the control panel subsections called “Display Settings” opens. Here we see three parameters:
- Screen;
- Permission;
- Orientation. (Read: )
Naturally, we are concerned about the second point. The first one is responsible for the choice additional monitor, and the last one is already clear. Open the options tab "Permission" and select the maximum. In my case - 1366 by 768. Most likely, opposite the maximum resolution there will be a corresponding word - Recommended.

Note: It is worth paying attention to the moment when you cannot change the screen value. The point is that you are mandatory must install drivers for the graphics adapter. As a result, you can change the screen value not only from the control panel, but also in the video card settings. Below I will explain how to use these settings. (Drivers are usually installed automatically).
How to change screen resolution in Windows 10
The specified operating system has the same parameters from the control panel, but it still needs to be found. We won't bother, but let's see how to do this from the options menu.
As in the first case, we right-click on the desktop and select the option "Display Options".

A window opens with the “System” subsection. There are many tabs there, but we are interested in “Screen”. On the right side of the window we see several parameters:
- Night light mode – best suited for reading in the dark;
- Scale and markup– what we need;
- Multiple displays – we can connect additional monitors.
Finding the parameter "Permission" and change to maximum value, it will be marked "Recommended".
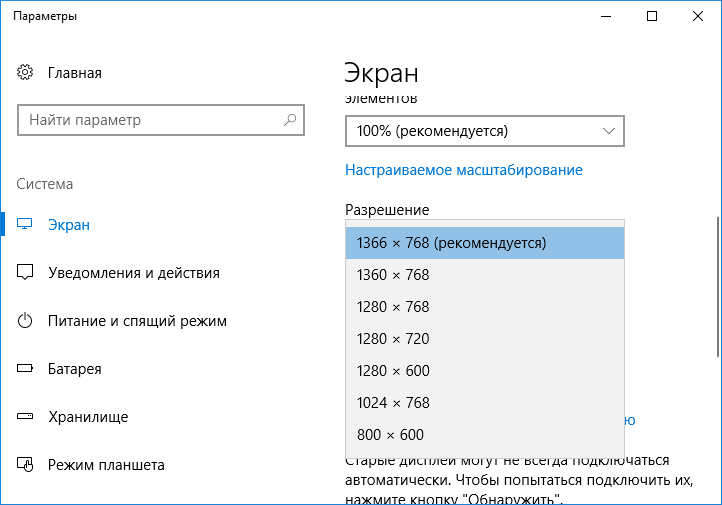
In addition, you can specify the text size in applications. The standard value is 100%, but the value can be changed to 125%.
Unfortunately, specified method the only one in the top ten. In the control panel, the “Screen” section was removed and changed required settings only possible through the Options menu. That's how bad they are, these Microsoft people.
Using the graphics adapter utility
I'll show you with an example NVIDIA video cards, since I don't have AMD.
When we click on the desktop with the mouse, to call context menu, we can see the following items:
- Graphic characteristics ( Intel Graphics HD);
- NVIDIA Control Panel.

Both of these sections have many settings, but only the first includes screen resolution settings. Let's look at the example of Intel HD. If you have this software, then launch it.
The HD graphics control panel opens. Go to the section "Display".

In the main settings of this miracle we see all the options that we need. Now you know how to change screen resolution using HD graphics.

Well, that's all, now you know everything. In the game, this procedure is done in the settings. But I won’t say anything about Windows 8, since the parameters are the same, why talk about the same thing a hundred times. I hope this little guide will help you.
Increasing screen resolution is not an easy procedure, which often forces the user to use outside help during its implementation. There are often situations when a laptop user accidentally changes the screen (matrix) resolution by pressing a combination of hot keys, or, for ease of use, selects the one that suits his needs.
Ways to increase matrix resolution on a laptop
Please note! Each specific model has its own “ceiling” highest resolution. It is determined by the maximum value that is supported by the laptop matrix. Attempts to increase the resolution to values not supported by the matrix can lead to its damage and further incorrect operation. By the way, replacing a laptop matrix is one of the most expensive PC repairs.
Changing the resolution using the system utility
Each operating system has a utility for setting screen resolution;
1. In order to use it, go to the Desktop, right-click on any free space.
You can also use the following alternative and no more complicated path: “Start/Control Panel/Display/Screen Resolution”. This path to the utility may vary slightly depending on the OS version used;
3. Select the most suitable resolution by moving the slider.
It is not always possible to achieve what you want using this method: in most cases, the user does not have the opportunity to choose maximum resolution because the system cannot recognize technical parameters established matrix.
Configuration via video card software
1. Before performing the described procedure using video card drivers, check that they are installed by opening the command prompt with the Win+R key combination and entering the devmgmt.msc command in it.
3. If the OS does not have the required software, you need to install the video card driver from the disk that came with the laptop, or from the official website of the video card manufacturer.
After installation, be sure to restart your PC.
4. After making sure that video drivers are available, go to the “Taskbar”, which is located in the lower right corner of the screen.
5. Find and open the video card software, then select the “Screen Personalization” section and start selecting the appropriate resolution.


