How to open a terminal in Ubuntu. How to open a terminal on a Mac (Mac OS) Ubuntu command line how to call
Terminal
Working with the command line is not as scary a task as you might think. To use the command line you do not need special knowledge, since it is the same program as all the others. Most tasks in Linux can be done from the command line. And while graphical utilities exist for most programs, sometimes they simply aren't enough. This is where it is used command line.
The terminal is often called the command line or shell. In ancient days, this is how users interacted with computers; and yet Linux users find that using the terminal can be faster graphic method. Now you will learn how to use the terminal.
The terminal was originally used as a file browser and it is indeed still used in this role. You can use the terminal as a file browser, access your files and undo the changes you have made.
Launching the Terminal
Application Console can be started by selecting K-menu->System->Console (Terminal Program) from the desktop menu.
Basic Commands
Browse directories and files: - ls
Team ls(LiSt) shows a list of files in different colors with full formatting text.
Creating directories - mkdir (directory name)Application mkdir(MaKeDIRectory) creates a directory.
Change directory: - cd (/address/directory)Application CD(Change Directory - change directory) changes your current directory to the one you specify.
Copying a file and/or directory: - cp (file or directory name) (to: directory or file name)Team cp(CoPy) copies any selected file. Team cp -r copies any selected directory with all contents.
Removing files and/or directories: - rm (file or directory name)Team rm(ReMove) removes any file you specify. Team rm -r deletes any directory you specify with all its contents.
Moving/Renaming Files/Directories: - mv (file or directory name)Team mv(MoVe) moves/renames any file or directory you specify
Finding files/directories: - locate (file or directory name)Team locate searches for files by name you specify. It uses the file index on your system to work quickly. To update this index, run the command sudo updatedb. This command runs automatically every day if you leave your computer on. It must be run with administrative privileges.
You can also use wildcards in file and directory names to specify more than one file, such as "*" (match all characters) or "?" (match one character).
Switching to console mode
To access the command line in Kubuntu, you usually launch a terminal (see "Running a Terminal" above), however, sometimes it is useful to switch to an actual console:
To switch to the first console use the key combination Ctrl -Alt -F1 .
To switch back to the desktop, use the keyboard shortcut Ctrl -Alt -F7 .
Comment
Six consoles are available. Each of them can be accessed using a key combination: from Ctrl -Alt -F1 to Ctrl -Alt -F6 .
Regardless of whether you are a beginner Linux user or you have been using Linux for a long time, you should use a terminal in your work. I want to help you start working with the terminal.
The Linux terminal is not something you should be afraid of.
The terminal is a powerful tool with enormous potential, which actually makes it easier and, if necessary, does all the routine work for you. Through the terminal you can very quickly:
- add new repositories (program storage)
- install programs
- run programs (to see possible errors)
- configure the distribution or individual programs via configuration files
- and much, much more
By reading this article you will not be able to learn all the wisdom that beginners need to know about the Linux terminal. You need experience working with the terminal.
Basic use of the Linux terminal
Launch the terminal from the desktop, applications menu and you will see the bash command shell running. There are other shells, but most Linux distributions use bash by default.

You can try to launch a program by entering its name in the command line. Through the terminal, you can run everything that runs on Linux: from graphical applications such as Firefox to console utilities. Unlike Windows, you don't have to enter the full path to the program to launch it. For example, let's say we want to open Firefox through a terminal. On Windows, you need to enter the full path to the Firefox exe file. On Linux, just type: firefox
Opening Firefox from the Linux terminal
Press Enter after entering the command and it will run. Note that you don't need to add an extension or anything like that to the end of the name, like in Windows .EXE, files in Linux don't have an extension.
Terminal commands can also accept arguments. The types of arguments you can use depend on the program. For example, Firefox accepts web addresses as arguments. To launch Firefox with open tab, you can run the following command:
Firefox website
Any other programs can be launched in the terminal, and they will work exactly the same as Firefox. There are programs that only know how to work in the terminal. They don't have graphic view, do not have a graphical interface in the form of an application window.
Installing Software via Linux Ubuntu Terminal
One of the most effective actions in the terminal is setting software. To install software, there are graphical managers, for example in Ubuntu “Application Center”. The Ubuntu Application Center is a graphical shell for the few terminal commands it uses in background. If you know what you need, then instead of clicking all these buttons and searching, you can easily install the program from the terminal with one command. You can even install multiple apps with one command.
I will use the example on Ubuntu / Linux Mint or other Ubuntu-like distributions (all other distributions have their own own systems package management). So here is the command to install a new software package:
Sudo apt-get install package_name
It may seem a little complicated, but it works, just like the aforementioned Firefox. The shorthand word sudo runs a program that asks for the root (administrator) password before running apt-get. The apt-get program in turn reads the install arguments of the package name and installs the package you requested.
An example for installing several packages at once through the terminal.
For example, to install the Chromium web browser and Pidgin instant messaging manager, run this command:
Sudo apt-get install chromium-browser pidgin

I use the above mentioned command after I install the “newly made” Ubuntu. I installed the new release of Ubuntu and added all my favorite programs with one command. You just have to know the package names of your favorite programs. As you can see, the names of the packages are quite easy to guess. You can also refine your guesses using tab, trick below.
I have dozens of programs I need in my working distribution, but I won’t enter the names of all the programs in the terminal on the new one. installed Linux. And so I use a more automated method. Which is that before installing a new Linux distribution, I'm on first old installation, using the terminal, I export the names of all installed packages to a text file.
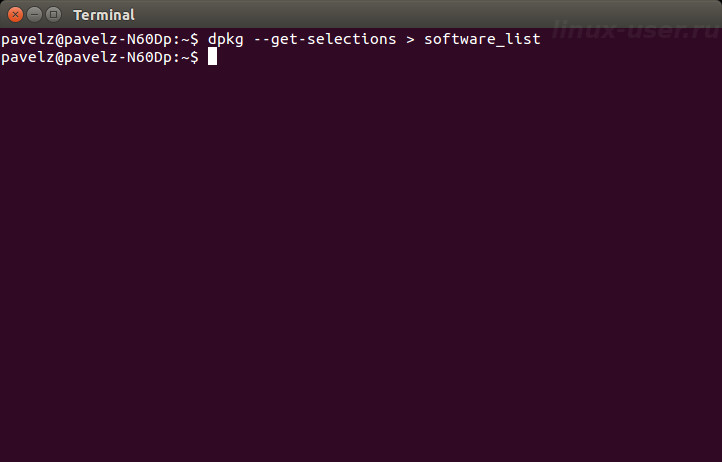
And then, after the reinstallation, in the new one, through the terminal, I import this test file, which informs the distribution about all the programs that need to be installed. This way, these commands are very small, unlike if I entered them manually, and a lot of time is saved. You will find this advice and other, more in-depth instructions in.
Working with Directories and Files in the Linux Terminal
The shell always operates in the current directory unless you specify a different directory. For example, NANO is an easy-to-use console text editor. Team:
Nano document1
will tell you that you need to launch the NANO text editor with open file under the name "document1" from the current directory. If you want to open a document that is located in another folder, you need to specify the full path to the file, for example:
Nano /home/pavel/Documents/document1
If you specify a path to a file that doesn't exist, nano (like many other programs) will create a new empty file in that location and open it.
To work with files and directories, you need to know several basic commands:
cd - command to change directory
~ (tilde) represents your home directory (/home/you), which is the default starting point in the terminal. To change to another directory, you must use the cd command.
For example:
you will be taken to the root directory
cd Downloads
move to the "Downloads" directory inside your user's current directory (the exact path, in my case, would be /home/pavel/Downloads), to move to your home directory /home/you/ from anywhere you need to command like this:
command to navigate up a hierarchical directory system.
ls - lists files in the current directory

mkdir - command to create a new directory
By command:
Mkdir newfolder
a new directory will be created in the current directory named newfolder, and:
Mkdir /home/pavel/Downloads/test
will create a new directory called test in my home "Downloads" directory (pavel needs to be changed to your username).
rm - command deletes a file
For example:
Rm testfile
deletes a file named test in the current directory, and:
Rm /home/pavel/Downloads/testfile
deletes a file named testfile in the /home/pavel/Downloads directory.
cp - the command copies a file from one location to another
For example:
Cp testfile /home/pavel/Downloads
copies a file named testfile from the current directory to /home/pavel/Downloads.
mv - the command moves a file from one folder to another
mv works exactly like the cp command above, but it moves the file rather than creating a copy. mv can also be used to rename files. For example:
Mv /home/pavelz/Downloads/testfile /home/pavelz/Documents/testfile1
moves a file named testfile from /home/pavel/Downloads to the /home/pavel/Documents directory under the name testfile1.
This may seem a little scary at first, but there is nothing complicated here. These are the basic commands that you need to master to effectively work with files in the terminal. Navigate file system with cd, view files in the current directory with ls, create directories with mkdir, and manage files with rm, cp, mv commands.
Secrets to speed up work in the Linux terminal
Auto completion on Tab key
Tab is a very useful trick. When you enter a command, a file name, or some other type of argument, you can auto-fill the command using tab. The terminal will simply finish printing for you.
For example, if you type fir in the terminal and press tab, firefox appears automatically. This will save you from having to type completely. You can press Tab and the shell will be ready to complete the command for you. This also works for folders, file names, and package names.
In any case, when I don't know what a command looks like in its entirety, I press the Tab key and see the command or a list of possible matches. If you go ahead and enter a few more letters, you will be able to narrow down the matches when you press the Tab key.
You will find more tricks in this book.
So: download, share any articles from this site and send me an e-mail: a letter containing the address, the web page where you placed the links, preferably several links to different pages of this site. This way, I can find that page of yours and respond to you with an email with the archive password.
This kind of payment for a book will help develop this site.
Conclusion:
I hope that after reading and putting this article into practice, you will feel a little more comfortable using the terminal. To learn more about the terminal—and ultimately master it—continue your journey with this book.
Currently users Ubuntu systems on home computer may not resort to working in the terminal at all and perform all usual tasks, such as: surfing websites, watching movies, working in the office and with by email as well as other typical tasks in a graphical environment.
But users whose level of computer work can be assessed as advanced still need to use the terminal from time to time to solve various problems, because there are a huge number of programs and utilities without a graphical interface in the Linux environment and they are often more functional and intuitive to use than software that has a GUI (graphical interface). And some don’t even have adequate analogues with an interface.
Also, advanced users cannot do without a terminal to completely customize their system using editing various text configuration files and writing bash scripts.
But beginners also need to be able to open a terminal to work, because most instructions on the Internet offer solutions to various tasks from installing programs to configuring the system in the form of commands for the terminal. Indeed, it’s much simpler, because you can write a program installation command, and a user who is not yet very well versed in the system can simply copy it and execute it on his computer. With this approach, the author of the manual will be confident that the reader will do everything correctly, because most commands will be interpreted the same in the system of the author of the manual and the one who will use it. In this blog I myself constantly refer the reader to some actions in the terminal, but I still haven’t given a detailed answer on how to open it, and this is the basics.
Text console
I'll start, perhaps, with the holy of holies - the text console. This is the interface for communication between the system and the user by receiving information from the user via keyboard input and displaying the response on the monitor in text form. To work with it, you do not need a graphics subsystem with a graphical environment, and you can continue to work in it even if you remove the X graphics server or an environment such as GNOME or KDE from your computer.
To access text terminals in Ubuntu you need to use keyboard shortcuts CTRL+ALT+F1- CTRL+ALT+F6. The first console is F1, then F2 and so on until F6. It turns out that you can simultaneously use up to six work environments with six users authorized in them. On the seventh console - CTRL+ALT+F7 Usually there is a graphical terminal - a familiar system with windows and a mouse. And it is CTRL+ALT+F7 that you need to press to return to your usual environment after working with the console.
But usually we don’t get to the text console often, but only when some kind of malfunction occurs with the graphics, for example, when the drivers for the video card fail. For normal setting system and program installations, you should use a terminal emulator in graphical mode.
Terminal emulator
Hotkeys
Ubuntu uses a default hotkey combination to open the terminal CTRL+ALT+T.

After pressing the combination, a window will open with a terminal invitation on behalf of the current user - this means that commands in this terminal will be executed on behalf of the one who is currently authorized in the system.
To execute commands as a superuser, you must prefix the command with sudo. This special program, which allows you to replace the user to execute the following command. By default in Ubuntu, it replaces the user with the superuser (root) so that you can work in the terminal with its privileges. This is necessary, for example, to install programs via apt.
When using sudo, you will need to enter the system administrator password that was specified during installation (in most cases, the password of the only user of the system).
Using the Run command
The system also has a special dialog that opens by pressing a key combination ALT+F2 and allows you to launch an arbitrary program by entering its name.

For different graphical environments, the name of the standard terminal emulator will be different; here are the most common ones:
- Gnome - gnome-terminal
- Xfce - xfce4-terminal
- Kde - console
- Unity - gnome-terminal
- The terminal emulator installed in all versions of *buntu by default is xterm
Application menu
On any system, the terminal emulator can also be found using the application menu. This is the menu from which the user launches his programs, such as a browser or text editor. In the menu, the terminal will be called “Terminal Emulator” or “Terminal” or “Terminal emulator” - in English.
I'm using the XFCE desktop environment and will provide an example in its applications menu.
Mac OS is a Unix system and, being a full member of the Unix family, it has a command line (I think this will surprise non-experienced Mac users). Yes, in Mac OS, as well as in Linux and Windows, there is a command line through which you can execute absolutely all commands. Initially, work in Unix, Linux, and Windows worked like this: the user entered a command and after a while received the result. Then a graphical interface appeared, with which you could perform the same operations only much easier. Today, almost all operations in Mac OS can be performed in a graphical interface, but there is still an administration area in which you cannot do without the command line (in Mac OS it is called Terminal), especially when restoring work operating system. But since crashes in Mac OS are extremely rare, many users do not even realize that they have a Terminal.
To start getting acquainted with the Terminal or simply execute some commands, you need to launch it. Launch Terminal on Mac possible in several ways.
Open Terminal using Spotlight search.
Launch Spotlight by clicking on the magnifying glass icon in the menulet area or using the keyboard shortcut
In the Spotlight search bar, enter the word Terminal and press "Enter"

As a result, you will see a Terminal window.

Launch Terminal in Finder.
If for some reason you are not satisfied with the first method of launching the Terminal, in my opinion it is the most convenient, there is another way. Open "Finder" select "Programs" - "Utilities".

Among the utilities, find “Terminal” and run it.
Sooner or later you are faced with the need to launch the terminal. And even though system developers are doing more and more to prevent this from happening, creating graphical shells for all programs, it is still necessary to use command input and, most importantly, convenient. However, not everyone even knows such things as opening a terminal (command line) in Ubuntu. If you are one of these people, this should be fixed soon.
The command line in Ubuntu is a fairly easy-to-use program.
Main
Let's start with how to run the program responsible for entering commands. By the way, you should understand that the terminal and the console are different things; terminal is an application that acts as a console, which is equipped with a graphical shell and various amenities. So, we can open the terminal through the main menu or by pressing ctrl + alt + T.
Let's look at some of the features and specific features that Bash gives us. Bash is the default command shell. In fact, there are more convenient ones. But first, let's deal with this one.

Another shell
You can use more than just the standard Bash shell. It was developed for UNIX systems back in 1989. It copes with all the tasks assigned to it perfectly, but all this can be done more efficiently if you install newer similar software.
One alternative is Friendly interactive Shell, or simply fish. She is much younger than her predecessor - the first issue was in 2005. Accordingly, she has more opportunities.
- Syntax highlighting. Correctly entered commands and those about which fish knows nothing will be highlighted in different colors.
- Convenient search for previously entered commands. We enter the first few characters, and use the up arrow on the keyboard to look for suitable options to continue.
- Autocompletion works not only with commands and addresses, but also with command options.
- All control structures can be easily completed with the entered word end.
- In general, fish is more accessible to understand, especially for beginners. A experienced users will find additional features, which do not exist in Bash.

Installing fish is quite easy.
- Enter the command:
sudo apt install fish - Open Profile Settings: right-click on the terminal in the drop-down menu and select “Profiles”.
- Find the “Team” tab.
- Check the “Run another command instead of my shell” checkbox.
- Enter in the line:
fish: /usr/bin/fish:

From now on, this shell will be the default in the terminal. If you just want to try fish, you can type the following into the console:
The shell will be disabled after the terminal is rebooted. Another convenience is setting up fish via the web interface. To do this you need to enter:
Visualization
Through Profile Options you can change not only the command shell. Not everyone may like the standard one appearance terminal. In the same profile settings, you can select settings such as:
- font and its size;
- cursor shape;
- original size;
- text and background colors.
The Ubuntu Command Prompt is not a dying, complex or useless tool. It's convenient and simple program, which perfectly complements the graphical interface. Now you have learned how to launch it and use the capabilities provided by the shell. All that remains is to remember a dozen other basic commands, and managing the system will become much easier, and even more interesting for beginners.


