How to set up Touch ID and view purchase history on MacBook Pro. What Touch ID can do in the new MacBook Pro Sometimes Touch ID is still better to turn off
We take a closer look at the main innovation of the MacBook Pro 2016
In the article about MacBook Pro In 2016, when describing the design, we paid a lot of attention to the main innovation of the model: the Touch Bar touch panel above the keyboard. But it is important that this is not only a hardware, but also a software solution. Moreover, the effectiveness of its use directly depends on the software and settings. In this article, we decided to look at the Touch Bar in all aspects and talk about the panel from the point of view of its application in various use scenarios.
First, some general information. So, Touch Bar is an OLED touch panel found in the 13-inch and 15-inch 2016 MacBook Pro models. Touch Bar resolution is 2170x60. The panel replaces the top row of keys and can display various information - depending on running application, user settings and actions.
Needless to say, the panel can only fully function in an environment macOS Sierra and only if the specific application is optimized for use with the Touch Bar. Of course, everything is preinstalled macOS apps have such optimization, but third-party developers can also use its functionality. In particular, we will look at how this is implemented in Microsoft Office.
In order to take screenshots with the Touch Bar, you need to install the latest version. macOS beta Sierra. Any user can do this by registering for Apple's beta testing program, but you must be prepared for the fact that the MacBook Pro will quickly discharge.
To the right of the Touch Bar is the Touch ID fingerprint scanner. It is physically separate from the Touch Bar and is not part of it, but when we open the lid of the laptop, the Touch Bar displays the words “Unlock with Touch ID” and an arrow pointing to Touch ID.

As we noted in the first article, the MacBook Pro 2016 is the first Apple laptop with a fingerprint scanner. And its support first appeared in macOS Sierra. Below we will tell you how to use this feature on your MacBook.
Touch ID
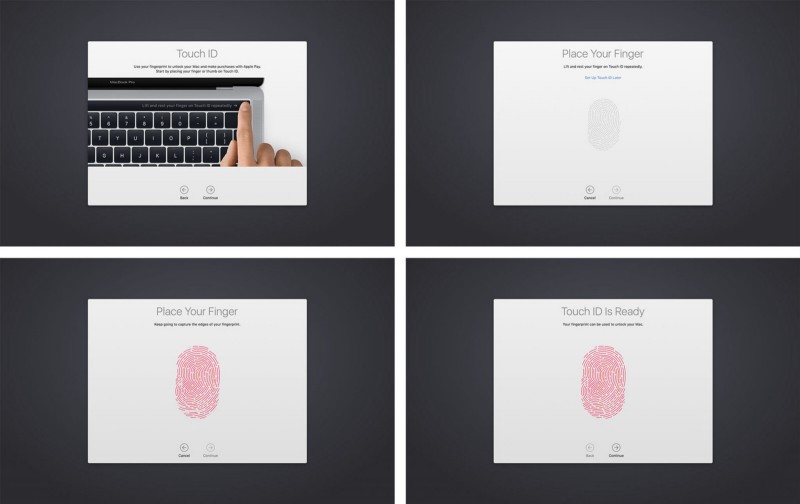
So, when we first turn on and initially set up the MacBook, we are prompted to add a fingerprint.

The procedure is the same as for iPhone/iPad. We put our finger on the scanner several times, and the screen shows how the gray grooves are filled with red.

Once a fingerprint is added, you can add another finger and also specify what types of operations Touch ID can be used for. Besides unlocking the Mac it can be used with Apple Pay and confirmation of purchases in the iTunes Store and Mac App Store.
Touch Bar: Standard Options
Now let's get back to the Touch Bar itself. We have already seen what the panel shows before unlocking the computer. And this is what we see by default after unlocking. The screenshot shows the right side. On the left there is only the Esc button, between it and the one shown in the screenshot there is black space. The original screenshot is available by clicking.
So, on the right is the Siri call button. Starting with Sierra, macOS supports Siri, and Apple immediately decided to make its launch as clear as possible. Moreover, during operation you often press this button by accident, because previously the volume up button was located in this place. And it turns out that we are being deliberately pushed to use Siri, willy-nilly.
The remaining icons do not need comments. Except for the arrow. If you touch it, a row will open touch buttons, identical to what we see on the top row of a traditional MacBook keyboard. Here is a screenshot divided into two halves: at the top is the left part, below is the right.
The decision seems quite controversial, firstly, to make this view not the main one, but accessible only after touching the small arrow (hit it again!), and secondly, to leave the Siri call icon in this row. However, if desired, all this can be configured. We will tell you how exactly further.
Touch Bar in apps
Now let's see how the Touch Bar works in applications. Once again, if the application is not optimized for the Touch Bar, the bar will always display what is shown above. However, with its pre-installed apps, Apple has naturally made sure that each one actually takes advantage of the Touch Bar's capabilities. For example, Safari. The screenshots below show fragments of Touch Bar screenshots, but the original screenshot is available by clicking.
As we can see, thumbnails are displayed here open tabs. You can move between them simply by swiping your finger. Comfortable? Perhaps. On the other hand, I can’t say that it’s very clear - the thumbnails are too tiny, and they don’t always allow you to understand which site is which. And switching between tabs in the usual ways is no more difficult. But it's certainly a spectacular opportunity.
Another useful thing on this panel in Safari is “search” and “open new tab”.
The panel may also change depending on what is open in the browser. For example, if a video is playing there, the video navigation panel appears.
And here we come to understand the main quality of the Touch Bar: it is complete variability, that is, in one application there can be an infinite number of Touch Bar options. Everything depends solely on the imagination of the developers. The main question The point is that the functionality of the panel complements, and does not duplicate, the already easily accessible application options.
A good option is in the “Calendar”. There, you can easily switch between different weeks using the Touch Bar.
Less successfully done in text editors Pages and Word. The problem is that, for example, marking a piece of text in italics is much more convenient simply with the mouse, because we select this piece with the mouse. It turns out that in order to use the Touch Bar, we first need to make some kind of gesture with the mouse, then drop it, press the button on the Touch Bar, then grab the mouse again.
In general, despite the fact that the capabilities of the Touch Bar in text editors are very wide, in fact it turns out that you either need to relearn and get used to completely new movements while working, or simply perceive the Touch Bar as some kind of optional addition that we, maybe , someday we’ll use it purely for fun, but for now we’ll do it the old fashioned way - with a mouse and keyboard.
This applies not only text editors, but also most other applications. For example, QuickTime Player.
Yes, we see a pause button, but in order to pause the video, just press the space bar on your keyboard.
And this is the main problem of the Touch Bar concept and the main challenge for developers: how to make using the Touch Bar intuitive and simpler than the usual keyboard shortcuts and mouse commands? It is clear that a lot here depends on Apple itself, because it is necessary to set an example for third-party developers to show that the Touch Bar can really be used intelligently. And there are such examples. We have already given several examples and we can give more.
Let's say Pages has word suggestions that pop up. This is exactly the option that is impossible, or at least impractical, without touch screen, and the Touch Bar is just right for its implementation.
Setting up the Touch Bar
The Touch Bar can be customized, not only in general, but also for each application individually. Access to general settings can be accessed through Settings/Keyboard.

You may notice that the “Configure Control Strip” button has appeared there. This is exactly what you need for Touch settings Bar. At the top you can also specify what should be displayed by default on the panel.

Control Strip is standard icons on the right side of the Touch Bar. An extended version of the Control Strip opens if you click on the arrow. But if you don't want to do this regularly, you can set the extended Control Strip to show immediately.

So, click “Customize Control Strip” and we see a window with icons, and above them there is the inscription: “Drag frequently used items to the Touch Bar at the bottom of the screen.” Actually, from this it is already clear how exactly we can replace any icon on the Touch Bar with another. Just take the mouse you need and drag it down to the edge of the screen, after which it “jumps” to the Touch Bar and shakes there, like on iOS after a long press.

There is quite a large selection here. There are also useful things. For example, “Screenshot”, “Sleep”, Launchpad, “Show desktop”, “Do not disturb”... So don’t miss the opportunity to create the optimal set.

Thus, outside of applications, we have two levels of Touch Bar customization: the first level - what is displayed by default, the second level - what is the composition of the Control Strip (regular and extended options). But in addition to this, you can also customize the composition of the Touch Bar icons in individual applications. For example, below is how this is done in Safari. In the “View” menu we see the line: “Customize the Touch Bar.”

Click on it - and we see a window similar to the Control Strip settings window, but with a set of icons directly for the browser. Well, then we proceed according to the familiar scheme: drag the necessary icons with the mouse and pin them to the desired place in the Touch Bar.

Therefore, software developers must take care not only about the fact of using the Touch Bar, but also about the options for customizing the panel within their application and choosing additional icons. That is, on the one hand, there must be a clear relationship between user actions and the icons that appear on the Touch Bar, and on the other hand, the initial set can be adjusted by the user.
Conclusions
Touch Bar is one of the main innovations for recent years. This is a very interesting and promising solution that can significantly expand the user’s interaction with a laptop and make it easier to perform a number of tasks. Hypothetically. In practice, a lot depends on how the Touch Bar functionality is implemented in a particular application and how easy or difficult it is for the user to customize it and start using it in real life.
We can't say that the Touch Bar is really useful yet. And expecting your productivity to increase if you upgrade from a previous generation MacBook Pro to a MacBook Pro with Touch Bar would be reckless. And considering that most third-party software manufacturers have not yet managed to optimize their applications for the Touch Bar, there is no need to be under any illusions. But, at the same time, the idea itself seems very promising, its implementation is as competent as it can be in real conditions, and the prospects are impressive, given that Apple has already demonstrated more than once how it can convince the entire industry of the need to implement those or other innovations. Will it work this time?
The Apple MacBook Pro (Late 2016) deserves our Original Design Award for its innovative Touch Bar and the deep integration of this hardware element into the laptop's software.

The new MacBook Pro, as we know, has finally received, approximately the same as the iPhone and iPad. The reader is built directly into the laptop power on/off button, which in turn is located next to touch panel, right above physical button Delete keyboard.
As the developer himself noted during the ceremonial presentation, using Touch ID the user will be able not only to turn on the laptop itself, but also to log in to Apple Pay, the App Store, as well as in a variety of specific applications like 1Password etc.
However, here we can clarify a little. As of now, Touch ID is supported mainly only by branded Apple apps. Moreover, 1Password is virtually the only computer application from a third-party developer that supports Touch ID. As for Apple programs, the fingerprint scanner in the MacBook Pro can be used, for example, to open protected entries in the Notes application, view the Link iCloud keys» in , pay for something in Apple Pay, etc.
Enable scanner fingerprint Touch ID in the 2016 MacBook Pro is possible in at least two ways.
Namely:
- when first turned on
And also, when registering each new account, the system will automatically prompt you to set up Touch ID. The procedure is simple: just like, you need to place your finger on the surface of the scanner several times, slightly changing its position with each touch. After a couple of seconds, the laptop will remember the fingerprint. Actually, nothing more is needed. The only caveat : When you turn it on for the first time, you can only add one finger to the memory.
- through System Settings
When you need to add additional “fingers” or set up Touch ID on your MacBook Pro without having to register a new account, you can always do this in the Touch ID section of the MacBook Pro system settings. Open it and then simply follow the instructions. To add a new fingerprint, click “+”. Along the way, you can also configure the functionality of Touch ID, that is, indicate where it will be used: for logging in, for authorization in Apple Pay and/or.
New MacBook Pro models feature a dedicated Touch Bar that offers support for Touch ID, a fingerprint-based authentication system.
If you have one of latest iPhone, you've probably already used Touch ID: This is Apple's built-in privacy system for unlocking your device and logging into Apple Pay. Here's how to set it up and use it on your Mac.
How does Touch ID work?
Touch ID is the name of Apple's fingerprint identification sensor. This is a form of biometric security that should be more convenient than entering a password, especially on iPhones and iPads, which we use hundreds of times a day. You can register up to five fingerprints on MacBook Pro, up to a maximum of three fingerprints per user account.
After you add a fingerprint to your MacBook Pro, you can do the following:
- waking up and logging into a user account from sleep mode (on first boot you will need to log in with a password);
- switching between users if each of them has separate fingerprints saved;
- using Apple Pay;
- authorization of purchases in iTunes, iOS App Store or Mac App Store.
.jpeg)
Set up and manage Touch ID on your Mac
You'll first be asked to register your fingerprint for Touch ID as part of the 2016 MacBook Pro setup process. You can also register additional fingerprints at any time. It's worth clarifying that you can have up to three fingerprints per user account and five in total for all users. All fingerprints are encrypted and stored offline in the Secure Enclave system.
How to add a fingerprint
1. .
2. Select settings panel "Touch ID".
3. Click “Add a fingerprint”.
4. Enter your user password and follow the instructions to create a fingerprint.

How to enter a name for a fingerprint
1. Open the Apple menu and select System Preferences.
2. Select settings panel "Touch ID".
3. Press the Tab key to move through already created fingerprints or click the mouse directly on the name of the fingerprint.
4. Rename your fingerprint.
5. Press the key Enter.

How to remove a fingerprint
1. Open the Apple menu and select System Preferences.
2. Select settings panel "Touch ID".
3. Hover over the fingerprint icon you want to remove until you see the icon "X" in the left top corner, then click on it.
4. Enter your password.
5. Press the key Delete for confirmation.

How to change Touch ID settings
Once you have set up your fingerprints, you can select that you would like to use those fingerprints for authorization. By default, all three options are enabled, but you can change them manually by unchecking the box next to each option.
1. Open the Apple menu and select System Preferences.
2. Select settings panel "Touch ID".
3. Select or clear your preferred options.

Options "Use Touch ID for" include:
- Unlocking your Mac;
- Apple Pay;
- iTunes and App Store.
How to Use Touch ID on MacBook Pro

As with Touch ID on iPhone and iPad, the first time you boot up your Mac, you'll need to use a password to sign in. Only after you sign in for the first time will you be able to use Touch ID whenever your MacBook Pro wakes from sleep, switching users, authorizing in-store purchases, or for Apple Pay.
How to sign in with Touch ID
1.
2. Place your finger on the Touch ID sensor.
How to switch between users with Touch ID
If you have multiple user accounts on your MacBook Pro, you can register a different fingerprint for each one. Once each account has been signed up once after the initial boot, you can switch to it using Touch ID.
1. Open your closed MacBook Pro.
2. Place your desired finger on the Touch ID sensor.
Although MacBook Pro with TouchBar supports Touch ID authentication in both the App Store and iTunes, setting it up can be a challenge.
1. Visit iTunes or Mac App Store and navigate to the item you want to download.
2. Click the button "Buy" next to the app or song you want to download.
3. Enter your password Apple ID.
4. Click Yes when prompted to use Touch ID for future purchases.

The application you selected will begin to download. You will then be able to use Touch ID for all future purchases in this app.

How to use Touch ID with Apple Pay
Apple allows you to make purchases in certain stores and authorize payments using a touch sensor Touch ID on your MacBook Pro or iPhone, so you don't have to enter your credit card information on every site that requires it.

1. Open Safari on MacBook Pro.
2. Go to a website where you want to buy something that accepts Apple Pay.
3. Proceed to the checkout process.
4. Click “Checkout with Apple Pay”.
5. Click Pay with Apple Pay.
6. Double check yours contact information to make sure everything is entered correctly.
7. Place your finger on the Touch ID sensor to pay with using Apple Pay.

How to Restart MacBook Pr o
Touch ID replaces the old power button on the MacBook Pro, but it can perform the same functions. For example, to turn on your MacBook Pro, you press the Touch ID button. Do the same when you want to reset your MacBook Pro. This can be useful when the laptop freezes and does not respond to any actions.
1. Press and hold the Touch ID button.
2. Hold it until you see the loading screen.
How to reset Touch ID data
If for any reason Touch ID stops working and you are prompted to use it even after deleting your fingerprint, you may need to reset it to remove all current Touch ID registrations at the root level. Here's how to do it.
1. Reboot Mac computer and hold Command+R during reboot to enter recovery mode.
2. Run the program "Terminal"
3. Enter the following command in it:
xartutil --erase-all
4. Click Enter.
5. When prompted for confirmation, select "Yes".
6. Click Enter.
7. Close "Terminal".
8. Restart your computer normally.
Allowing you to unlock the laptop using your fingerprint, use and log in to third-party applications. You can use Apple Pay on other Macs, but you need an iPhone or Apple Watch.
During initial setup, the MacBook Pro requires you to select a fingerprint, which will then be used to unlock it. Please note that only one fingerprint is allowed. Once setup is complete, you can add additional (up to three) prints using System Preferences. During the initial setup process, you can also set up Apple Pay by scanning credit card or by entering secret code, if the card was already found in the file.

How to Set Up Touch ID and Advanced Fingerprints on MacBook Pro
1. To get started, open System Preferences from the Apple menu and select Touch ID.

2 . Click on “+ Add typos.” To remove a fingerprint, click on the cross (“x”) next to it and enter your Mac password.

4. You can also separately activate or deactivate a number of Touch ID features, such as unlocking your MacBook Pro, Apple Pay, and iTunes.

How to Add Apple Pay Cards and Wallet to MacBook Pro
1. Open from the Apple menu " System Settings» and select Wallet & Apple Pay.

2. Select " Add a map" to scan the card.

3 . Bring your payment card to the camera so that the device can automatically determine its number, or click on the " Enter card details manually».

4. Once the cards are added, you will be able to manage them, view transaction history, edit information about contacts and purchases. To add or remove a card, click on the “+” or “–” icon, respectively.

Even if you've set up Touch ID and Apple Pay on your MacBook Pro, you can still use your iPhone or Apple Watch for authentication as an alternative.
Apple's fingerprint scanning technology, Touch ID, is no longer limited to iOS devices. The new MacBook Pro with Touch Bar has a Touch ID reader built into the power button, directly above the key Delete.
Using Touch ID, you can do things like approve Apple purchases Pay, unlock your laptop, or unlock important apps like 1Password.
Apps that support Touch ID.
At the moment, the list of applications outside the Apple ecosystem is quite short. Short enough that 1Password seems to be the only third party application of those that support Touch ID. As for Apple apps, you can use Touch ID to view iCloud Keychain in Safari or unlock secure notes in the Notes app, in addition to unlocking your MacBook Pro and using Apple Pay.There are two ways to set up Touch ID on the new MacBook Pro; let's take a look at both.
Initial setup.
During initial setup laptop or adding a new one account user, a prompt will be displayed asking you to set up Touch ID.The process is very simple. Place your finger on the reader several times, just as it does on iOS device, change the position of your finger slightly between touches.
In a few seconds everything will be ready. You will not be given the option to add more than one finger during initial setup.
System settings.
If you want to add another finger or you missed initial setup you can always open System Settings and click on Touch ID.Follow the instructions to add your first fingerprint, or click on the "+" sign to add another.

You can then customize how you want to use Touch ID on your MacBook Pro by checking (or unchecking) the three options listed: Mac Unlock, Apple Pay, and iTunes and App Store.


