EaseUS Partition Master Home Edition is a free program for changing hard drive partitions. EaseUS Partition Master Free: an effective tool for managing hard drive partitions How to use easeus partition master 10.1
To effectively use the drive on your computer, you need to partition it. This will separate system data and user files. This makes it easier to organize backup and secure storage of important documents.
Why do you need the EaseUS Partition Master Free utility?
The EaseUS Partition Master Free program will allow you to perform the following operations with drives on a computer running Windows:
- Create, delete, rename or restore partitions on your hard drive.
- Merge partitions without losing data on both parts of the disk.
- Resize existing logical drives, also without losing data or using intermediate drives.
- Completely clear the hard drive of data before disposing of it.
- Transfer the system and data from one drive to another. This function is useful when moving from a slow HDD to a new one fast SSD. The feature is implemented in the paid version of the utility.
It is important that the program is free for personal use with certain restrictions: the size of the hard drive must be no more than 8 TB.
Attention! When installing the utility, there is no Russian language. At the end of the procedure, the installer offers installation additional software, the usefulness of which is questionable. In these windows, click Decline and stop installing unnecessary browsers and antiviruses.
How to work with EaseUS Partition Master Free
Getting started
If several users work on the computer, we recommend setting a password for its use when you first launch the utility. This will eliminate the possibility of accidentally making changes to the existing partition system and damaging system data.
Setting a password is done through the menu item General – Set password.
The operating screen displays the existing disk partition. In our laptop, the EaseUS Partition Master Free utility detected two drives: HDD for user data and SDD for the system.
Resizing partitions on a drive
The advantage of the program is the convenient organization of the user interface. All basic operations are performed clearly, in two mouse clicks.
Changing the size of the area on the disk is done in the interactive panel at the bottom of the working screen. To split D: into two logical drives, you need to hover the cursor and press the right mouse button.
Select Resize/Move partition and specify the new partition in percentage or megabytes. The operation can be made more clear. Hover your mouse over the border between sections, press the left key and move the slider left/right to increase/decrease the size of the areas.
The Undo button will cancel the changes and return everything to the starting point.
Consolidating logical drives
This operation is called Merge partition. The program will ask you to indicate with which area of the disk you intend to merge the partition selected by the mouse.
Changing the drive letter
The Change label operation changes the name of an area on the drive. Change drive letter logical drive. The selection is made from a list of available values.
Fixing and checking the drive
Testing is one of the functions of EaseUS Partition Master Free. Select the Check partition operation. By default, the properties of the disk are checked, searching for errors and bad blocks on it. Unnecessary functions are disabled with checkmarks.
Removing and cleaning a logical drive
The following options are available:
- Hide partition - hide the partition. The hidden drive will not be shown to users.
- Delete - delete an area.
- Format - Removes the formatting markup and runs it again.
- Wipe - clears data. It is recommended to use it when transferring the drive for recycling or to another user.
Moving from HDD to SDD (paid version only)
An operation for which a huge number of users who want to increase the performance of their computer or laptop will want to download the utility.
The script is simple:
- We connect the SSD as a second drive to the computer.
- In EaseUS Partition Master Free, click the Migrate OS to SSD/HDD button.
- In the next window, select a paid plan for more features.
This mode is available only in the paid version of the program.
Optimizing the drive and cleaning up garbage on it
The EaseUS Partition Master Free program is capable of cleaning the disk from debris in the form of temporary files. The function is launched by buttonCleanup and Optimizationmain menu. The modes are equipped with large, clear pictograms. In particular, garbage collection is displayed as a trash bin.
On our laptop, EaseUS Partition Master Free found more than 600 MB of unnecessary data.
Large File Cleanupfinds huge files. Usually these are watched movies, videos and other unnecessary data that takes up a lot of space. Note that scanning is fast and effectively finds garbage.
Disk Optimizationanalyzes the state of the disk and, if necessary, defragments it. The function will be useful for old Windows versions. The new 8s and 10s independently perform the operation as part of servicing the drives.
Conclusion
EaseUS Partition Master Free is a convenient utility, the main advantages of which are its wide capabilities and simplicity user interface. All operations are equipped with intuitive icons and tips from the developers. The program will cope with all the tasks that arise when installing new drives and when moving to new disk transfer (including changing HDD/SDD type) without hassle and data loss.
You can download EaseUS Partition Master Free using the following link . You can try out the capabilities of the paid PRO utility using the free trial version.
For readers of our site, purchasing EaseUS Partition Master Free is possible at a discount, which can be obtained using the following promotional code.
For normal installation and Windows operation 7/8.1/10 20-25 GB of hard disk space is enough, but in practice you have to allocate much more for the system partition, at least 50-60 GB, since in addition to the system itself, users also install packages of different applications. But over time, this volume may not be enough.
In such cases, you can remove some programs and then reinstall them, but on drive D, but this is far from the best option. It is much easier to increase the size of the system partition by borrowing some of the disk space from other partitions. There are several ways to do this, but the fastest and most reliable is software. To expand the system partition, it is not at all necessary to use expensive applications like free analogues, for example, EaseUS Partition Master Free.
This program is powerful, convenient and simple. In addition to the Free edition, there is also a commercial version, but in in this case we don't need it. The application can work with disks up to 4 TB, supports converting primary partitions into logical ones and vice versa, creating copies of partitions to transfer data to another computer without Windows reinstallation, view, split and resize partitions of any type.
Additional features programs include hiding and showing drives, complete removal files, as well as checking the disk surface for bad sectors. There is no Russian language in EaseUS Partition Master Free, but it doesn’t matter. The application's interface is simple, and most operations are performed using intuitive graphical controls. To get to the Disk Wizard window, after installing and launching the program, click the “Launch Application” button located in the center.
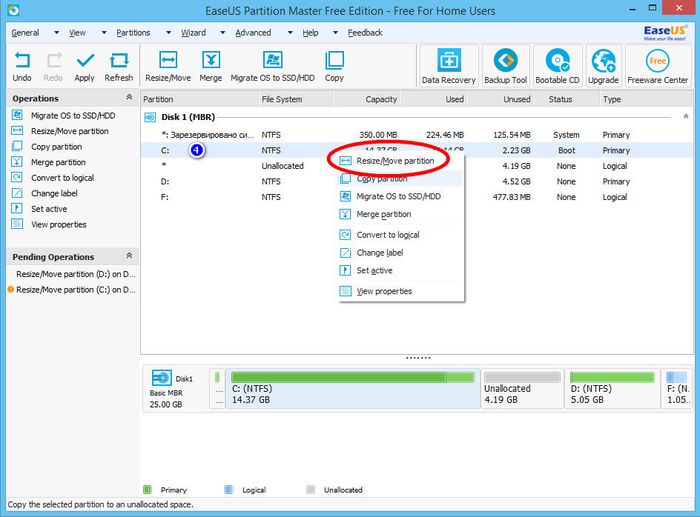
On the right larger panel window you will see a list of your partitions. Perhaps there will also be a reserved one on this list Windows area no letter (will be marked with an asterisk) and some unallocated space. So, to enlarge partition C, we need to cut off part of partition D, and then “solder” it to partition C. Right-click on partition D and select the very first option “Resize/Move Partition” from the menu that appears.


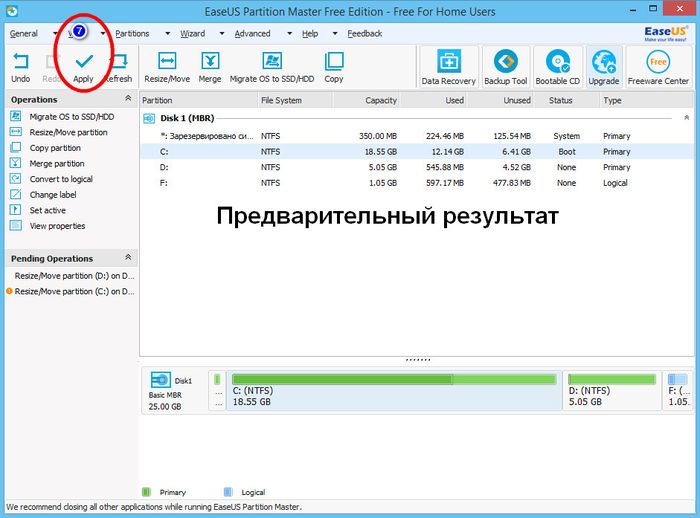
In the window that opens, drag the slider so that the resulting unallocated space borders the system partition. Click OK. The same can be done without calling additional window wizard by dragging the slider on the panel graphical representation disk located at the bottom of the main window. We do the same procedure for partition C, only this time we drag the slider to the area of unallocated space, thereby increasing the volume of drive C. Click OK again, and then apply the new settings by clicking the “Apply” button.
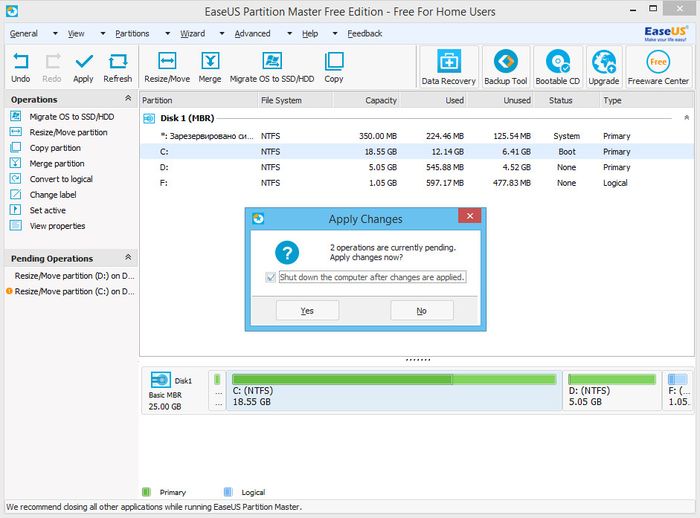
As soon as you do this, a window will pop up notifying you that the operation has begun. To prevent the program from asking unnecessary questions, check the “Shut down the computer after changes are applied” checkbox. Click YES and confirm starting the procedure. The computer will restart and you will see a black window with the progress of the operations, after which the desktop will load. Wait for the procedure to complete and do not turn off the computer, even if it seems like it is taking too long. Otherwise, you risk damaging the file system, which will prevent Windows from booting.
You can download the program for free on the developer’s website www.partition-tool.com/personal.htm. Be careful when installing free version applications can be installed into the system by third-party software.
Have a great day!
For normal installation and operation of Windows 7/8.1/10, 20-25 GB of hard disk space is enough, but in practice you have to allocate much more for the system partition, at least 50-60 GB, since in addition to the system itself, users install other packages different applications. But over time, this volume may not be enough.
In such cases, you can remove some programs and then reinstall them, but on drive D, but this is far from the best option. It is much easier to increase the size of the system partition by borrowing some of the disk space from other partitions. There are several ways to do this, but the fastest and most reliable is software. To expand the system partition, it is not at all necessary to use expensive applications like Acronis Disk Director; their free analogues, for example, EaseUS Partition Master Free, will also work.
This program is powerful, convenient and simple. In addition to the Free edition, there is also a commercial version, but in this case we don’t need it. The application can work with disks up to 4 TB, supports converting primary partitions to logical ones and vice versa, creating copies of partitions to transfer data to another computer without reinstalling Windows, viewing, dividing and resizing partitions of any type.
Additional features of the program include hiding and showing disks, completely deleting files, and checking the disk surface for bad sectors. There is no Russian language in EaseUS Partition Master Free, but it doesn’t matter. The application's interface is simple, and most operations are performed using intuitive graphical controls. To get to the Disk Wizard window, after installing and launching the program, click the “Launch Application” button located in the center.
In the larger right pane of the window you will see a list of your partitions. It is possible that this list will also include a Windows reserved area without a letter (it will be marked with an asterisk) and some unallocated space. So, to enlarge partition C, we need to cut off part of partition D, and then “solder” it to partition C. Right-click on partition D and select the very first option “Resize/Move Partition” from the menu that appears.


In the window that opens, drag the slider so that the resulting unallocated space borders the system partition. Click OK. The same can be done without calling an additional wizard window by dragging the slider on the graphical representation of the disk panel located at the bottom of the main window. We do the same procedure for partition C, only this time we drag the slider to the area of unallocated space, thereby increasing the volume of drive C. Click OK again, and then apply the new settings by clicking the “Apply” button.
As soon as you do this, a window will pop up notifying you that the operation has begun. To prevent the program from asking unnecessary questions, check the “Shut down the computer after changes are applied” checkbox. Click YES and confirm starting the procedure. The computer will restart and you will see a black window with the progress of the operations, after which the desktop will load. Wait for the procedure to complete and do not turn off the computer, even if it seems like it is taking too long. Otherwise, you risk damaging the file system, which will prevent Windows from booting.
The program is available for free on the developer’s website www.partition-tool.com/personal.htm. When installing, be careful; the free version of the application may install third-party software into the system.
Hi all. Good news for supporters of software from EaseUS - their Partition Master disk manager has been updated to version 12.9. The developers have made a number of fixes and improvements, making the program more stable, and also expanded its functionality with support for operations with dynamic disks. Below we will talk about how to use this program. I already wrote earlier, but now I propose to see how its individual functions actually work. But first, let’s talk about the specifics of EaseUS Partition Master.
EaseUS Partition Master disk manager: how to use
So, EaseUS Partition Master is a functional disk space manager for Windows.
This is an alternative to well-known products like Acronis Disk Director or AOMEI Partition Assistant, with a classic organization of software of this type, with a usable interface, with a modern presentation format software product and a convenient distribution scheme: basic functionality is free, advanced functionality is available at an affordable price.
Official page of EaseUS Partition Master:

It is also a trial, which, if purchased license key turns into one of the more functional editions of the program.

EaseUS Partition Master Editions
EaseUS Partition Master has several editions:
Free – basic;
Professional - with additional features;
Server – the same as Professional, but with support Windows Server and RAID 5 recovery function;
Unlimited – the same as Server, but with favorable conditions for purchasing a multi-user license;
Technician - the same as Unlimited, but with technical support and free lifetime updates.
For home use and a small business providing computer help The capabilities of the Free and Professional editions are quite enough.
Features of the EaseUS Partition Master Free edition
The main functionality supported by all editions of the program and supplied in the free Free edition is as follows:
Supports many types of storage devices, in particular, SSD, HDD, RAID, USB drives;
Formation of the structure of partitions on the disk (a full range of operations such as: creation, moving, merging, resizing, deleting, setting letters and labels);
Overwriting data until it is completely impossible to recover it;
Formatting partitions as files FAT systems, NTFS, ReFS, EXT2/3;
Partition recovery;
Media surface testing;
Disk and partition cloning;
Aligning partitions and simultaneously optimizing them for SSDs during other operations;
Converting disks from primary to dynamic (without the ability to operate on them and convert back to primary);
Operating with partition types on MBR disks – converting primary partitions into logical ones and vice versa, designating primary partitions as active;
View the full contents of sections, including protected technical Windows sections;
Cleaning Windows from temporary and disk-cluttering data;
Analysis of used disk space;
HDD defragmentation;
Ability to configure the program with password access;
Automatic shutdown of the computer upon completion of long-term operations.
Features of the EaseUS Partition Master Professional edition
In addition to the basic functions mentioned above, the Professional edition of the program additionally provides:
Converting disks from dynamic to basic and vice versa;
Operations with dynamic disks - creating partitions, resizing them, moving, formatting, deleting, cloning;
Transferring existing Windows to another disk;
Converting disk partition style from MBR to GPT and vice versa with preservation of partitions and data;
Creating a Live disk for working with computers without Windows (or when it does not start).
Let's look at how individual operations directly occur using EaseUS Partition Master.
How to create partitions on an empty disk
For example, one of the basic operations for managing disk space is partitioning a new hard drive. To create partitions, click on the unallocated space (Unallocated) on the tabular or visual map of the disk, and in the operations panel on the left of the program window (“Operations”) select “Create partition”.

Give the partition a name and activate the “Optimize for SSD” checkbox (optimization for SSD, i.e. partition alignment). We set the size of the section by dragging the slider on the visual map (or enter it in the table view below). If desired, we can choose a file system other than NTFS, set a different letter for the partition, or select a different cluster size. Finally, click “Ok”.

By the same principle we distribute disk space Next: again click on the unallocated area and create partitions.

When all partitions have been created, click the “Aply” button to apply the planned operations.

How to reduce or increase partition size
How to reorganize disk space? In order, for example, to squeeze between existing sections new section, it is necessary to reduce one of these existing ones. Preferably the one to the left on the disk map, in which case the extra process of moving data will not be required. Click on the partition to be reduced and select “Resize/Move partition” on the operations panel.

On the visual map, pull the space slider to the left until the required released volume is displayed in the column below “Unallocated Space After:”. Next, check the checkbox for optimizing the partition for SSD. And click “Ok”.

To increase the size of one of the sections at the expense of another, click on this very different section. On the operations panel, click “Resize/Move partition”.

On the visual map, pull the slider to the right until the required released volume is displayed in the column below “Unallocated Space Before:”. Next, we’ll use optimization for SSDs. And click “Ok”.

Returning to the main program window, click on the section that you want to enlarge. Click “Resize/Move partition” again.

And pull the slider on the visual map to the right all the way. We optimize for SSD. Click “Ok”.

Apply the operation using the “Apply” button.
How to convert a hard drive from dynamic to basic
Conversion hard drives from a basic type to a dynamic one, perhaps using Windows itself. But the operating system does not provide for the reverse direction. This functional gap is filled third party managers disks, including EaseUS Partition Master. Click on the dynamic disk and select “Convert to basic disk” in the operations panel. And we wait while the program checks the file system.

We apply the operation.

A reboot will be required to apply the operation.
How to convert disks from GPT to MBR and vice versa
A disk partition style converter from MBR to GPT and, conversely, from GPT to MBR is a Must Have functionality of any disk manager. The modern market demands more from this type of software - the ability to convert not only disks with user data, but also those with existing Windows. EaseUS Partition Master can convert disk partition styles without the need to reinstall operating system. In our first case, we have an EFI system with a typical structure - an NTFS “Restore” partition, an EFI partition with FAT32 and a 16 MB MSR partition. To convert hard drive from GPT to MBR, in the program window, click on the disk being operated on, and select “Convert to MBR” on the operations panel.
Tweet
Hard drive partition editors are humble workers who save you in the most unexpected moments. You can’t do without them if you are planning to move your system from an outdated HDD to a fast SSD, have purchased a new hard drive, or want to repartition existing partitions.
The difference between a physical disk and an icon in the Computer folder is the same as between a closet and the drawers in it. There is only one disk, but there can be as many partitions inside as you like.
To work with hard drive partitions in Windows, you need programs like the hero of my review EaseUS Partition Master Pro. With its help, you can format your hard drive and manage its partitions.
The program is paid, but is valid until 08/23/2018 good discount, which appeared for a reason. At the end of the review, the reason why I recommend purchasing this software is described.
For those who don't know
On any Windows 10 computer, you will find a main partition where system and user files are stored, and hidden sections with recovery system and bootloader. Advanced users go further and independently divide the disk into several partitions in order to somehow organize the storage of documents or separate personal files from system files.
In each partition, the file system is responsible for storing data. For example, system Windows disk will definitely be in the NTFS file system, camera memory cards use FAT32 or exFAT, and USB flash drives can be in FAT32, exFAT, NTFS or (if you use Linux) ext3, ext4.
Information about what partitions are on a disk can be stored in different ways. The most popular standard is MBR- supported by a huge number of devices and operating systems, but, alas, maximum size The partition is limited to two terabytes. Therefore, on modern PCs they are increasingly using GPT, which is devoid of this disadvantage.
Confusion arises due to two simultaneous standards. So an opportunity happened to me, in which the EaseUS Partition Master software helped a lot, when I connected a new TOSHIBA HDWD130 hard drive with three terabytes. Relying on the capabilities of the Windows 10 operating system, I formatted the disk and received a metaphorical rake in the forehead, because the partition turned out to be much smaller than stated - 2 TB. It turned out that for some reason the manufacturer laid out the partitions according to the MBR standard.
It was then that I remembered Partition Master, where you can clearly see the list of partitions and painlessly partition the disk in GPT, using the maximum volume.
But manipulations in standard “Disk Management” did not help; Windows stubbornly saw no more than two terabytes. This happens with this system component; I have not identified a pattern.
EaseUS Partition Master Pro
You can download and buy a hard drive partition editor on the official website: EaseUS Partition Master Pro(button "Free Trial" For trial version or "Buy Now" for purchase).
System Requirements:
- Operating system: Windows 10/8.1/8/7/Vista/XP.
- Hard disk space: at least 100 MB.
- Processor: with a frequency of at least 500 MHz.
- RAM: 512 MB or more.
Supports:
- Devices: internal and external hard drives, solid state drives(SSD), USB flash drives, memory cards, RAID arrays(several physical hard drives work as one), etc.
- File systems: NTFS, FAT12, FAT16, FAT32, ReFS, EXT2, EXT3.
There are several versions of the software: Pro, Server And Unlimited. There is an interesting table on the authors’ website, which shows that the only difference is in price, supported operating systems and RAID-5 support. That is, the cheapest “Pro” version is enough for a home user.
| Pro | Server | Unlimited | |
| Support for Windows Server 2016/2012/2008/2003 and Home Server | - | + | + |
| How many PCs can be used on? | 1 PC | 1 server | No restrictions |
| Types of hard drives | All | All | All |
| Editing hard disk partitions (resizing, moving, copying, merging, creating, deleting, clearing, checking, hiding, viewing) | + | + | + |
| Working with dynamic disks (resizing, moving, copying, checking, creating, formatting, deleting, viewing files on dynamic volumes) | + | + | + |
| Optimizing SSD speed by fitting 4K clusters | + | + | + |
| Recovering deleted and damaged partitions | + | + | + |
| Cloning a disk (or partition) to another data store | + | + | + |
| Storage Spaces Direct support | + | + | + |
| Cleaning and optimizing disks (removing unnecessary and finding large files) | + | + | + |
| Converting disks and partitions (from the main partition to logical and back, MBR to GPT and back, FAT to NTFS, dynamic disk to normal and vice versa) | + | + | + |
| Transferring the operating system from disk to disk (including from/to SSD without reinstallation) | + | + | + |
| Command line support | + | + | + |
| Recovering RAID-5 partitions | - | + | + |
| Price at the time of writing the review | 39,95 $ | 159 $ | 399 $ |
Without purchasing, the program works in trial mode, which is enough to understand whether you need it on your farm. There is a free version of Partition Master, it cannot convert MBR to GPT and many other things, so it is not very useful.
How does it work
EaseUS Partition Master Pro is software that is not overloaded with whistles. The interface is visual and understandable. There are no settings; all necessary options are specified during the execution of actions.
In the area (1) a list of physical disks and partitions inside is visible. In the area (2) - visual representation of the location of sections. In which area to click the mouse is up to you. No difference.
When one of the disks or partitions is selected, in the “Operations” section (3) a list of available actions appears.
For section:
- Resize/Move partition- change the partition size. Often used to attach a “piece” of one section to another. Just reduce one, expand the other.
- Clone partition- clone a disk partition. To do this, there must be enough unallocated space on the receiving disk.
- Merge partition- merge partitions without data loss.
- Convert to logical/Convert to primary- converting a section to a logical type or primary. MBR only. Due to the limitations of this standard, only 4 primary sections can exist. Using logical partitions allows you to circumvent this limitation. Do not use on flash drives and memory cards, where logical partitions are not always visible.
- Change label- change the disk label (which is visible in the “Computer” folder).
- Change drive letter- change or remove the drive letter altogether. Useful thing when, due to some failures, hidden partitions of the Windows disk become visible.
- Set active- for MBR, specifies the boot partition to launch the operating system from (no longer relevant now).
- Hide partition- as far as I understand, it not only deletes the partition letter, but also changes its properties so that the letter is not assigned again. Use with caution.
- Delete partition- delete a partition, leaving behind unallocated space.
- Format partition- format the partition into one of the supported file systems. The data will naturally be deleted.
- Wipe partition- erase data from the partition so that no recovery programs will return it.
- Properties- service properties of the partition and the disk on which it is located.
For disk:
- Clone disk- clone the contents of the entire disk.
- Convert MBR to GPT/Convert GPT to MBR- conversion no data loss from one type of partition layout to another.
- Delete all partitions- delete all partitions en masse.
- Wipe data- wipe the entire disk so that the data cannot be recovered.
- Rebuild MBR- recreate MBR markup. Fixes some specific problems with file table placement. Better not touch it.
- Surface test- checking the disk for bad sectors. It is useful to scan the disc immediately after purchase to make sure there are no defects, and after a year and a half of work.
- Properties- some service information about the disk.
For empty disk space (Unallocated):
- Wipe data- erasing data that remains after deleting the partition.
- Properties- some service information about the unallocated space and the disk itself.
Operations that change partitions are not applied immediately. They appear in the list of pending actions (4). You need to press a button "Apply" (5) to begin the process of changing partitions.
On the toolbar (6) There are several “chips” of Partition Master:
- Migrate OS to SSD/HDD- procedure for transferring the system to a new disk. If the system is being transferred from a regular hard drive to a solid-state drive or vice versa, change the program Windows settings to optimal for of this type drives.
- 4K Alignment- alignment of virtual clusters (sectors for data storage) and physical ones. This will speed up read and write operations. In modern operating systems and the program itself, when created, the position of the partitions is already adjusted, but there are many hard drives left in the world created in XP...
- Cleanup and Optimization- launch a separate utility that can remove junk data, find and erase large files, and run disk defragmentation.
- Wipe data - reliable removal data from the media.
- WinPE bootable disk- Creation bootable flash drive or CD/DVD, from which you can launch a special version of EaseUS Partition Master, which works without starting the main operating system. I recommend using it when you need to manipulate the system partition - this way there is less chance of losing files.
On the menu (7) All the operations described above are duplicated; you can also call up help for the program.
Partition Master Pro in action
There are several nuances that novice users should know so as not to be perplexed later: “Why is the disk not visible in the “Computer” folder?” They do not concern the program, everything is fine with it, but the disks: For different types media must use different file systems. I’ll show you a clear example with a portable HDD connected via standard USB.
Creating a section
When creating partitions on a new hard drive, be sure to look at its type - MBR or GPT:
If you have Windows 10, it won't care, but external drives with GPT markup may not open on computers with Vista and certainly will not open on ancient XP. So if you bought a new drive with a capacity less than or equal to 2 TB and use it as a flash drive, convert the disk to MBR using the “Convert GPT to MBR” command.
This feature helped me when I purchased a new hard drive and decided to properly partition the partitions.
After that, right-click on the unallocated space and select “Create paritition.”
A window will appear where you need to select the disk size and its file system.
If the disk needs to have multiple partitions, move the sliders to the right and/or left to make room for the rest.
The file system should be NTFS if it is a hard drive or SSD, and FAT32 for memory cards and flash drives.
Cluster size (cluster size), Drive letter (drive letter) and so on can not be touched, everything is standard and optimal there. Just check the “Optimize for SSD” box if your portable hard drive is not a hard drive at all, but a solid-state one.
After " OK" And " Apply" to apply the operations. It will turn out something like this:
In unallocated space, you can create not one, but several partitions of arbitrary size.
Partitioning the hard drive into partitions
Let's say you need to create another partition on a disk. To do this, you need to shrink the existing one. Right-click like this:
And indicate how much space to free up. For example, 100 gigabytes. This is done by moving the round sliders or directly indicating it in the digital input fields below.
A nuance that concerns almost all programs for working with hard drives: due to the peculiarities of partition alignment, if you free up space on the “right”, the moving process will be faster, because. Typically, data on disks is stored at the beginning (“left”). But at the same time, an unmarked space of several sizes is formed on the left. kilobyte(this is very little, if anything). If for some reason this is critical for you, do as in the screenshot above - free up space on the left.
Then click on the unallocated space and continue as when creating a partition normally.
The size of the resulting partition will be smaller than the unallocated space, since part of it is used for the needs of the file system.
Disk formatting
In the process of formatting all data is deleted and the file system is recreated - the place where information about the location of all data on the media is stored.
Formatting is an unpleasant procedure, because you have to look for where to copy files from the media, but often this is the only way to make the flash drive work normally.
It is with portable media that there are the most problems, because users do not want to wait for files to be copied and they tear out flash drive from a USB port at the most crucial moment. When I first saw this I was shocked. Afterwards, the shock increased: it turned out that there is an opinion that files are copied to them instantly, and the copying progress indicator is only beautiful animation. And where does this nonsense come from?
In fact, when recording is interrupted (this also happens with dead photo and video cameras), the file tables are damaged, because memory cards and flash drives often use the very unreliable FAT32 file system. Checking for errors (in Partition Master there is a “Check” item for this) is not magical; you have to format the partition.
An interesting observation: in the EaseUS partition manager, in the formatting options you can only select the file system type, cluster size and label. In the standard utility Windows formatting The option of full (long) formatting is also available, when the data on the partition is erased so that it difficult recover (not impossible). Partition Master has a separate “Wipe partition” function for this.
Recovering deleted and damaged partitions
Partition Master Pro has a function " Partition recovery", which returns erased or damaged disk markings from oblivion.
A choice of scanning type will open - quick or full. The full one is terribly long, choose only if you fail with the first one.
Select one of the found file system options (there may be several of them), click on Pause (if the scanning has not yet come to an end, and you are in too much of a hurry and the quality of the result is not important) and Proceed.
Pay attention to the blue stripe in the screenshot below - the recovered partition was full of files.
After all the creation, resizing and formatting, the original data is back! It’s not a fact that all the files on it will be intact, but at least it’s something. For a more detailed restoration, you can try the product of the same developers
Bottom line
EaseUS Partition Master Pro is a representative of adequate software for working with partitions on the most common types of storage media. Some may not like the “paid” option, but this is the price for the opportunity to receive advice from technical support at any time. The program is simple, easy to use and not overloaded with irrelevant functionality.
Remember: do it often backups, force majeure situations can never be excluded. Data is perhaps the most valuable thing in a computer for its owner. Family photo and video archives, documents and work projects - all this must remain safe and sound at all costs.
Make the world a better place
EaseUS, legally known as CHENGDU Yiwo® Tech Development Co., Ltd, is celebrating its 14th birthday at the time of writing this review.
Software from EaseUS for data recovery, editing and backup was awarded good reviews not only from my site, but also from such well-known giants as CNet, PCWorld, Softonic, Lifehacker.com - you have heard about some of them if you have been searching useful programs on the English-language Internet.
1. Raffle iPhone 8 or 500 $ , as well as smaller amounts. To participate, you need to make a video review of one of their products that is at least three minutes long and post it on YouTube. Details at the link above.
2. Promotion "Help make the world a better place." Follow the link above and “light” the candle on the cake at the bottom of the page. The more candles are lit, the more EaseUS will donate to educational program for children in need through the international charity World Vision.
There is another charity attraction: you can buy the following programs with a 30 percent discount:


